Email Details
Access Email Details
- Step 1
You can access the details for any email by going to one of the following locations:
Go to an individual’s record, click on the Communications tab and select either Received, Sent, Transactional, Scheduled or Failed.
Users with the ManageEmails or Admin role can also go to Admin > Communication > Email Log to access the email log.
On the Email Log you will see a list of emails with the following information for each one:
Date and time it was sent
Sender’s name
Email address from which it was sent
Subject of the email
Number of emails sent
Number of emails opened
- Step 2
Once you are viewing the list of emails, click the Subject of the email in order to view the details.
Note
A user with the Access role, but without either the ManageEmails or Admin role, will be able to view emails he has sent, received, or has sent on behalf of another user. Only users with either ManageEmails or Admin role can view all emails. Exception: Only an Admin user with the Finance role will be able to see emails created with a Finance template.
Contents of the Details Page
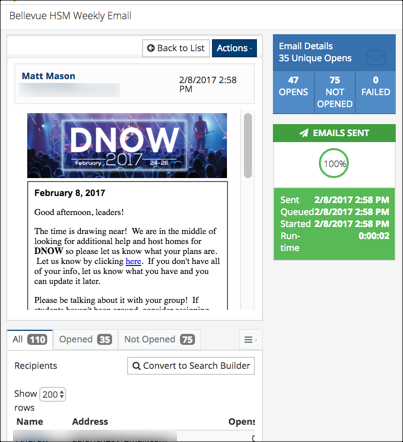
Notice in the image above the following elements of the email:
- Actions
This has the following options:
Make Public - This will open the email in another page so you can copy the URL and post it on Facebook. It basically makes the email into a webpage.
View Link Tracking - If the email has the replacement code {tracklinks} you will see every link in the email (except special TouchPoint links such as Register Links) and how many people clicked on that link. See paragraph below for more information about tracking emails.
View HTML Source - You can select all and copy the source code and then paste it into a new email. See paragraph below for more information about copying and pasting HTML code.
Create New Draft - Select this option to open a new draft with the same email body. See steps below for creating a draft using this email.
Resend - If the email was a Transactional Email, such as a confirmation for an online registration, an Admin user will be able to resend the email.
Tip
The Resend option is helpful if you have emails returned either because the person’s email address is incorrect or they are on the blocked list. After you correct the problem you can resend the confirmation email from the individual’s Transactional email tab after you click the Subject to view the details.
- Header of the Email
This displays the sender, his email address, and the date and time the email was sent.
- Body of the Email
If email replacement codes were used, you will see the code as it was entered.
- Tabs
Each tab will present a list of recipients with the count in parentheses on the tab.
All - Every recipient
Opened - Recipients who have opened the email and how many times they have opened it
Not Opened - Recipients who have not yet opened the email
Failed - Recipients who did not receive the email due to a bounce, spam block or an incorrect email address
Note
The indicators for opened or not opened are dependent on the sender inserting both an image and the email replacement code {track}. See paragraph below for more information about tracking emails.
See also
- Convert to Search Builder
For each tab you have the option to convert those in the list to a Search Builder search. This is a great tool when you want to send a follow-up email to your original recipients.
- Summary
To the right of the page will be a graph and a summary of the stats about the email.
Creating a New Email from Details of Existing Email
We provide 2 ways to use the existing email to create another email just like that one. You can use that new email to send to a different group of recipients, or you can use it as a starting point and revise the content keeping the same template.
- Method 1 - New Draft
Select the Action Create New Draft while you are viewing the details of the email you wish to use as the starting point for your new draft.
This will open another page with the same email body. The email will appear in the HTML builder for editing.
Note
When using Creating New Draft from the Email Details screen, an email originally created by the Mobile Responsive builder will open with and can be edited ONLY by the HTML builder.
Enter a Subject and then click the Save Current Draft button under the body of the email.
This will save the draft with the name New Draft followed by the date and time. Example: new draft 2/8/2025 11:24 PM
You can access it as you would any saved draft by going to your record and clicking Create / Edit Draft if you want to edit it. Or you can go to your recipient list and select it from the My Drafts tab.
Note
The draft will remain saved with the name new draft, so this option is designed for drafts that you plan to use and send that soon.
- Method 2 - Copy HTML Code
This method can be used if you do not want to create a Draft as in Method 1, but instead want to create a new email to send to another group of recipients or you want to revise it to send to the same recipients.
The main difference is that Method 1 creates an actual Draft which you will access and edit like any other draft, and copying and pasting the HTML code allows you to paste it into the body of an email when you already have your target audience. You can then just send the email without ever creating a Draft.
- Step 1
Click View HTML Source and highlight everything on that page (CTRL A or use your mouse).
Then copy everything (CTRL C or right-click and Copy).
- Step 2
Go to your new list of email recipients and select Email from the blue Toolbar and then the appropriate option - Individuals, Parents Of, etc.
Select an empty email template.
- Step 3
Click in the body of the email to edit it. Then click the Source button in the top left corner of the toolbar. Now paste all of the HTML code using CTRL V or right-clicking and pasting.
- Step 4
Click the Source button again to see your beautiful email and you are ready to send it!
Tracking Emails
There are two ways to track emails using one or both of our tracking email replacement codes.
{track} which tracks opens (those that open your email)
{tracklinks} which tracks links embedded in your email and how many times each is clicked
See also
Important
Do NOT use {tracklinks} in Mission Trip Supporter emails.
Latest Update |
06/09/2025 |
Updated language, clarified creating new draft, clarified viewing Finance emails