Schedule Email
When emailing via TouchPoint, you can create an email and schedule it to be sent at a later date and time. Emails are sent every 15 minutes, beginning at the top of each hour. So, if you enter a time such as 1:35, that email will be sent at 1:45.
Important
Scheduled emails are handled by the batch service. Each morning, we have a number of important daily processes that start at 4:30 AM Central. Due to the high number of processes running during this time, any emails scheduled between 4:30 AM and 8:00 AM Central could be delayed.
Who Can Schedule an Email
Users with Edit role OR
Users without Edit role, but with the special ScheduleEmails role
How to Schedule an Email
- Step 1
Compose your email as usual.
Note
If you are creating a Draft, you will not schedule the email until you are viewing the list of recipients.
- Step 2
Once your email is ready, check the Schedule Email? box under the Subject. This will open the Schedule field.
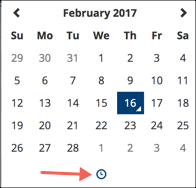
- Step 3
Click the calendar icon to select the date and click the clock icon under the calendar to select the time. Once both are selected just click outside the calendar box to dismiss it.
- Step 4
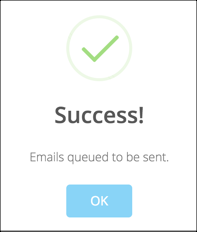
Click Send.
You will see the message that emails have been queued.
Caution
Do not schedule emails too far in advance. Whoever is in your group of recipients at the time you schedule the email will be the actual recipients when the email is sent. So, if someone fits your search criteria at the time the email is sent, but did NOT fit it at the time you scheduled it, they will not receive the email.
Exception: See below for scheduling email to Involvement members.
How to Cancel a Scheduled Email
- Step 1
Go to your people record and select Communications > Scheduled.
- Step 2
Click the Subject to view the Details.
- Step 3
Select Actions > Delete.
This will totally delete the email.
This action can also be done by someone with the Admin or ManageEmails role by going to Admin > Communictions > Email Log. Scheduled emails will appear at the top of the Email Log. Then proceed with Step 2 above.
Schedule Email for Current Involvement Members
If you are emailing from an Involvement, you have the option to schedule an email for those who are members at the time the email is sent, instead of scheduling it to go to those who are members at the time the email is scheduled.
This option ensures that any new members that will be added between the time you schedule the email and the time it will be sent will receive it.
- Step 1
While viewing members of an Involvement, select from the Blue Toolbar Email icon > All Current Members.
Note
This option is available only when you are emailing while viewing an Involvement. Additionally, you will not be able to add additional TouchPoint recipients to the email using the PLUS sign, but will still be able to add additional CC/Reply-To recipients.
These means that the list of recipients will not compile until just before the scheduled email is to be sent.
- Step 2
Compose your email as usual and proceed with Step 2 above to schedule the email.
Note
When you view Scheduled emails that are going to be sent to Current Members, the count will be zero until the email is sent.
Why Use this Option
Choosing this option lets you compose and schedule emails to an Involvement as far in advance as you need. It will always send to the current members at the time it is sent, not current members at the time you schedule it. This allows new Involvement members to be included, and for dropped members to be excluded.
See also
Latest Update |
12/29/2025 |
Added verbiage to Note for Current Members option