How to Send Texts via TouchPoint
Before you can send texts, you must have completed the steps in the following articles:
See also
See the Tracking Text section below to see how you can know who received your texts.
Send a Text
When texting using the PBT or Twilio integration with TouchPoint, you send texts from your computer directly from your church’s TouchPoint database.
- Step 1
Find the people you want to text.
You can send a text from wherever you see the blue Toolbar. That is, from an individual’s record, an Involvement, a sub-group within an Involvement, a Tag, or from Search Builder results.
From the blue Toolbar select Envelope > SMS > Send Text.
- Step 2
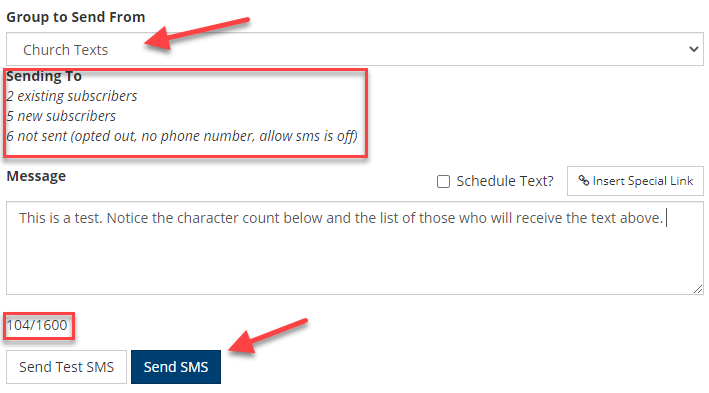
Select the Group from which you are texting.
Note
You cannot send a text message from the PBT Quick Sign-In group.
In the example below, the group is Church Texts. If you have only one number for texting, you will have only one group.
Enter your Message. If you do not have two-way texting setup, you may want to include DO NOT REPLY. Keep the message brief.
Important
If you enter text that is longer than 1600 characters, it will truncate the text. So, be sure to note the character count before sending.
When sending text messages, you will see a breakdown of who is receiving the text:
Existing Subscribers - They are currently opted in for that group.
New Subscribers - They have never received a text message from that group before. They will first be sent a compliance message and then opted in.
Not Sent - As explained in the image below, they are either opted out of the group, don’t have a phone number, or are unsubscribed to all text messages.
If you desire to schedule the text rather than send it immediately, check the box for Schedule Text? and set the date and time when the text should be sent. Note that the process sending out scheduled texts checks for them every five minutes. So texts may not necessarily be sent at the exact minute they are scheduled, but should be sent within five minutes of the schedule.
If you would like to include an image or PDF, click the MMS checkbox to reveal the MMS Upload section. From there, click the Choose File button and navigate to the image or PDF on your computer. Then click the Upload button.
Note
The MMS option is only available with the PBT integration. Twilio does not support sending MMS messages from TouchPoint.
See the MMS section below to find at more about MMS.
Click Send SMS
Tip
When drafting your text messages, you will also notice you now have the ability to send a test SMS to yourself prior to sending to the entire list of recipients. This will allow you to double-check your text before sending it out to your entire list of recipients.
Note
Be sure to notice the Subscriber count at the top of that dialog box. Texts will only be sent to Current and New Subscribers, not those who have opted out or don’t have a cell phone number on their record.
Caution
Do not copy and paste into the message text box. This may pick up formatting that, once the text is sent, can use more characters than are indicated. This may cause your message to be split into multiple messages. The best practice is to type the message directly into the text box.
- Step 3
After sending the text, send a follow-up email (optional) to the same people by clicking the Click Here link.
By following the text with an email, you ensure that anyone who was not included to receive the text (hasn’t opted in or has no cell phone) can receive your message via email. This will be sent to the entire group, whether they have or have not received the text.
Your original text message will display as the body of the email. You can send it as it is, or edit it at that point. Optional: provide additional instruction to opt-in to SMS for those that didn’t also get the text version.
Multimeda Messages (MMS)
With the ability to send MMS comes the need for multimedia compression. Currently, the file size limit for MMS is 960 KB. The following settings provide a starting point to get your files to the proper size. As there are many different ways to compress multimedia, your results may vary.
Images
You can use the following image sizes as a starting point. Depending on your image quality settings for JPG or transparency settings for PNG, you may be able to get large images. You are also not limited to square images. As these will be viewed on a mobile phone, consider using common vertical aspect ratios like 2x3, 5x7, or 9x16.
Supported file types: JPG, PNG and GIF
JPG - Width: 2,000px; Height: 2,000px
PNG - Width: 950px; Height: 950px
Videos
Just like with images, consider making your videos vertical (9x16). See below for some recommended compression settings to start with.
File type: MP4
Length: 30 seconds
Codec: H.254 or H.265
Video: 854x480 (1.0), 29.97 fps
Audio: AAC, 48 kbps, 48 kHz, Stereo
Bitrate: CBR, Target 0.15 Mbps
We recommend using Apple Compressor for compressing your videos. Apple Compressor has built-in presents like Prepare for HTTP Live Streaming - Cellular High that serves as a great place to start when compressing video for MMS.
Audio
The following settings are recommended starting points as they will yield an audio file that is both good in quality and not too short. It is possible to create longer audio files by bringing the quality down.
Supported file type: MP3
60 seconds
Audio: MP3, 96 kbps, Stereo
Additional Details
File size limit: 960 KB
File name recommendations: Don’t include spaces or anything other than basic letters/numbers and keep the name less than 20 characters.
1 MMS = 3 message credits: Ex. Sending an MMS to 24 subscribers will use 72 message credits.
1 MMS message can also contain up to 459 characters.
File names must not contain the following characters:
+ # & % ^ \ / : * ? ” < > |.
If you encounter any issues or need help with file compression, please reach out to PBT at https://help.poweredbytext.com/s/contactsupport.
Including Special Links in Text Messages
When sending a text, special links can be included. Click the button for Insert Special Link, select the desired Type of link, and enter the information needed for that link. Then click the Copy and Close button and paste the link into the Message body. See the next section for information about how Special Links and other URLs are automatically shortened when the text is sent.
See also
Special Links for Online Registrations for more information about special links.
URL Shortening
Any time a URL has the protocol included (e.g., the http:// or https:// prefix), it will be automatically
shortened when the text is sent. This includes the Special Links mentioned above, as well as any other URL you enter with
the protocol.
Tracking Texts
Note
This page is limited to those with the Admin, SendSMS, or ManageSMS role.
After your text and email have been sent, you can view a report about your message.
Go to Administration > Communication > SMS Messages. This is where you will see a list of the SMS messages that have been sent. If you opted to send the email after the text, you will track those just like any other TouchPoint email.
You can use the Start and End Dates to filter for a date range. The Message you entered when you created your text is what appears to identify your text in the report.
Click the Message link to see a list of those who were in your group of recipients, their cell phone number, whether or not they were sent the text and the reason why, if they did not receive it.
Latest Update |
1/22/2024 |
Added MMS section