Family Mapping
Family Mapping is a feature that allows you to set a latitude and longitude for every person’s address in the database, which can then be used to find out which geographic region they live in (based on a map you define and upload to TouchPoint) as well as visualize where people live with points on a map.
Use Case
Once this feature is configured and addresses are updating nightly, each person’s address (that has been updated) will be automatically assigned a Geo-Region. The regions are configured by your church (instructions below). This will allow you to run reports based on the Geo-Regions to guide ministry decisions.
For example, you can run a Search Builder search using the Geographic Region Condition (specifying a particular region in your area) and the In Main Fellowship Condition (set to False) to find those who live in that region but aren’t involved in a Main Fellowship Involvement. This may help inform your decisions for starting a Small Group within a particular community.
Setup
- Step 1
Create a Google Cloud account if you do not already have one. You can get started at the Google Maps Platform page and view their pricing details here.
Note
Google gives each account a $200 monthly credit for their API usage, making it likely that your costs will be minimal or zero. This credit equates to roughly 40,000 free geocodes per month. This is dependent on other uses of the APIs including but not limited to mapping.
Follow Google’s instructions to create your account and enable the required APIs. You will need the Maps JavaScript API and the Geocoding API enabled.
Create API Keys
After completing the account creation, you will need to create and configure two API keys. Go to your Google Cloud console and navigate to APIs & Services > Library to ensure both the Maps JavaScript API and Geocoding API are enabled.
Next, create API keys at APIs & Services > Credentials. (One key may have already been created for you during account initialization.) Create the following two keys with these names and restrictions:
- touchpoint-gmap
This key is used for the map display. Under Application Restrictions, select HTTP Referrers (web sites) and enter your database URL followed by
/*. For example,https://bellevue.tpsdb.com/*. If you have a custom domain, add it also using the same format (e.g.,https://my.bellevue.org/*). Under API Restrictions, select Restrict Key and select Maps JavaScript API.
- touchpoint-geocode
This key is used for the backend geocoding call to pull latitude and longitude. Under Application Restrictions, leave the setting as None. Under API Restrictions, select Restrict Key and select Geocoding API.
Navigate to Admin > Settings > Features > Small Group Finder Map & Family Map. For the Google Maps API Key setting, enter the value of the key named touchpoint-gmap. (Make sure you copy the key value itself, not the key name.)
For the Google Geocode API Key setting, enter the value of the key named touchpoint-geocode. (As above, make sure you copy the key value itself, not the key name.)
- Step 2
On the same settings page, toggle the Enable Nightly Geocoding setting to True and set the Max Geocoded Addresses Per Day. This setting is helpful if you want to limit your usage (and costs) of the Google Geocode API key.
Note
If no max is set, the default is 1,000 addresses per night. If you are just starting, you may want to set this higher until all your addresses are coded, and then lower it moving forward.
- Step 3
Visit Google My Maps to create your map and define the geographic regions. You can define your regions by creating a custom Google map, adding layers, and using the “draw a line” or “add line or shape” tool. We recommend designating one person from the church to create and update your map.
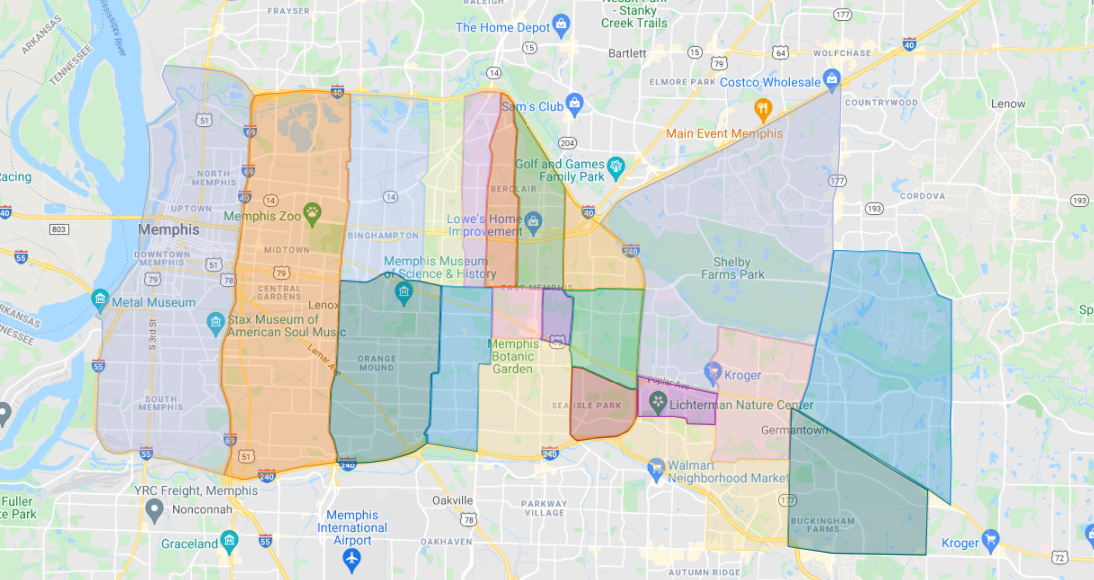
Sample Map With Geo-Regions
- Step 4
Once your map is created, export it as a KML file. In Google My Maps, click the three-dot menu next to the map name, select Export to KML/KMZ, and ensure you select the KML format. Then upload the file by navigating to Admin > Advanced > Geocoding.
Warning
Uploading a new KML file will replace all existing Geo-Regions and reassign region data for all geocoded addresses.
When you upload the file, it will automatically set the available Geo-Regions for your database and assign that region to any record whose address falls within that region.
This page will give you a quick summary of the following:
Addresses with geocodes - Addresses that already have a latitude and longitude (i.e., a geocode) set.
Addresses with regions - Of the geocoded addresses, the ones that fall within a defined region you have set up.
Addresses without geocodes - Addresses that have not yet been coded (these are coded each night as part of the nightly batch process).
People without addresses - People who do not have an address on file and therefore cannot be geocoded.
Feature Use
Here are some examples of ways to use this feature.
Identify Geo-Region on a People Record
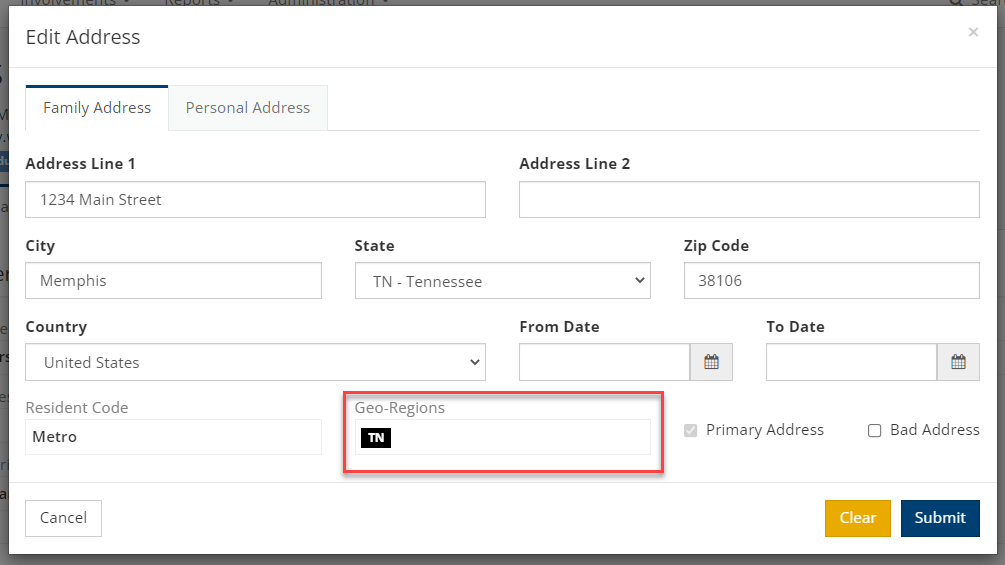
Once a person’s address has been geocoded (occurring nightly as described above in Step 2), the record will have a
Geo-Region assigned to it, visible by clicking on the Pencil Icon next to the address. The Geo-Region is
assigned and updated nightly.
Use Search Builder to Identify People Within a Geo-Region
Navigate to People > Search Builder > New and select the Search Builder Condition Geographic Region. Keep the Comparison set to Equal and select the region from the items available in the Codes list.
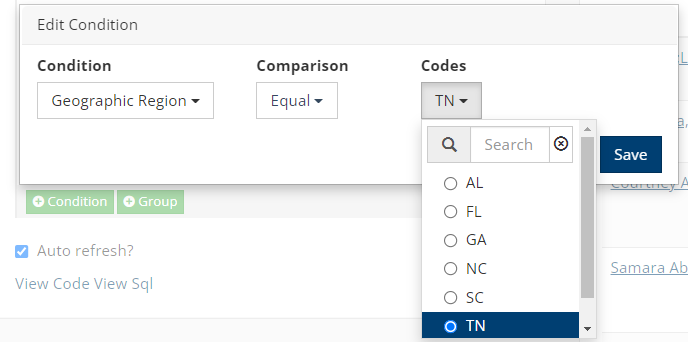
This screenshot is from a Training database. Your Geo-Regions will likely be neighborhoods or towns, not states.
Run Report to See Families on a Map
From Search Builder, click the Cloud Icon on the Blue Toolbar and select Family Map, found under the Directories section.
Note
The Family Map option only appears if the Google Maps API Key setting has been configured (Step 1).
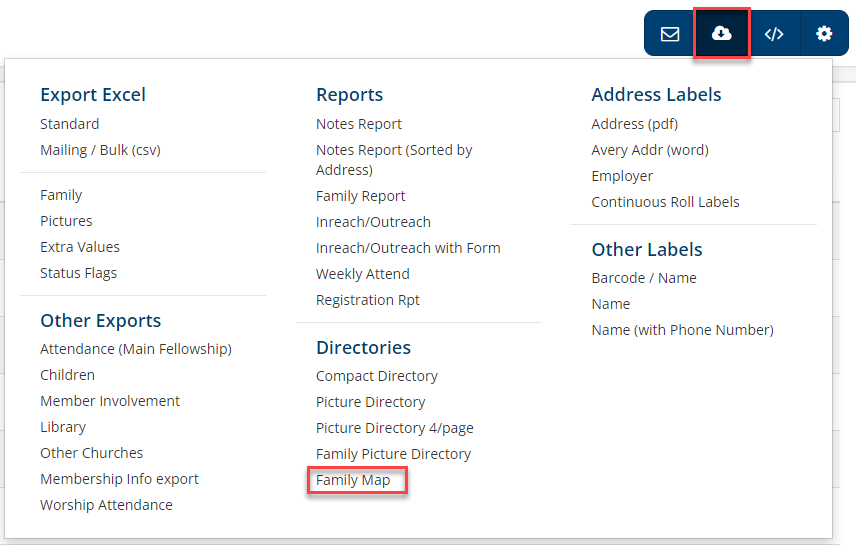
This will generate a map with colored pins (representing the families within the search results) corresponding to the Geographic Regions defined on your map (see Step 3 above). Clicking a pin will reveal the Family Name and ID.
Latest Update |
06/15/2026 |
Updated settings navigation path, refreshed Google Cloud setup instructions, improved accuracy of feature descriptions