Online Registrations on Custom Mobile App
If your church is using the custom mobile app, you can define a tile or banner to point to Online Registrations. This makes it very easy for your members to sign up for your upcoming events. Once they sign in to the app, they will be authenticated to register. All they need is a user account in your TouchPoint database and the app downloaded onto their mobile device.
Staff users (with Access and Edit roles) can manage their registrations, deciding if they want them to display on the app and, if so, in what Order, under which Category, by Location set in the app portal, and whether to display the Individual or the Family link.
If your church does not have a Custom mobile app, get more information and register to take a tour of the app here - TouchPoint Software Full Integrated Mobile App.
Note
For each registration that you want to show on your custom app, check Include in Mobile App in the Advanced Setup section on the Registration > Registration tab for each Involvement.
Registration Categories
Categories are used within the app to group registrations by type or ministry.
- Step 1
Go to Administration > Setup > Lookup Codes > Involvements > Category in Mobile.
- Step 2
Click the green Add Category Mobile button and enter the New ID number (cannot use same number twice) and click Submit.
- Step 3
Click Empty under the Code column to enter a code, which should be 1-3 unique letters.
- Step 4
Click Empty under the Description column and type the name of the Description you want to use. This will be the name for the Category, so name it according to the way you are choosing to categorize your registrations.
- Step 5
Under the Sort Order column, add numbers to establish the sort order for these categories, which will determine the order they will display in the custom app.
- Step 6
Go to Involvements > Manage > Search and click the Mobile View tab to assign the Category to each live registration that will be in the app.
Tip
Create the Categories before your registrations are turned on for your app. You can go ahead and assign the Categories to your online registrations and they will be in place when your mobile app registrations go live.
Registration Locations
Locations that have been created in the TouchPoint App Portal can be used to show specific registrations per location in the app, which you control in your database.
Note
The Location feature will only be used if you use multiple locations in your app.
- Step 1
Go to Administration > Setup > Lookup Codes > Involvements > Location in Mobile.
- Step 2
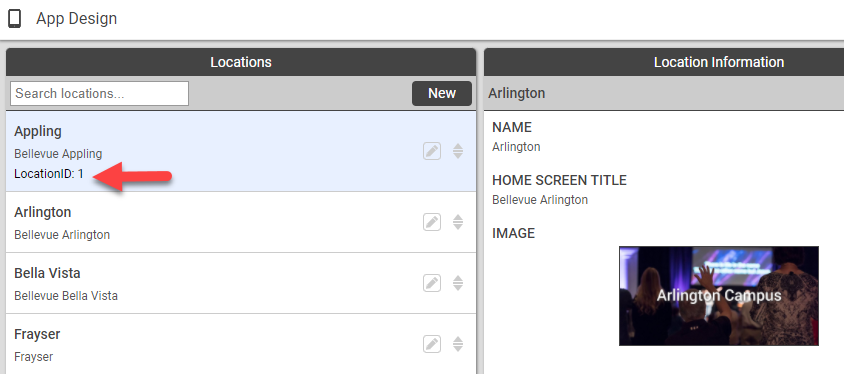
Open a new browser tab and go to the TouchPoint App Portal under Locations > Locations and hover your cursor over the specific location you want to assign to your registrations. A popup will show the LocationID number that you will need to add to your database under the Id column on the page mentioned in Step 1.
- Step 3
Go back to the browser tab with the Location Mobile page and click the green Add Location Mobile button. Enter the new ID number, which was the number that was assigned to the Location within the app portal labeled LocationID. Click Submit.
- Step 4
Click Empty under the Code column to enter the code, which should be 2 unique letters.
- Step 5
Click Empty under the Description column and type the name of the Description you want to use, which should be the name for the Location. This will make it easy to identify when you are choosing to categorize your registrations by that specific location.
- Step 6
Go to Involvements > Manage > Search and click the Mobile View tab to assign the Location to each live registration that will be in the app.
Managing App Registrations
Here are a couple of points to remember about Online Registrations and the Mobile App:
Most of the management of the online registration itself is done on the registration involvement.
Most of the management of registrations in regard to displaying on the app is performed on the Mobile View tab on the Involvements > Manage > Search page.

Sample Mobile View
Important
Registrations will not show in the app if the Involvement is Inactive or has a Registration Type of No Online Registration.
Editable Settings on Mobile View Tab
These settings can be edited right on the Involvements > Manage > Search page under the Mobile View 2.0 tab.
- Include in mobile app
This box is checked in the Advanced Setup section on the Registration > Registration tab of the Involvement, which then adds it to the Mobile View 2.0 tab and displays the registration in the app. Unchecking this box from the Mobile View 2.0 tab will remove this registration from the app and this page.
- Sort Order
This determines the placement of this registration within its specific Category. Click in the field and enter an integer for the sort. A sort is not required for the registration to display on the app.
- Category
These options will be whatever was created in the Registration Categories under Administration > Setup > Lookup Codes > Involvements > Category in Mobile. Click in the field to select a Category. See the section above regarding Categories.
- Location
This is where you can assign the Location to each live registration in the app.
- Start Date and End Date
The Start Date and End Date are the dates the registration will allow someone to register.
- Filled and Closed
If either of these are checked, the registration will no longer display on the app. These indicate that the registration has either met its maximum number of registrants or the End Date has passed.
- Type
This is the link type tied to the registration. By default, the link is Individual to initially display only the person that is logged in. You can select Family to initially display all the family members of the person that is logged in. This is referring to what the person sees when they click the Register Now button at the bottom of the Registration Details page on the app.
- Description
A Description can be added here or on the Involvement page itself under Settings > General > Basic Setup. This description will be displayed on the Registration Details page on the app.
- Photo
A Photo can be added here or on the Involvement page itself under Settings > General > Basic Setup and this description will be displayed on the Registration Details page on the app.
Tip
To find other registrations that are not on your app yet, go to Involvements > Manage > Search and filter for Online Registration, selecting (Any Reg Not on App). Look through those to decide if any of those should be displaying on the app and make any necessary changes to the registration Involvement so they will display.
Latest Update |
4/24/2023 |
Updated for Mobile View 2.0 name change