Small Group Finder - Embedding a Map
The Small Group Finder can be configured with an embedded map. The location of your groups will be indicated on the map by pins. Clicking on a pin brings up information about the group. You can configure what information is displayed when pins are clicked.
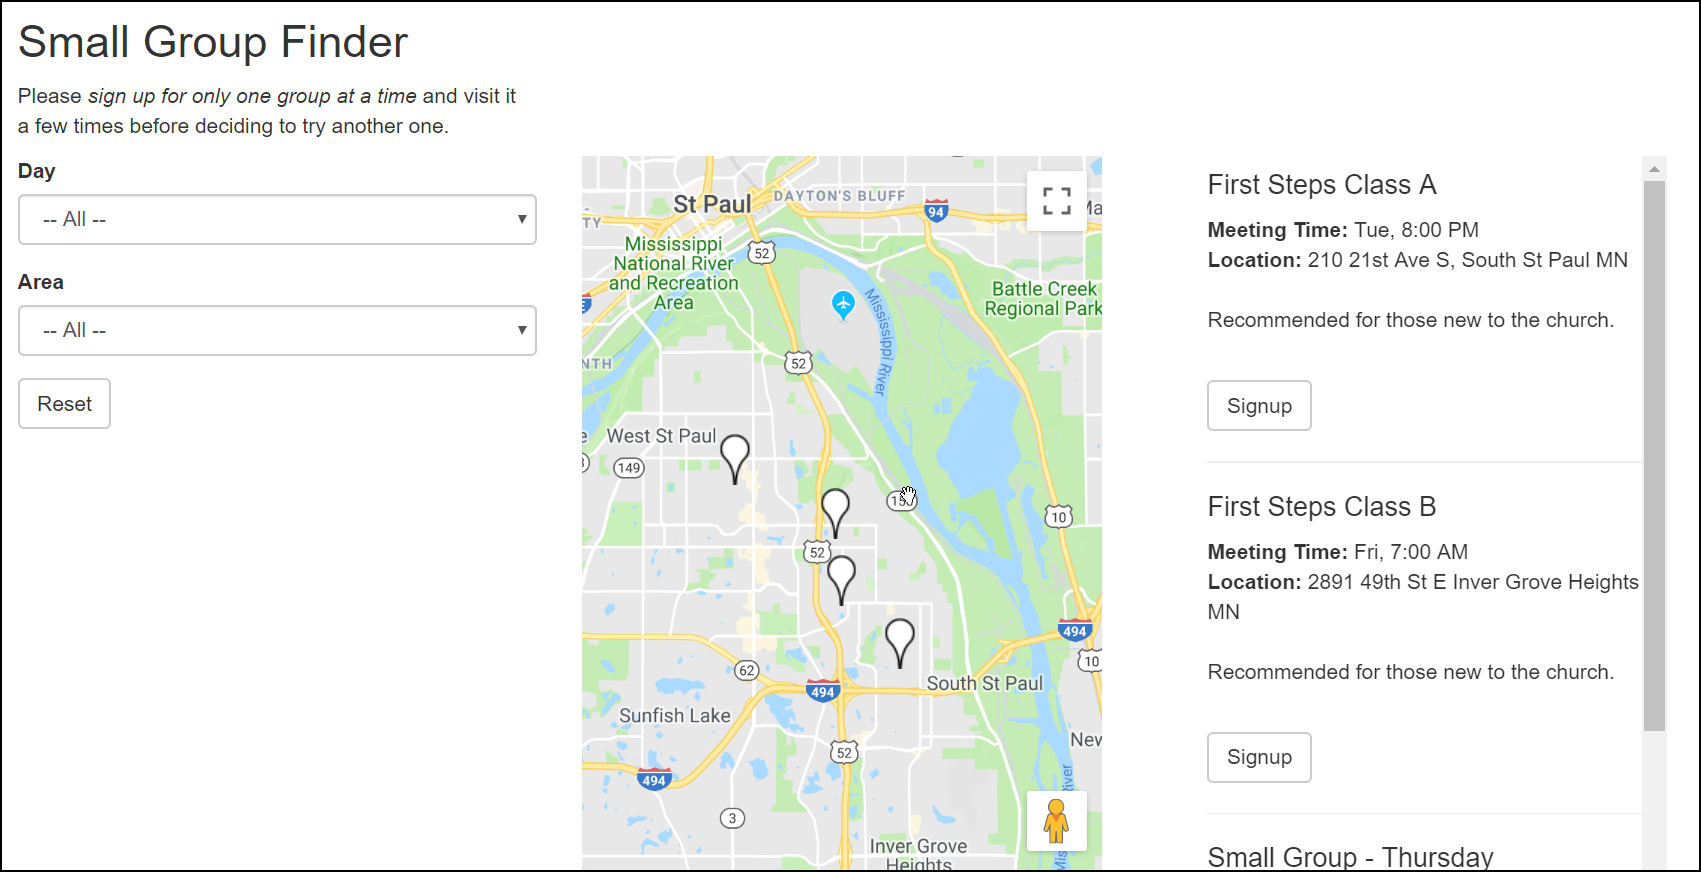
Sample Small Group Finder with Embedded Map
Steps to Open a Google Cloud Account
- Step 1
To enable this feature, you will need a Google Cloud account. View their pricing details at https://cloud.google.com/maps-platform/pricing/sheet. An account includes a recurring $200 per month credit, making it likely that your costs will be minimal or null.
- Step 2
From that same pricing page, initiate the creation of your account by clicking on the Get Started button.
- Step 3
Click on APIs and Services on the left hand side.
- Step 4
Agree and Continue on Step 1 and add a payment method on Step 2.
- Step 5
Close the popup containing the key and then click “Go to Google Maps Platform”.
- Step 6
In the prompt for Protect your API key, choose the option for HTTP referrer (web sites), then enter https://yourchurch.tpsdb.com/, replacing yourchurch with your database name. If you have a Custom Domain for TouchPoint, enter this also.
Steps to Create API Keys
- Step 1
After completing the account creation, you will need to create and configure a couple of API keys for use with your Small Group Finder map. First, double-check to make sure the needed services are enabled. Go to your new account console (https://console.cloud.google.com). If necessary, open the navigation panel on the left by clicking on the hamburger icon (the triple horizontal lines). Then go to APIs & Services > Library, filter for Maps to ensure the following two APIs are enabled:
Maps JavaScript API
Geocoding API
- Step 2
Next, go backwards one screen and click Credentials on the left console. At the top of the page click + Create Credentials > API Key. (You will need to do this twice to create both keys). Close the popup window containing the key. You will see the new API Key in the API Keys list. Click on the 3 vertical dots under the Action column to Edit API. Give the keys the following names and restrictions:
- touchpoint-gmap
This API will be used for the map display.
Under Application Restrictions, select Websites and enter your database URL followed by /*. For example, https://bellevue.tpsdb.com/*. If you have a custom domain, you will need to add it also, using the same format. For example, https://my.bellevue.org/*.
Under API Restrictions, select Restrict Key and select Maps JavaScript API. Then click Save.
- touchpoint-geocode
This will be used for the backend geocoding call to pull latitude and longitude.
Under Application Restrictions, leave the setting as None.
Under API Restrictions, select Restrict Key and select Geocoding API.
Add API Keys to Administration Settings
Navigate to Admin > Advanced > Settings > Features > Small Group Finder & Family Map for the API keys you just created.
For the setting named Google Maps API Key, enter the value for the key named touchpoint-gmap. (Make sure you copy the key itself, not the name.)
For the setting named Google Geocode API Key, enter the value for the key named touchpoint-geocode. (As above, make sure you copy the key itself, not the name.)
Test Geocoding
We recommend that you test geocoding before going further. This will demonstrate that your new Google Cloud account is operational and that your geocode API key is functioning properly. To test, create a Python script named TestGeocoding and copy the following code into it:
apiKey = model.Setting("GoogleGeocodeAPIKey")

uaddress = model.UrlEncode("SOME ADDRESS TO TEST")

val = model.RestGet("https://maps.googleapis.com/maps/api/geocode/xml?address=" + uaddress + "&sensor=false&key=" + apiKey, {})

print(val)
In the script, replace “SOME ADDRESS TO TEST” with an actual known address (e.g., the address of your church). Make sure the address you enter is within quotes as shown in the sample script. Using the main campus of the Bellevue church as an example, you would enter “2000 Appling Road, Cordova TN”. After entering the address, save the script and then run it.
If successful, the output will be information about the address, such as political areas, postal code, latitude and longitude. If this test is not successful, go back and recheck your work. Make sure you have correctly configured the API keys in your Google Cloud account and that you have accurately copied them to the TouchPoint administration settings as directed above.
Configure the Map in Small Group Finder
When you have successfully tested geocoding on your TouchPoint database, you are ready to configure your Small Group Finder to use an embedded map by completing the following steps:
- Step 1
Configure the layout HTML file. If you already have a Small Group Finder, you could use your existing SGF-Layout file. But to accommodate the extra space taken up by the map, you might want to create a more streamlined layout. Below is an example:
<div class="form-group">
<h4>[SGF:Name]</h4>
<strong>Campus:</strong> [SGF:Campus]<br />
<a class="btn btn-default" href="/OnlineReg/[SGF:OrgID]">Signup</a>
<hr /></div>
The above layout will simply display the group name, on the top line, with the campus on the next line and a registration line at the bottom. You can, of course, add or change the information shown, using Involvement fields and extra values.
- Step 2
There are additional settings, specific to the embedded map, that can be added to your main settings file, the .XML file. These additional settings should be inserted into the SGFSettings section of the file. Below are the map-specific settings, preceded by explanations. For the naming of this file and other general information, see Small Group Finder Step 4 - Create the XML File.
- Enable the Embedded Map (line 5)
The crucial setting for including the map is UseEmbeddedMap. Give this setting a value of
trueto embed the map in your finder.- Set the Center of the Map (lines 8-9)
To set the center of the map, enter the latitude and longitude of an address near where you desire the map to be centered. In many cases, this may be the address of your church building. If you created the Python script to test geocoding, you can enter the desired location there to get the latitude and longitude. Otherwise, they can be obtained from any number of web sites, such as https://www.latlong.net.
- Set the Zoom Level for the Map (line 12)
The MapZoom setting determines the zoom level for the map. The higher the number, the more you are zoomed in (larger scale, less area covered); the lower the number, the more you are zoomed out (smaller scale, more area covered). The MapZoom value must be an whole number–it cannot have a decimal component. For most applications, a value of 10 - 12 will be appropriate.
- Optional Pin Marker Text (lines 16-18)
You can include text on the map pins to help easily identify a certain type of group. For example, during a certain period, you may want to make it very easy to identify groups for Financial Peace University. Using a specified extra value on those Involvements, you can configure the MarkerText settings so that an “F” is displayed on all the pins for groups offering FPU. Omit these lines if you will not use this feature.
 1
 2
 3
 4
 5
 6
 7
 8
 9
10
11
12
13
14
15
16
17
18
19
20
21
22
23
24
25
26
27
28
29
<?xml version="1.0" encoding="utf-8"?>
<SGF divisionid="14,18" layout="SGF-Layout" shell="SGF-Shell">
    <SGFSettings>
        <!-- this is the setting that puts the map in your Finder -->
        <SGFSetting name="UseEmbeddedMap" value="true" />

        <!-- the center of the map -->
        <SGFSetting name="Latitude" value="32.7567879" />
        <SGFSetting name="Longitude" value="-97.0728131" />

        <!-- the zoom level for the map -->
        <SGFSetting name="MapZoom" value="12" />

        <!-- these optional settings go together for the marker text... so, for Involvements with
             a "Group Term" == "FPU" then show "F" on the map pin -->
        <SGFSetting name="MarkerTextName" value="Group Term" />
        <SGFSetting name="MarkerTextValue" value="FPU" />
        <SGFSetting name="MarkerText" value="F" />
    </SGFSettings>

    <!-- the list of filters that are used for searching... the name is the Involvement extra value -->
    <SGFFilters>
        <!-- note the "exclude" attribute - this is if there are Involvement extra values that shouldn't be shown -->
        <SGFFilter name="Campus" title="Congregation" locked="false" lockedvalue="" exclude="Undecided,Do Not Attend" />
        <SGFFilter name="Group Type" title="Group Type" locked="false" lockedvalue="" />
        <SGFFilter name="Group Term" title="Beta / Community Group" locked="false" lockedvalue="" />
        <SGFFilter name="Childcare" title="Childcare" locked="false" lockedvalue="" />
    </SGFFilters>
</SGF>
- Step 3
Map pins will indicate the locations of the groups in the finder. When you click on the head of a pin, a small dialog box displays information about the group. The default information shown in the dialog may not be what you desire and, in fact, may reference information that is not provided on your Involvements.
To configure the information you would like to be displayed, create an HTML special content file named SGF-MapToolTip. This file is similar to the Layout file, indicating what group information to show and how it should be organized. Below is an example HTML Snippet:
<strong>[SGF:Name]</strong><br />
<img src="[SGF:LeaderPicSrc]" width="128" /><br />
[SGF:Leader]<br />
[SGF:Day] at [SGF:Time]<br />
<a href="/OnlineReg/[SGF:OrgID]" style="line-height: 1.6;" target="_blank">Signup</a>
Explanation of Map Pin Locations
By default the pin locations on the map will indicate the address of the group leader. Optionally, you can add to the XML file the setting ExtraValueHost and set its value to the name of an Involvement extra value that you place on all the groups and that contains the host address for the group. You can give this extra value the name of your choice (for example, SGF:HostAddress).
Optional Settings
Below are some optional administration settings associated with the Small Group Finder You can find these settings at Admin > Advanced > Settings, on the Features tab, in the Small Group Finder section.
- SecureProfilePictures
For security reasons, viewing profile pictures requires you to log in. Set this value to false to override this security feature and allow leader photos to be displayed in the Small Group Finder, viewable by those not logged in.
- SGF-LoadAllExtraValues
By default, the Small Group Finder utilizes only extra values that begin with the prefix SGF:. Set this to true to load all extra values for use with the finder. You might do this so that you can make use of pre-existing extra values that were created without the SGF: prefix.
- UX-MapPinTextColor
Use this setting to set the text color within the Small Group Finder map pin (hexadecimal RGB).
- UX-MapPinColor-Campus-x
If your church has multiple campuses, you can specify the color map pins should be for a certain campus. In the name of the setting, the final ‘x’ should be replaced by the desired campus ID. The value given the setting should be the NAME of one of the 140 HTML colors based on your desired color. For example, if your Main campus has and ID of 2 and you want the map pins for Main campus groups to be orange, create the setting UX-MapPinColor-Campus-2 with a value of orange.
Note
To find the IDs for your campuses, go to Admin > Advanced > Lookup Codes and select Campus from the Involvement panel.
Latest Update |
6/27/2024 |
Updated menu locations, changed orgs to involvements