
Volunteer - Get Sub
The Volunteer Calendar allows your volunteers to take ownership and get their own substitutes for times when they cannot meet their commitments.
Get a Substitute
Be sure that the Email Reminder for the volunteer Involvement includes a Register Link, as the volunteer will use this when needing a sub.
See also
- Step 1
A volunteer will access the Manage My Commitments page by using the Register Link in the Email Reminder or their original Confirmation Email for that Involvement.
- Step 2
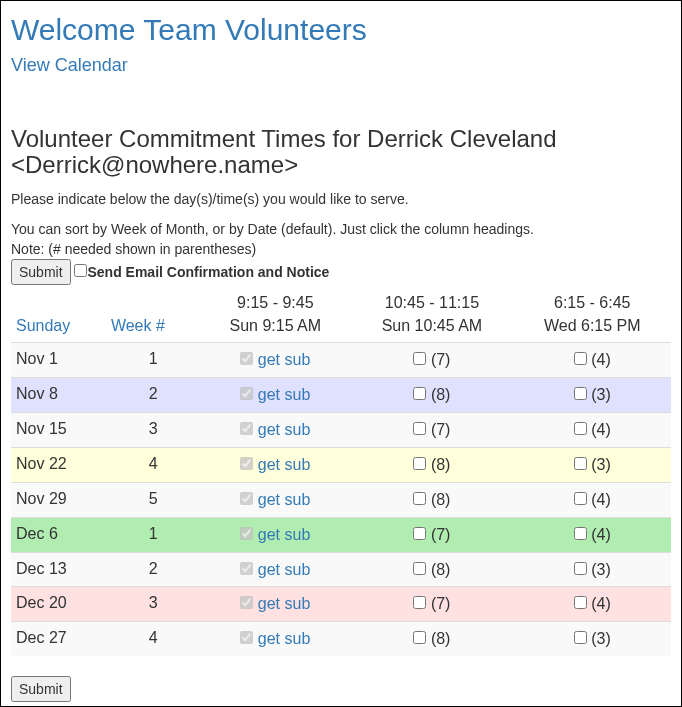
Once on that page, the volunteer will click the Get Sub link for the time slot for which they need a substitute.
Note
Notice in the image that every commitment shows a get sub link instead of a check box the volunteer can clear. That is because the Lock Days setting for this Involvement is 365. Commitments within that number of days require a substitute; commitments beyond that number of days can be changed by the volunteer on this page. A lower number, such as 21, lets volunteers manage commitments more than 21 days away without getting a substitute.
- Step 3
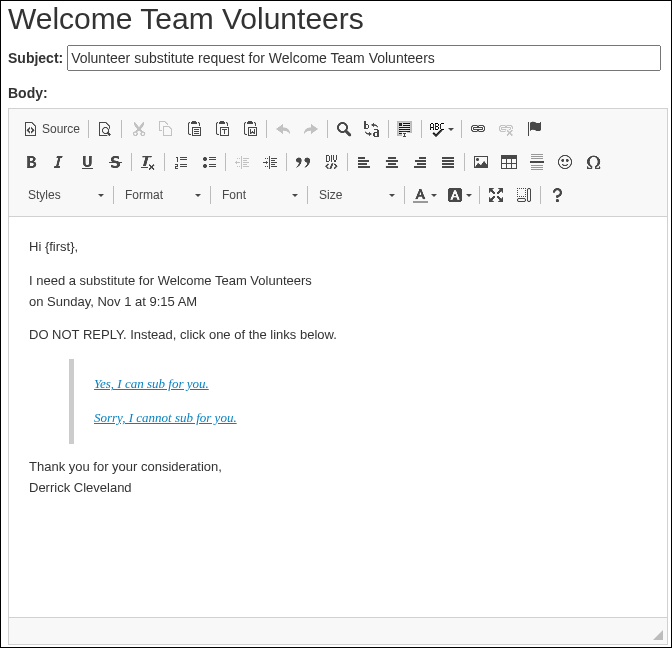
Clicking Get Sub will open an email like the one below. Notice that the Subject uses the name of the volunteer Involvement. Also, the body of the email gives them two options: Yes, I can and Sorry, I cannot.
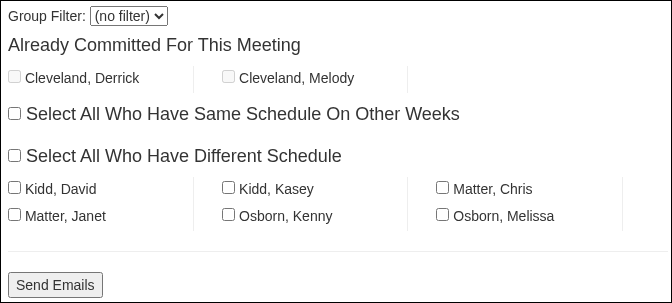
Below the email itself are options for selecting recipients. The volunteer selects the people who should receive the email. Volunteers who are already committed for that time slot cannot be selected.
- Step 4
After making any revisions in the email, such as the reason for the request, the volunteer will click Send Emails.
Important
Do not edit the two options (Yes and No), as those contain links that allow the recipient to respond.
- Substitute Status Report
The people selected as notification recipients on the Involvement’s Settings > Messages tab receive an email from the volunteer with a link to the Substitute Status Report, where they can track the responses.
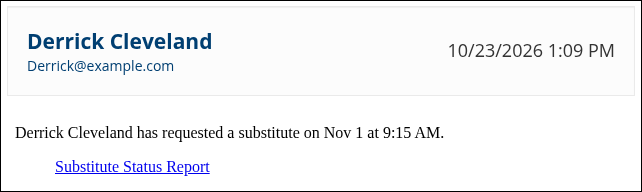
Substitute request notification email
As soon as one person responds “Yes”, the report shows who responded and that the person Can Substitute. Anyone else who responds “Yes” after that sees the message “This substitute request has already been covered. Thank you so much for responding.”
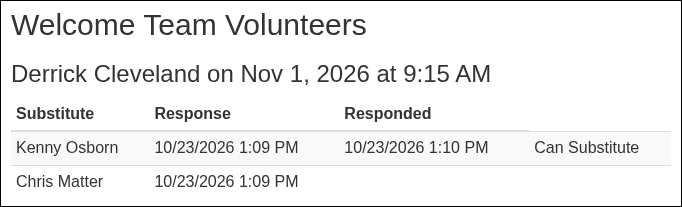
Substitute Status Report
- Volunteer Calendar Indication of Sub Being Requested
Here is what the Volunteer Calendar looks like when a volunteer has requested a Sub, but the time slot has not yet been filled. Note that there is a red dotted-line border around the name of the original volunteer and the name is in bold blue. Also, if you hover over the name, Find Sub displays. This is to let you know that a sub has been requested.
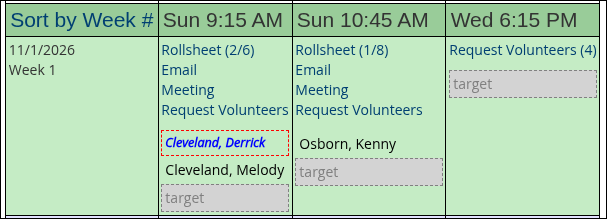
Sub requested
After a sub has been committed, here’s what that same time slot looks like. Notice that the original volunteer’s name is marked through and the sub’s name is added. Also, note that the sub’s name is in green type. This lets you know that person is filling in that week.
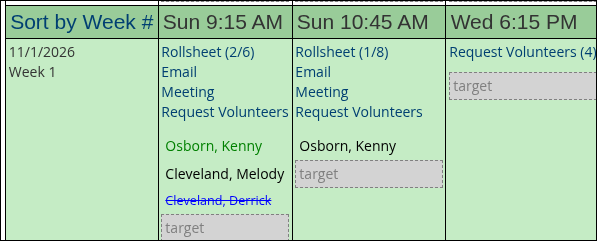
Sub found
The sub will receive an email confirmation with a message like this:
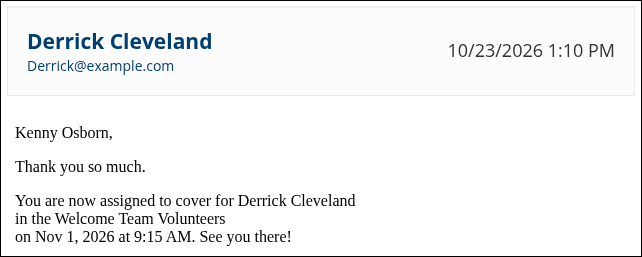
Substitute confirmation email
Customize Volunteer Emails
TouchPoint has three emails related to Volunteer Management that have system default text.
VolunteerRequest
VolunteerSubRequest
VolunteerSubConfirm
These are not included on the Messages tab of the Involvement; however, your System Admin can customize these if you want. After each one has been sent for the first time (this should happen during your testing), these files will get added to Admin > Advanced > Special Content > HTML on your database where your System Admin can edit them. These are used for all the Volunteer Calendars in your database.
Important
You must enter the text for the Confirmation Email and the Reminder Email on the Involvement itself, on the Registration > Messages tab. There is no default text for those. Be sure you include a Register Link in each of these.
- VolunteerRequest
This is the email sent when the calendar manager sends a request asking for more volunteers.

VolunteerRequest
- VolunteerSubRequest
This is the email a volunteer sends to request a substitute for a specific date and time. In Special Content, your System Admin can edit the email to say what you prefer. The volunteer can also edit the email just before sending it, for example to include the reason a substitute is needed. By then, the Involvement name, meeting date and time, and the volunteer’s name are already filled in. The volunteer should not remove the two response links (Yes, I can sub for you. and Sorry, I cannot sub for you.), because recipients use them to respond. The greeting shows
{first}, which is replaced with each recipient’s first name when the email is sent.
VolunteerSubRequest
- VolunteerSubConfirm
This is the confirmation email sent to the person that has accepted a sub request.

VolunteerSubConfirm
Caution
Please note the specific email replacement codes in each of the emails. These are very important as they contain the information the recipient needs to know.
See also
Latest Update |
10/23/2026 |
Updated Involvement terminology and the Special Content path, replaced the Manage Commitments, Get Sub email, recipient, Substitute Status Report, calendar, and confirmation email screenshots with the current UI, corrected who receives the status report email and the “already covered” message, updated the Lock Days example, clarified what the volunteer sees in the VolunteerSubRequest email before sending it, used gender-neutral wording, corrected typos, and removed first-person wording.