Tasks
- Tasks
TouchPoint has 2 types of Tasks:
Ministry Tasks: These are used in conjunction with Notes to help you follow up with your guests, minister to absent members, those in the hospital, or anyone with whom you need someone to communicate.
These Tasks are always about one individual and can be assigned to another individual.
You can create Tasks either one at a time for one individual or for a group of people at one time (from a Search or any list). Regardless of which way you create them, there will be one Task about each person.
When you have a Task that either you have created for yourself or one that has been assigned to you, it will stay on your Home Page in the My Task List section until you complete it.
System-Generated Tasks: These are automatically created and assigned to users whenever they create a new people record or a recurring gift fails to process for the first time. These Tasks are either named New People Data Entry task or Failed Gift task. New People Data Entry tasks are owned by the New People Manager and assigned to the person who created the new record. Failed Gift tasks are assigned to the person idicated in the Failed Gifts Task Owner setting.
This article addresses Ministry Tasks. View the following articles to learn more about the System-Generated Tasks.
- Task Creator
The person that creates the Task is called the Creator. As Tasks are created, the Creator has the option of specifying a different Owner. If the Creator doesn’t assign someone else as the Owner, he/she will be both the Creator and Owner of the Task.
- Task Owner
As new Tasks are created, the Owner is defaulted to the person that is logged in, creating the Task. However, he has the option of transferring ownership to another user either before or after assigning the Task to someone else. That person then becomes the Owner. The Owner will receive the email notifications when the Task is Accepted and Completed.
- Task Assignee
The Assignee is the person who is assigned to perform the Task. We also refer to that person as the minister. They must have a user account in TouchPoint, either with full access or as OrgLeadersOnly.
- Task About
This is the person about whom the Task is referring, the person to be contacted or ministered to.
- Transfer a Task
A Task Owner can choose to Transfer ownership of a Task instead of assigning it. The person to whom the Task is transferred, now becomes the Owner and can assign it to the person who should complete the Task.
Managing and Searching for Tasks
The Task & Notes Search page is your go-to place for finding and managing Tasks and Notes. You have the option to filter and sort by various fields, and can Assign, Complete, Archive, or Delete multiple Tasks at one time as well. Your System Admin can also assign the user role ManageTouchpoints to a minister or other user, in order for that user to manage/view all Tasks, not just Tasks belonging to him.
See also
Mobile App
You can Create, Accept, and Complete Tasks using the TouchPoint Mobile app. Read more about the features on the app, including how to use it for Tasks and Notes.
See also
Use Case for Transferring a Task
Our church has a ministry assistant whose job it is to assign a Task about every new guest each week. He decides who would be the most appropriate minister based on the age / demographic group that would be appropriate for that new guest. However, instead of assigning the Task to the minister, he transfers the Task. This allows the new Task Owner to decide if he will complete the Task himself or if he wants to assign the Task to a lay leader. This is a tiered approach to ensure that new guests are contacted by the most appropriate person. Often, that person is a leader in a life group, not necessarily a minister on staff.
Create a Task for One Person
- Step 1
Go to the person needing to be contacted, click on their Touchpoints > About tab. Note that you will arrive on the page with About Person defaulted in the dropdown. Click the green + Task button. The Task Details will open.
- Step 2
Click in the Task Details and enter any information that the person who will be assigned the Task needs to know concerning the reason for contacting that person. Details must be limited to 5,000 characters.
Select a Due Date if you want the task completed by a certain date.
- Step 3
Select the Keywords to associate with this Task. These are able to be searched upon using Search Builder and are also able to be filtered upon on the Tasks & Notes Page. Some example Keywords are “Pastoral Care,” “Women’s Ministry,” and “Prayer Request.”
Note
Keywords must be configured by your System Admin in order for them to appear in the dropdown list.
- Step 4
If this Task should be Owned by/monitored by someone other than yourself, search for a different Owner by typing the Owner’s name in the Owner field. You may optionally indicate the Assignee at this point (the person responsible for ministering to the individual), or the new Owner may complete this field. Select a Due Date if you want the Task to be completed by a certain date. Lastly, you may Limit the Task to a Role if the Task you are creating is sensitive in nature.
Note
The roles available in the drop down list come from those indicated in the LimitToRolesForTasksNotes Setting, located by navigating to Admin > Advanced > Settings > Features > Tasks & Notes.
- Results of Creating and Assigning a Task
Several things happen automatically when you create and assign a Task, ensuring that the Owner of the Task is kept informed all along the process.
Once you select the Assignee, he is sent an email letting him know he has a Task for him to Accept.
The Type changes to Pending Acceptance.
When he accepts the Task, you (the Task Owner) will receive an email notification that the Task has been accepted.
The Type will change to Accepted as soon as it is accepted.
When the Assignee completes the Task, you (the Task Owner) will receive an email notification that it is complete.
The Type changes to Completed.
Use Case for Creating Tasks for Multiple People
On Sunday, 10 people visit your church worship service and you want to assign the appropriate staff member or lay leader a Task to follow up with each one, and you want a record of the contact in TouchPoint.
See also
Transferring Tasks
If you want to follow the tiered approach and transfer Tasks rather than delegate them, here are the steps to follow.
- Step 1
Complete Steps 1 and 2 above.
- Step 2
Click on your name under the Owner heading and enter the name of the user that you now want to be the Owner of the Task. This will send an email letting that person know that a Task has been transferred to them.
- Step 3
The new Owner can now assign the Task to the appropriate user to make contact with the individual.
Note
An owner can also transfer a Task that has been transferred to him. He would access the Task, click on his name under the Owner heading and select someone else as the Owner.
Creating Tasks from a Search Result or Tag
- Step 1
Find those guests you want contacted. There are several ways to find them, depending on the parameters you want to use.
Go to the specific Meeting for that week’s worship service and select Toolbar > Convert to Search > Guests. This will build a search on the fly, with the results being the guests to that meeting.
OR
Click Reports > First Time Attenders. This will build a search on the fly giving you the 1st time attenders for the past 7 days.
OR
Create your own Search to find those who visited in any of your services.
Note
There are several ways to find the people you want to contact. These are just a few examples.
- Step 2
Select the blue Toolbar > Gear > Tasks / Notes > Add Tasks to create a task for each of these people.
You will see an on-screen confirmation message letting you know the Tasks were created successfully.
- Step 3
You may further manage these Tasks on the Tasks & Notes Search Page (People > Tasks & Notes). From this page, you may update the Task Details, Keywords, Owner, Assignee, Due Date, or Visibility as necessary.
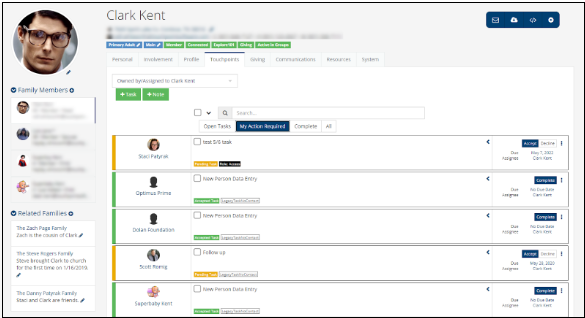
Action Buttons and My Action Required Filter
Tasks for which you are expected to do something will display action buttons.
Accept or Decline - these options will appear together as actions required by the person to which the task is assigned. Note: If an assignee declines a task, that assignee will be prompted to enter a reason.
Complete - this option will appear on its own as an action required by the person who was assigned and has accepted the task.
Complete or Edit - these options will appear together as actions required by the owner of the task once that task has been declined by the assignee. The owner can either Complete the task on their own or click Edit to reassign or make any other necessary adjustments.
The My Action Required button allows you to easily filter for tasks that are owned by or assigned to you that require some sort of action. This button can be found either on an individual’s Touchpoints tab or on the Tasks & Notes search page (People > Tasks & Notes).
Latest Update |
04/24/2023 |
Added character limit for Task Details.