Online Registration Checkboxes
When creating an online registration, you can create multiple sets of checkboxes on the Organization > Settings > Questions tab. These checkboxes allow the registrant to check more than one of the options presented.
You have the following options:
A minimum number that must be selected
A maximum number allowed to be selected
Sub-group name (optional - usually something shorter than what is presented for the registrant)
A fee (optional)
A Date and Time if the sub-groups will be for a meeting and the meeting will get created
Each checkbox will create a sub-group in the organization.
If you are interested in using Online Registration to enlist attendees for future meetings, see the help article below.
See also
You can also create headers so that you can create groups of checkboxes within the same set of checkboxes. See explanation below.
Note
You must first select a Registration Type on the Settings > Registration tab in order for the other tabs to display.
How to Create Checkboxes for an Online Registration
- Step 1
Go to the Organization > Settings > Questions tab and click Edit, select Add Question Item and then select Checkboxes from the dialog box.
- Step 2
Enter the Label for the checkboxes. For example: “Please select 1 or more of the following options”
Enter the minimum and maximum number of boxes you want the registrant to select.
- Step 3
Click + Add Item (each Item will be a checkbox) and enter the information for the items listed below. Repeat for each checkbox.
Note
For the actual checkboxes (not the header), only the Description is required. If your Description is short, you do not need to enter a SmallGroup name. It will be the same as your Description. If you do not need the other options, leave them blank.
- Description
This is the name of the checkbox as you want it to display to the registrant.
- Sub-Group
The sub-group name should be a shortened version of the Description, which will become the name of the sub-group in the organization. If the Description is short, you do not need a sub-group name as the Description will be used.
- Fee
Enter a dollar amount (without the dollar sign).
- Limit
This is the number of people you want to allow to make that selection.
- Date Time
Only select a date using the calendar if you want a meeting to be created.
Grouping Checkboxes Using Special Headers
For registrations in which you have a lot of checkboxes and if it make sense for them to be grouped together by type and you want to keep them in the same set of checkboxes (with the Minimum and Maximum applying), you will want to create groups of checkboxes. You do this by creating a header. This is not the same header that is available from the Add Question Item dialog box. Follow the directions below to create these special types of checkbox headers.
Group Checkboxes with Special Headers
- Step 1
Create a checkbox as described above by clicking +Add Item
- Step 2
In the Description box use
HTML(the pointy brackets, etc) as indicated below to specify that this is a header. In this example, Check-in Table will display as the actual header.<h3>Check-In Table</h3>
For the SubGroup enter
nocheckbox(all lower case and no spaces)- Step 3
Position this header so that it is directly above the checkboxes that you want to display under it
Note
You can move an item by selecting Actions and either Move Up, Move Done, Delete, and so on.
- Step 4
Continue creating checkbox headers and grouping the checkboxes as needed.
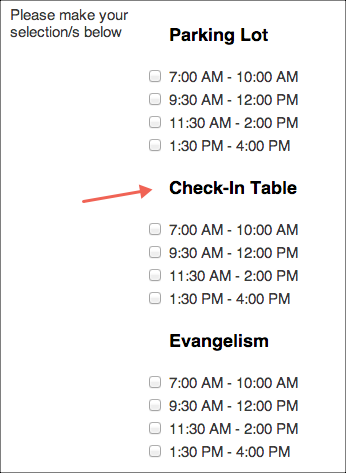
- Example
Here is an example of what checkboxes will look like when you use headers. In this example, people are volunteering to help with a one-time event and are selecting the area where they wish to serve, as well as the day and time. This is using 3 checkbox headers.
Registrant’s view
See also
Latest Update |
11/13/2020 |
Modify image link with secure protocol.