Questions Settings Tab
Below are the options that are available on the Registration > Questions tab of an Involvement. These all relate to an Involvement that will be used for online registration.
Tip
Before pressing Edit, you may want to select ?Show Help. This will provide a description for every item that you add from the Questions dialog box. This is a toggle. When help is displayed, the button will be ?Hide Help.
The tabs for Fee, Questions, and Messages under the Registration tab will not display unless you have a Registration Type (other than the default) selected on the Registration tab.
Note
Press Edit on the Questions tab and then click Add Question Item to display the dialog box from which you make your selections.
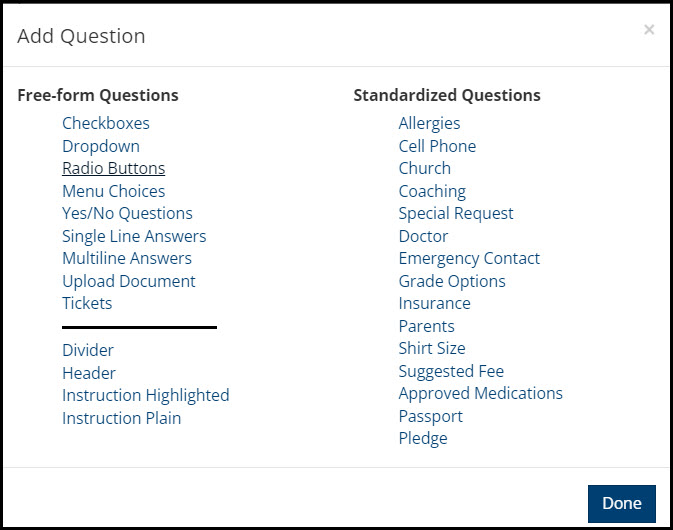
Question Options
After making a selection, use the Actions button beside each item to move the item up or down, or to cut and paste. For some options, such as Drop Downs or Yes/No Questions, you will see a green +Add Item button. Click this to add each drop down item or other questions. The actual registration form will have the items you add in the same order in which you have them on your Questions tab.
Note
Several options create sub-groups as people make those selections. You will not see any of these groups in Group Member Management until someone makes that specific selection.
Important
Drop-downs, checkboxes, Radio Buttons, Menu Choices, and Yes/No questions create sub-groups. The sub-group names are used in registration reports in Excel as column headers. Therefore, you must keep these sub-group names short.
If you need the Description to be a little longer than the sub-group name (that is what the registrant sees when registering), you can do that. However, if your description gets too long, it can cause display issues on the registration form. In those cases, use Instructions and/or Headers, to explain these to your registrants.
Upload Documents also creates sub-groups. The group name is created based off of the document name. Read more about the Upload Document question type below.
Freeform Questions
Unlike Standardized Questions (below), Freeform Questions do not correspond to a standard field on the registrant’s profile or to standard registration data.
Checkboxes
These are presented as a group of checkboxes.
Question is the description that appears above the options.
Minimum and/or Maximum is where you can limit the number of items the registrant can select. You must also select the Require setting to enforce these limits.
Option is the checkbox option that displays for the registrant.
Sub-Group is the name of the group in the Involvement. The sub-group name will be the same as the description if you do not enter anything for the Sub-Group.
Fee is the charge when that option is chosen (enter a dollar amount without the dollar sign or leave blank if no fee).
Limit is the maximum number of registrants allowed for that option
Date/Time is an optional setting that creates a meeting with the registrant added to the meeting as Attending (enter a date in this format - mm/dd/yyy hh:mm am or pm. E.g.,
02/11/2018 06:30 PM)
You can add as many sets of Checkboxes as you need.
Note
If you want to separate the checkboxes into sections under the same heading, you can create a Header. This is different from the header or instructions described below. This header is inside the group of checkboxes.
See also
Online Registration Checkboxes for more details about checkboxes
Dropdown
This will be presented as a dropdown selection and will enter the registrant in a sub-group within the Involvement. A registrant can make only one selection.
Question is the description that appears above the options.
Option is the dropdown option that displays for the registrant.
Sub-Group is the name of the group in the Involvement. The sub-group name will be the same as the description if you do not enter anything for the Sub-Group.
Fee is the charge when that option is chosen (enter a dollar amount without the dollar sign or leave blank if no fee).
Limit is the maximum number of registrants allowed for that option
Date/Time is an optional setting that creates a meeting with the registrant added to the meeting as Attending (enter a date in this format - mm/dd/yyy hh:mm am or pm. E.g.,
02/11/2018 06:30 PM)
You can add as many sets of Dropdowns as you need.
Caution
Each sub-group must have a unique name. This applies to any item that creates a sub-group. If you have a registration that is asking similar questions in different groups, perhaps for different days, use something like this: Skiing-Mon and Skiing-Tue instead of just Skiing. If you create duplicate group names, you will see a warning like the one below. The number in parentheses tells you how many duplicates you have for that name. Click Edit and change the names. See note below regarding finding existing registrations with duplicate sub-group names.
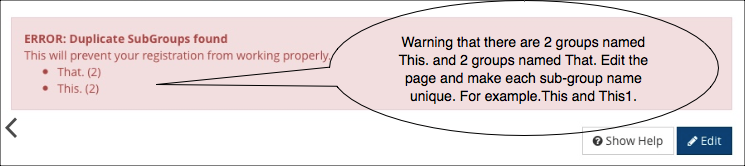
Error Warning
Yes/No Questions
These are questions that will force a Yes or No answer, and will place the registrant in the appropriate sub-groups with Yes or No appended to the sub-group name. Enter your question in the Description text box and the name for the sub-group in the Sub-Group text box. All the Yes/No Questions will be grouped together on the registration form. Just keep selecting +Add Item to add other questions.
Single Line Answers
These questions are answered with text and the answers do not result in a sub-group. You can have multiple sets of questions. In other words, all the questions do not have to be grouped together. You can also put a Header above the groups of questions, if needed. See Header section below.
Multiline Answers
These basically work just like the Single Line Answers above, but allow the user to enter more than one line of text. A larger text box is displayed for the registrant to enter as much text as they need to answer your question.
Upload Documents
For each Upload Documents item you include in the registration, the registrant is provided a button to select and upload a file. Label the item with a description of the document being requested.
Registrants who upload a document will be placed in a sub-group called RegDoc-DocName where “DocName” is the name of the document.
The uploaded documents will be accessible on the registrant’s Member Dialog, on the Questions tab.
Tickets
For the Label, enter text asking how many tickets/dinners/etc. they are purchasing or how many people are coming. This number will be multiplied by the fee (on the Fee tab) to calculate the total they will pay. You could also use the Instruction option if you need further clarification. This is good for things like number of lunches (so the registrant can invites friends). See below for how to add more tickets after a person has already registered and purchased tickets.
Note
Do not use the Extra Fee when using Tickets. If the fee increases after a certain date, just change the amount of the Fee on the Fee tab. Allow Only One will automatically be applied when using the Tickets question.
Caution
If you have a Max Limit on the Registration tab, it will apply to the actual number of tickets that can be sold. However, please note, that the last purchaser before the maximum has been reached could actually purchase a number of tickets that would exceed the maximum limit. The next person, however, will see a message that the maximum has been reached.
Example: Maximum is 100 and 90 have been sold, so there are 10 remaining. The last purchaser could actually purchase 12 tickets, because this is not validated until the transaction is completed. We recommend that you set the maximum a few less than you can actually accommodate to account for this.
Add More Tickets
After someone registers and purchases tickets, if they want to buy more (using cash or check..or even pay online), there is an easy way to handle that.
- Step 1
Go to the Member Dialog for that person in that Involvement and select the green Transaction button and Make Fee Adjustment.
Enter a negative number to represent the cost of the extra tickets and enter a note such as ‘buying 2 more tickets’ and click Add Transaction.
Now the person has a balance due equal to the extra tickets. See tip below if the person wants to pay online
- Step 2
Next select the Transaction button and Add Transaction.
Enter a positive number for the total paid by cash or check and enter the check number or ‘cash paid’ and click Add Transaction.
Now there is no balance due.
- Step 3
Next, click Edit on the Member Dialog and change the number of tickets to the new total the person has purchased and click Save.
Tip
You can also email the registrant a paylink after you make the Fee Adjustment, so the person can pay online. So, you complete Steps 1 and 3 above, omitting Step 2. Then copy the paylink and email it. The paylink will be in the person’s member dialog. Just right-click, copy link and paste it into an email.
Design Elements
These allow you to organize your registration to include instructions.
Divider
Adding this will put a dividing line between registration questions at the position you determine.
Header
The text you to enter will appear as a header that can be positioned above any items on your registration page. The text can include HTML. You can add multiple headers.
Instruction Highlighted
This works similar to a Header in that the text you enter can be positioned where you want it on the registration page and can include HTML. Your text will be highlighted in light blue. You can add as many of these as you need.
Instruction Plain
Identical to the instruction type described above, but without the highlighting.
Tip
You may want to provide instruction to your users to encourage opting in for text message communication. Newly created accounts will be opted in automatically. However, you can use an Instruction block to provide additional information in a registration and/or include instructions in the footer of your email templates to manage SMS subscriptions. We also suggest including this in your emails that you send as follow-ups to texts. Sample text below:
Want to receive text messages from our church to be notified of upcoming events? Text “Start” to XXX-XXX-XXXX to be added to our list. You can modify your email and text subscriptions on your Communications/Subscriptions tab of your personal record.
Standardized Questions
These are questions that relate to standard registration information (such as passport information). In many cases the question is associated with a field on the registrant’s profile with the answer updating the registrant’s profile with the new information.
Allergies
When you select this option, it will display a text box in which the registrant can enter any allergies. It is labeled Allergies and the box has a caption reading “Leave blank if none”. This is one question for which, by design, answers are not required.
Cell Phone
When included, this question will only show for someone registering for an Involvement and are logged into their account. It will only update the cell phone on the person record of the person who is logged in.
Church
The registrant has three options as radio buttons for the Parent’s Church:
Member of this Church
Active in another Local Church
Currently not attending a church
This is helpful for indicating whether they are a prospect or not. Search Builder has conditions Not Church Member and Rec Active Other Church to help you find those who are prospects.
Coaching
The registrant is presented with the question Interested in Coaching? with Yes or No radio buttons. Search Builder has a condition Reg Interested Coaching to help you find potential coaches for recreation teams.
Note
The first online registrations we created in TouchPoint were for our Recreation Ministry. This is why some of these types of questions exist.
Special Request
Displays a text for entering a request for a coach/teacher/roommate, for example. Enter instructions/clarifications in the Question text box.
Note
The text the registrant enters in the Request field will display on the Member Dialog, Members and Group exports, and the Manage Involvement Members page for the Involvement. This is helpful when you are trying to honor someone’s ‘request’.
Doctor
This will display two text boxes asking for doctor’s name and phone number.
Emergency Contact
The registrant is required to enter answers in two text boxes asking for Emergency Contact and Emergency Phone.
Grade Options
Enter a suitable Question to indicate what should be selected. Click +Add Item to create the list of Grades. What you enter as the option is what the registrant will see displayed (such as Pre-K). Then choose the correct corresponding Grade Option from the dropdown.
The option selected during registration will be put on the child’s people record and will display on the Manage Involvement Members page, along with being included in some reports.
Note
When setting up this question, consider what date you are using for the GradeUpdateDate administrative setting, to avoid double-promoting someone. You may choose to ask for “current” grade versus “upcoming” grade.
Insurance
The registrant is prompted to enter answers in two text boxes asking for Health Insurance Carrier and Policy/Group#. This is necessary for camps or teams where a registrant might get hurt and need medical attention.
Parents
The registrant is required to enter an answer in one of the two text boxes asking for Mother’s Name and Father’s names.
Shirt Size
Enter a Shirt Description (such as Select the size t-shirt you need) and Fee. Enter both a Size Description (what the registrant sees) and a Sub-Group name for shirt sizes. You can omit the sub-group name if the size description will suffice, i.e. if the name is short.
This sub-group name is what will appear on the Shirt Sizes Report, as well as in the Member Dialog and on the Groups export. This option does NOT create a sub-group in the Involvement.
Note
Be sure to click +Add Item and enter the Size Description and SmallGroup for each shirt size you are offering.
Check Allow Last Year if you allow them to use the shirt they already have from the previous year (such as for a sports team). This will not charge them the shirt fee. When this is checked, the option Use shirt from last year will be added to the bottom of the list of sizes on the form. The registrant must select this option if they are not purchasing a new shirt.
Tip
If you want the purchase of a shirt to be optional, but not because they will be using ‘last year’s shirt’; you can add an Extra Value to the Involvement and enter the text you want the registrant to see. Instead of displaying Use Last Year’s in the drop down menu, it can display No Shirt or whatever you would like.
Suggested Fee
For the Question, enter text telling the registrant that they can enter the amount they want to pay. The registrant can enter any fee, including zero (0) in the box presented. An example use case would be a teachers’ leadership meeting with a fee of $15, but you don’t want a teacher to be excluded if they cannot pay the fee.
Caution
This is designed to be used when you have a Fee on the Fee tab. This is not designed for use when you have other fee-associated options on the Questions tab. Also, this is not how you would ask for an extra donation. For that, you would use the Ask Donation option on the Fee tab.
Approved Medications
This presents the label May we give your child and has Yes/No radio buttons for Tylenol, Advil, Maalox, Robitussin.
Passport
The registrant is required to enter answers in two text boxes asking for Passport Number and Passport Expires Date. This is useful for mission trips or other trips out of the country, where it is desirable to have a record of participants’ passport information.
The passport information entered will be included on the Registration Report (both PDF or Excel) and on the registrant’s Member Dialog.
Once you have selected an item that should be used only once, there will be a line through it, so you can’t select it again by mistake.
Pledge
With this question, the Label will default as “Pledge Amount”, which you can edit and the Fund dropdown will only show active pledge funds. You will have the option to Require or Disable this question. The pledge to the selected fund will automatically be created in a bundle.
Target Extra Values
When you have Checkboxes, Yes/No Questions or Dropdowns that normally place the person in a sub-group, checking Target Extra Values will create an Ad Hoc Extra Value on the person’s record instead of placing them in a sub-group in the Involvement. The name you enter for the Sub-Group will be the name of the Extra Value.
Caution
This is intended for a very special type of registration, so think carefully if you are using any of the three options mentioned above. For any of these three types of questions, selecting Target Extra Values will result in Extra Values being created on the person’s record and sub-groups will not be created in the Involvement.
Finding Existing Registration with Duplicate Sub-Group Names
In April 2016, we added an error message to keep you from creating sub-groups with the same names. You may have older existing registrations that have duplicate sub-group names. We have a script your Admin user can add to your database that will find these sub-groups so you can make corrections.
See also
Latest Update |
02/7/2023 |
Added Cell Phone standardized question