Drop Involvement Members
When you drop Involvement members, you will be able to find them on the Previous tab of the Involvement, and by using one of the Conditions on the Enrollment History tab in Search Builder.
There are several ways to remove (Drop) members from an Involvement.
Note
If you are going to make an Involvement Inactive, you should first drop all the Members.
See also
See also
Drop Individual Members
- Step 1
On the Members tab, click the
 icon under the Actions column for the person you want to drop.
- Step 2
Click Yes, Drop Member when the Are you sure? dialog box comes up.
Note
If you want to specify a drop date other than today, follow these steps.
- Step 1
On the Members tab, click the
 icon under the Actions column for the person you want to drop. This will bring up
the Member Dialog box.
icon under the Actions column for the person you want to drop. This will bring up
the Member Dialog box.- Step 2
Click the red Drop button in the Member Dialog box.
- Step 3
Enter a drop date (or leave it blank for today’s date). You can also check the box to Remove From Enrollment History. See Caution section below. Click the red Yes, Drop Member! button.
- Step 4
Click the green Close button on the confirmation dialog box.
Caution
You must have the Edit role in order to drop Involvement members. Also, there is an option to Remove From Enrollment History for an individual. Only use this option when you have been testing or if someone has been enrolled by mistake. This will remove all enrollment (but not attendance) history.
Drop Multiple or All Members - Batch Process
- Step 1
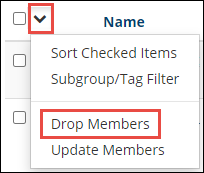
On the Members tab, click the down arrow to the left of the Name column to reveal additional options. Select Drop Members. Be sure to note the red message in the dialog box, letting you know how many members you will be dropping.
Note
If you are not dropping everyone, use the checkboxes to select those you want to drop before selecting Drop Members.
- Step 2
Click the Drop button.
Note
You have the option to enter a drop date. If you leave it blank, the current date will be used.
- Step 3
Click OK to confirm that you want to drop the member(s).
- Step 4
You will see the progress. Once it finishes, click the Dismiss button.
Dropping Prospects or Inactive and Pending Members
You can use the same methods as above to drop Prospects, Inactive Members or Pending Members - i.e. either individually or as a batch.
Drop Using a Tag
If you have members in the Involvement that are also in one of your Tags, you can use the batch process to drop them as well.
- Step 1
Make sure that the Tag you want to use is your Active Tag, then go to the Members tab of the Involvement.
- Step 2
Click the down arrow to the left of the Name column to reveal additional options. Select Subgroup/Tag Filter.
- Step 3
In the Advanced Filter dialog box, check the box next to Filter by Active Tag, then click the blue Filter button.
- Step 4
Click the Close button to close the Advanced Filter dialog box and return to the Members tab of the Involvement.
- Step 4
Now that your list is filtered by the Active Tag, click the down arrow to the left of the Name column to reveal additional options and select Drop Members. Then click the Drop button.
- Step 5
Click OK to confirm that you want to drop the member(s).
- Step 6
You will see the progress. Once it finishes, click the Dismiss button.
Drop All Members for Multiple Involvements
This process will not only drop all members from the Involvements, it will also make those Involvements Inactive. This cannot be undone, so it can only be performed by your TouchPoint System Admin.
- Step 1
Go to Involvements > Manage > Search from the main menu and filter for the Program / Division, etc. and click Search. Be sure you have just those Involvements listed for which you want to drop the members.
- Step 2
Select the Blue Toolbar > Gear > Drop Members / Inactivate Involvements. You will see a warning indicating the numbers of Involvements and members that will be affected.
- Step 3
Click the Drop button and wait for the process to complete.
Use Case for Dropping Members from Multiple Involvements
If you have multiple Involvements for your Vacation Bible School, once the week has ended, you will want to drop everyone and make those Involvements Inactive until next year. This process makes that so simple. Be careful, as it cannot be undone.
Drop Members Based on Zero or Low Attendance
This method is used prior to annual promotion, so that you do not promote children who either have never attended in the past year, or who have a very low attendance and have not attended recently.
You can use this anytime you need to clean up Involvements, not just at promotion.
- Step 1
Go to the individual Involvement People tab and click the % Att. column header to sort from lowest to highest attendance percentage.
- Step 2
Click the Clear button to make sure no check boxes are selected. Now select the checkboxes by those with a zero attendance.
- Step 3
Click the down arrow to the left of the Name column to reveal additional options. Select Drop Members. Be sure to note the red message in the dialog box, letting you know how many members you will be dropping.
- Step 4
If that is correct, click the Drop button.
Important
Do NOT select Remove Enrollment History, as you will want to preserve the history.
Click the Clear button to remove all checkboxes.
Proceed with the same steps for other classes involved in promotion.
Low Attenders
You can also use the same procedure to remove those that have not attended since early in the year. For these, click the header Dates > Last Attended to find those who have not attended in a long time. Proceed with Step 2 above.
Latest Update |
3/19/2021 |
Update steps for Involvements