Volunteer Management: Using Sub-Groups
There are a couple of ways that using sub-groups will help you when setting up and managing a Volunteer Calendar. One use is when requesting a sub or additional volunteers; the other is in managing the calendar itself.
Requesting Sub or Additional Volunteers
When a volunteer is requesting a substitute or the leader is requesting additional volunteers, the sub-groups will be very useful. You can filter by sub-group to find those who are in the sub-group for which you need a volunteer(s).
Notice in the image below, the Group filter option. These sub-groups display when using either Get Sub or Request Volunteers.
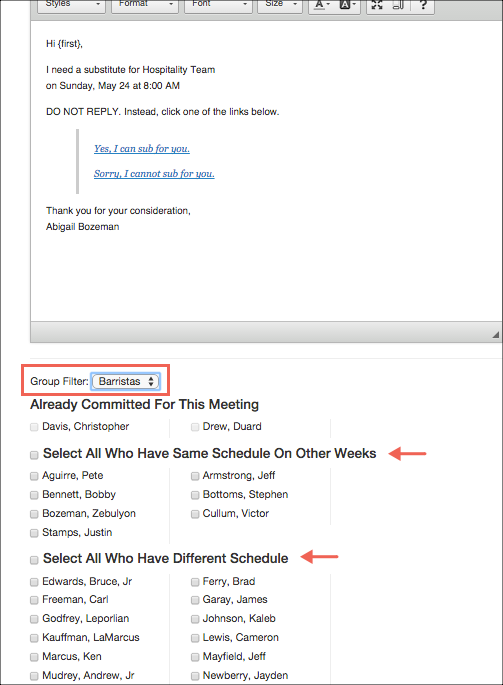
Get Sub
Important
Only Sub-Group with the prefix SG:
will display for Get Sub or Request Volunteers.
Managing Volunteer Calendar
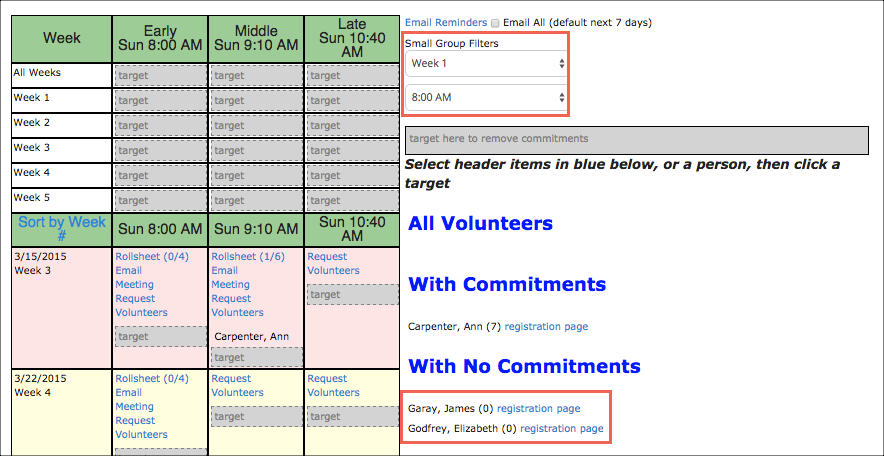
Another use of Sub-Groups is to help when placing volunteers on the Volunteer Calendar, if you are doing that manually or are making changes. For this use case, all sub-groups will display in these filters - those with the SG: prefix and those without it.
If you assign volunteer to the appropriate sub-group for the week of the month they are available and also by the time slot, then you can filter by sub-groups to find, for example, everyone who can serve Week 1 and at the 8:00 slot.
The Volunteer Calendar has the option to select 2 sub-groups. So, if you select Week 1 as the first option, and 8:00 AM as the second one, the results will be only those who are in both groups. Or you could find those in Week 1 and in SG:Baristas.
Calendar Sub-Group Filter
Note
If you are using the Simple Volunteer Calendar view you still have the option to filter by sub-groups. They do not display until you click either the + icon or the Details toggle when adding Volunteers to the calendar.
Create Sub-Groups
The person creating the sub-groups must have the user role Manage Groups.
- Step 1
On the volunteer organization, go to the blue Toolbar > Gear > Administrative > Sub-Group Management and select the tab named Manage Sub-Groups.
- Step 2
Click the green +Create Group button and enter the name of the sub-group, putting the prefix
SG:before the name. Example: SG:Baristas or SG:West Side UshersThen click the blue Submit button.
- Step 3
Continue repeating Step 2 until all the sub-groups have been created.
Note
The sub-groups do not have to be named using a prefix. However, only groups with the prefix SG: will be used in the filter for Get Sub and Request Additional Volunteers.
Assign Members to Sub-Groups
- Step 1
While still on the Sub-Group Management page, click the tab named Sub-Group Members.
- Step 2
From the Target Group drop down, select a sub-group.
Click the box beside those you want to add to that sub-group.
Then click Actions > +Assign Selected to Target Group.
- Step 3
Continue repeating Step 2, changing the Target Group, until you have added everyone to a group.
Renaming or Deleting Groups and Removing Group Members
You can easily rename sub-groups by clicking the Rename button beside the group on the Manage Sub-Groups tab, and then entering the new name.
You can delete a sub-group by clicking the red Delete button beside the sub-group.
You can remove members from a sub-group by following the instructions in Step 2, but selecting -Remove Selected from Target Group, instead of the option to add them to the group.
See also
Latest Update |
11/13/2020 |
Modify image link with secure protocol.