Enlist Volunteers
There are two methods for enlisting your volunteers.
Method One allows your volunteers to access the Volunteer Commitment Form and select their times.
Method Two has them register online and select a Time and a Week. Then you move them to the calendar.
For either of these, start by creating a search to find your target audience - that is, those in your church who would be good volunteers. Perhaps this would be those who are church members, who have a volunteer application on file, who are enrolled in a Life Group - or whatever criteria you choose.
Once you have your search created and saved, you can send an email containing a RegisterLink for whichever online registration method you decided to use.
Either way makes it so easy for them to sign up as a volunteer. Remember, they will also be able to enlist their own subs.
See also
Tip
When you set up a Volunteer Calendar, be sure to enter a First Meeting Date and a Last Meeting Date on the Settings > Attendance tab. If you do not enter these dates the calendar will begin on the next Sunday and go for 7 months. Example: If you need summer volunteers use a date range for just those few months.
Method One
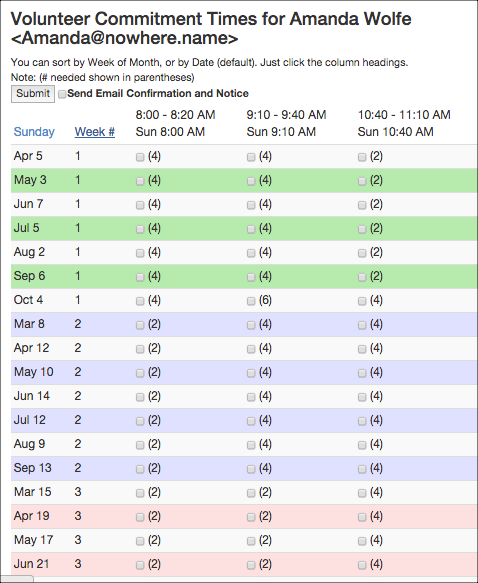
The simplest way to get volunteers placed on the calendar is by using this method. The volunteers register online and with the Registration Type of Choose Volunteer Times, they are taken to the Commitment Calendar and make their selections. They can sort by the Date or the Week #. In the image below, the sort is by Week #. If the volunteer is serving at the early time slot every first week of the month, they just click those boxes.
Volunteer Commitment Form
Note
If you have a need for a Volunteer Calendar to display just one week of the month, or to display just certain weeks of the month, see the Tip on Volunteer Management Calendar.
- Step 1
Create an organization to be used for your Volunteer Calendar.
- Step 2
Add the organization settings as follows:
See image below of the Questions tab sample.
* Set the Registration Type as Choose Volunteer Times.* On the Questions tab, create the number of TimeSlots that you need.* Enter the Description. This will be what you want the volunteer to see when they manage their commitments. Ex. 8:00 - 8:20 AM.* Select the Day (in the Time Slot)using 0 for Sunday, 1 for Monday, etc.* Enter the Time using this formatH:MM AM|PM* Add a Limit. This is how many people you need in order for that slot to appear as Filled on the Calendar.* Set the number of Lock Commitment Days. This is the time frame in which a person must request a sub instead of just removing their commitment for that week. If you always want them to get a sub, set the days to 365.* Add a Confirmation and Online Notify Person on the Messages tab. The confirmation is sent not only when the person first selects their initial commitment, but is also sent when they Manage Commitments and make a change.* Use the Options instructions if you want to add some text on the page where the person will select their time slots.* Add a Reminder Message. This is the email that is sent when the org administrator sends the weekly email reminders (or sends to all). Always include the email replacement code {details}, so the person will see their upcoming commitments.Note
Put a RegisterLink in both the Confirmation and the Reminder emails, so the volunteer can access the Volunteer Management Page. This is where they can Get a Sub or manage their commitments.
- Step 3
Using the search of your targeted audience, send an email with a RegisterLink to enlist your potential volunteers. Once they register, they will be automatically enrolled in the organization and placed in their specified time slots.
- Step 4
Enroll the person who will manage the Volunteer Calendar in the org and give them a Member Type that makes them a leader.

Questions Tab Sample
Important Requirements for Volunteer Calendars
In order for an organization to have a Volunteer Calendar, it must have a Registration Type of Choose Volunteer Times and must have Time Slots.
In order to manage the calendar on a volunteer org, the user must be enrolled and be a leader in that org Exception: a System Administrator can manage the calendar without being enrolled in the org. In other words, the only people able to manage the volunteer calendar are the leaders in the organization or the Administrator for your database.
Re Lockout Days: If a volunteer cannot be there for a specific commitment, and it is within the # of lockout days, they cannot uncheck the box to remove their commitment. They can click the Get Sub link, which creates an email for them to send to other volunteers in that org who are not already committed for that date and time.
Method Two
If, for some reason, you do not want the volunteers to use the method above to select their own time slots, you can create an online registration using the Registration Type of Join Org and have them select a Week of the Month, and a time slot. Then, whoever is managing the calendar, can use Manage Org Members to ‘move’ them to the Volunteer Calendar organization and place them on the calendar. We have a very easy way to do that manually.
- Step 1
Create an organization to be used for your online registration.
- Step 2
Add the organization settings as follows:
See image below of the Checkboxes.
* Set the Registration Type as Join Org.* On the Questions tab, create 5 checkboxes, one for each week of the month.* Create another set of checkboxes for the time slots - Early 8:00 and Late 9:00.* Add a Limit so you don’t get everyone volunteering for the same times.* Add a Confirmation and Online Notify Person on the Messages tab.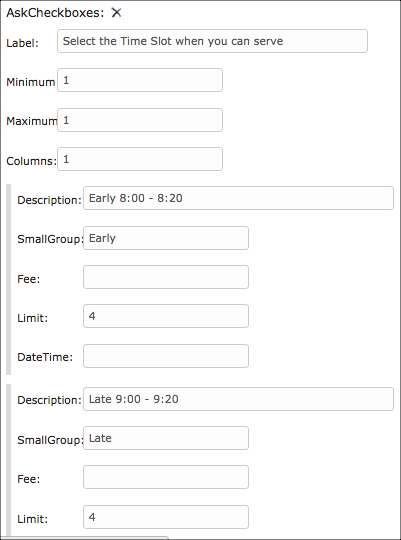
Time Checkboxes
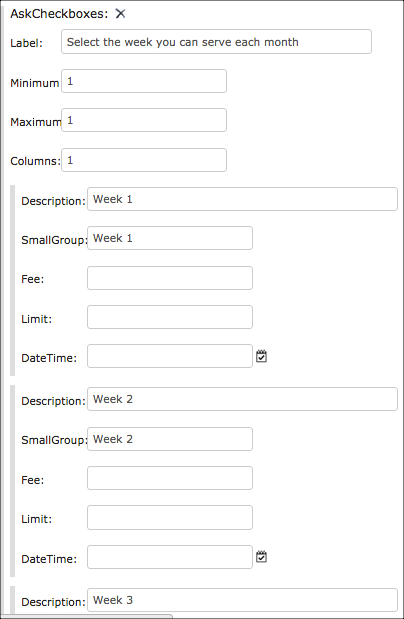
Week Checkboxes
- Step 3
Using the search of your targeted audience, send an email with a RegisterLink to enlist your potential volunteers. Ask them to select a week and a time slot. That will place them in 2 small groups - one for the week and one for the time.
- Step 4
Create another organization for your actual Volunteer Calendar using the settings described in Method 1.
- Step 5
Use Manage Org Members to ‘move’ the volunteers from the registration org to the Volunteer Calendar org. The small group will move with them.
- Step 6
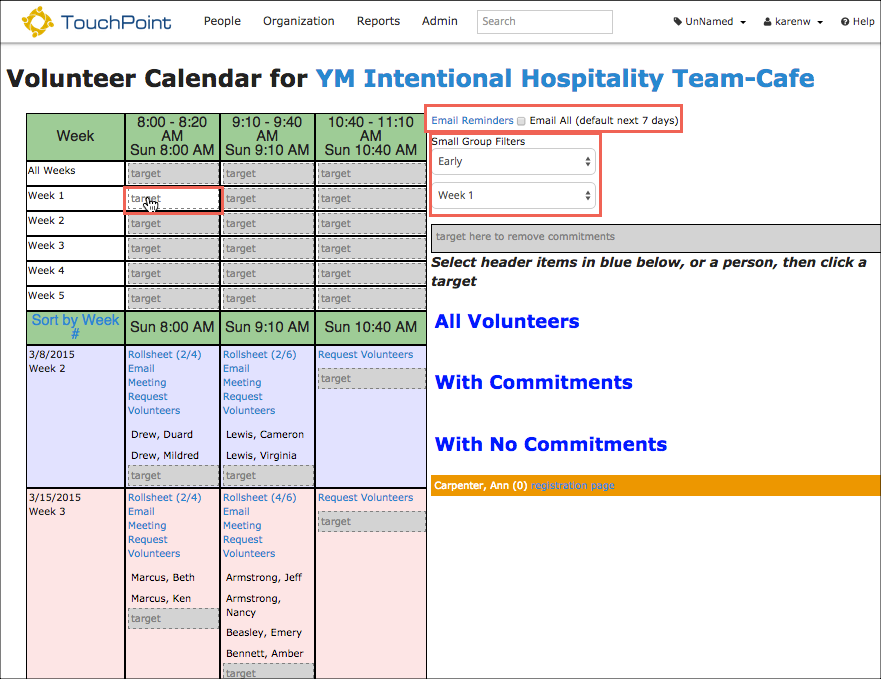
After people have registered online, go to the Volunteer Calendar, use the Small Group Filters. Find those who selected Week 1 and the first time slot. Select everyone, and add them to that Target area on the calendar. Continue filtering for the appropriate sub-groups and placing people on the calendar until everyone has been placed.
Then send the Email Reminders, checking Email All.
Calendar
See also
Tip
Using Method 2, you could post a link for that registration on your website. Then, as people register, you could move them to the calendar as needed.
Member Type - VIP or Volunteer
You may want to change the Member Type of all your volunteers from Member to either VIP or Volunteer. With one of these Member Types, a person’s attendance in another class that meets at the same time will be recorded as a Volunteer. The Attendance String will have a V and the Attend Type will be Volunteer. This lets the leader of the other class know that this member was serving elsewhere at the time of their meeting.
See also
You can easily change the Member Type for everyone (except your Leaders) and one time.
See also
Latest Update |
11/13/2020 |
Modify image link with secure protocol.