Batch Update Involvement Settings
TouchPoint has a batch action that allows you to export Involvements to Excel, edit certain items in the spreadsheet, and then import the spreadsheet to update the Involvements.
You can also use this update to add sub-groups to Involvements. See below.
Note
Anyone with the Edit role can generate and edit the export. However, only the user with the Admin role can perform the batch update.
The settings will be exported along with the name of the Involvement and of course the Involvement Id #. See below for the list of fields (columns) that can be updated using this method.
Tip
If you are not familiar with the meanings of all the terms / fields that are in the spreadsheet, you can select Show Help when you are viewing tabs on an Involvement. Also, you will want to review our help articles, especially those in the Involvement Settings Tab section in the article listed below.
See also
To Update Involvements
- Step 1
Go to Involvements > Search and use the filters to find the Involvements you want to update.
Click the blue Search button after applying the filters.
- Step 2
Click the Blue Toolbar > Cloud Icon > Export Excel > Export Involvements.
See also
- Step 3
Edit the Excel file, noting the list below of the columns that can be updated and the text that should be used when updating.
- Step 4
Remove any columns you are not updating except for the InvID column.
Then, copy the columns that you have changed, including the header.
Important
Do NOT remove the InvID column or the Header row.
Tip
If you are editing the spreadsheet, but are not the System Admin; make your changes, save the spreadsheet, and email it to your System Administrator to perform the Batch Update.
- Step 5
Go to Admin > Involvements > Update Involvements.
- Step 6
Paste what you have copied into the empty text box and click Submit.
Note
Only the items listed below can be edited using this update. Some of the drop down type items require the ID #, and that is indicated below. For those using an ID #, 0 equals NULL or Not Specified. You can find these ID#s in Admin > Advanced > Lookup Codes. When the field is a date use this format: 1/1/2015. When it is a Schedule use this format: Sun 8:00 AM.
The fields/columns that can be updated
These are in the order in which they appear in the spreadsheet.
- Name
actual Involvement name, such as Young Married Class
- Description
actual value, should be a short paragraph about the Involvement
- First Meeting
date
- Last Meeting
date
- Schedule
works when there is only one schedule on the Involvement
- Campus
ID #
- Location
actual value, such as W220
- Reg Start
date
- Reg End
date
- Can Self Check-In
TRUE or FALSE
- Roll Sheet Visitor Wks
integer
- Limit
integer
- LimitToRole
actual role name, or none to clear
- Birth Day Start
date
- Birth Day End
date
- Gender
Male or Female
- Grade Age Start
integer for a single grade, not a grade range
- Last Day Before Extra
date
- No Security Label
TRUE or FALSE
- Num Check-In Labels
integer
- Num Worker Check-In Labels
integer
- Phone Number
actual value, such as 9013472000
- Main Fellowship Involvement
TRUE or FALSE
- Entry Point
ID #
- Leader Type
ID #
- Involvement Status
ID # - 30 for Active; 40 for Inactive
- Use Register Link2
TRUE or FALSE
- Send an attendance link to leaders at the start of a Meeting
TRUE or FALSE
- Does not meet weekly
TRUE or FALSE
- Allow Attendance Overlap
TRUE or FALSE
- Use Directory
TRUE or FALSE
- Registration Type
ID #
- Filter Attendance Roster by subgroup
TRUE or FALSE
- Absents Threshold
integer
- Include in Mobile App
TRUE or FALSE
- ShowInSites
TRUE or FALSE
- ShowRegistrantsInMobile
TRUE or FALSE
- ShowMobileRegStart
date
- ShowMobileRegEnd
date
- CategoryMobile
ID # or description
- LocationMobile
description
- RegistrationMobile
description
- ShowMobileButtonText
actual value
- ShowReleaseTickets
TRUE or FALSE
- ShowTransferTickets
TRUE or FALSE
- OnLineCatalogSort
integer
- PublicSortOrder
actual value
- GradeLevel
ID #
- MobileChannelEnabled
TRUE or FALSE
- MobileChannelPrivate
TRUE or FALSE
- MobileEventsEnabled
TRUE or FALSE
- MobileChatEnabled
TRUE or FALSE
- MobileChatPrivate
TRUE or FALSE
- NotReqCampus
TRUE or FALSE
- NotReqMarital
TRUE or FALSE
- NotReqGender
TRUE or FALSE
- NotReqPhone
TRUE or FALSE
- NotReqZip
TRUE or FALSE
- NotReqAddr
TRUE or FALSE
- NotReqDOB
TRUE or FALSE
- NoReqBirthYear
TRUE or FALSE
- Extra values
will match the type of the extra value
Remember, there are other columns in the Excel export, but they cannot be updated using the batch process unless they are listed above.
Add Sub-Groups Using Batch Update
If you need to add the same sub-groups to multiple Involvements, you can do that using the batch update process.
Use Case
You want to track memory verses for all the children enrolled in Life Groups from 4 yrs old through 5th grade by using sub-groups in those existing Involvements. But that means that you need to create a lot of the same sub-groups in a lot of Involvements. This batch process will make it very easy for you. Use your imagination to set up groups that will give you what you need without creating too many groups. For example: one sub-group for every 10 verses a child memorizes, instead of one sub-group for every verse.
- Step 1
Follow Steps 1 & 2 above to get the export.
- Step 2
Add a column in the Excel spreadsheet named SubGroups.
Note
Make sure the new column is somewhere to the right of the column with the Involvement ID#.
- Step 3
Enter the list of new sub-groups (separated by a comma) in the SubGroups column for the Involvement at the top of the list.
- Step 4
Copy the cell containing the sub-groups and paste the content in the SubGroups column for all Involvements in the spreadsheet.
- Step 5
Complete Steps 5 & 6 above to import the spreadsheet.
The result will be that the same sub-groups will be added to every Involvement listed in the spreadsheet. If an Involvement already has a sub-group with the same name, a new group will not be created.
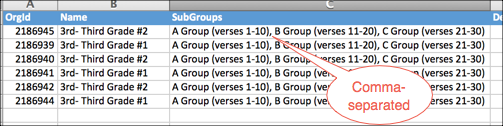
Sample Spreadsheet with Sub-Groups
Latest Update |
06/12/2026 |
Added LimitToRole and other missing fields, corrected field names to match code