GoDEX Printer Configuration for Check-In (DT200)
Before you use Check-In for the first time, you will need to configure your printer settings for the size labels you are using. Depending on your computer, these screenshots may appear a bit different for you, but the settings should be basically the same.
- Step 1
Insert the labels into the printer. The labels roll over the top of the roll, not under.
- Step 2
Calibrate the printer. See a video explanation here: https://www.youtube.com/watch?v=K5rANXdtgc4
Power OFF the printer.
While keeping the FEED button pressed, tap and release the POWER button to turn the unit on.
When the printer beeps, release the FEED button.
The printer will now measure the label stock and store the label height.
Once the printer has successfully measured the label stock, it will print a self-test label.
On the back bottom left of the printer, there is a small “C-Button”. While the power is on, hold down this button for 3 seconds. The printer will then perform a calibration on the labels and send out several blank labels.
- Step 3
Plug the printer into your Windows 10/11 device via the provided USB cable. It will auto-recognize and load the driver.
- Step 4
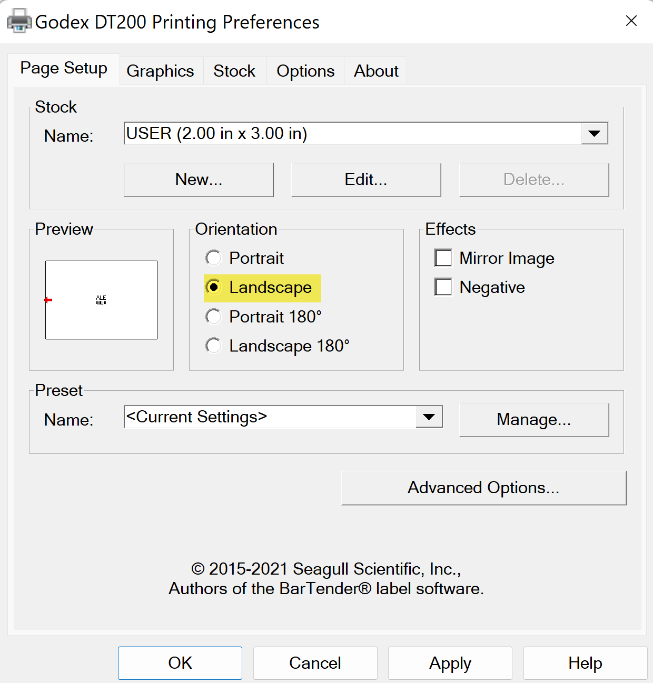
Go to Windows Settings > Printers > GoDex DT200 > Printing Preferences > Page Setup and set the Orientation to LANDSCAPE.
- Step 5
Go to Windows Settings > Printers > GoDex DT200 > Printer Properties.
Give the printer a unique name.
Place a sticker on the bottom of the printer with its name so it is identifiable. (Each printer has a unique ID and is recognized as printer uniquely, even if it’s the same model.)
- Step 6
Install and set up the Print Server for Check-In.
- Step 7
Reboot the computer.
Purchase Information
GoDex DT200 Printer:
Laser Toner & Computer Supply
Richard
800-900-LASER
$333
GoDex DT200 2x3” labels:
Prime Labels
972-487-6064
840/roll @ $9.50 (20295 2” X 3” RCR, WHITE on TC Direct Thermal Perm, on 1”cores) (1.1¢ per label)
See also
Latest Update |
7/11/2024 |
Added link to Troubleshooting article