
Configuring the MCP Server
Important
Beta Feature — MCP Server (AI Access) is currently in beta and is being rolled out to databases over the coming weeks. It may not be available in your database yet, and the details on this page may still change during the beta. See MCP Server (AI Access).
Everything an administrator needs in order to turn on AI access, decide what AI agents are allowed to do, and control who can connect lives on one page: MCP Server (AI Access). You must have the Admin role to open it.
To get there, go to Admin > Advanced > AI Features > MCP Access.
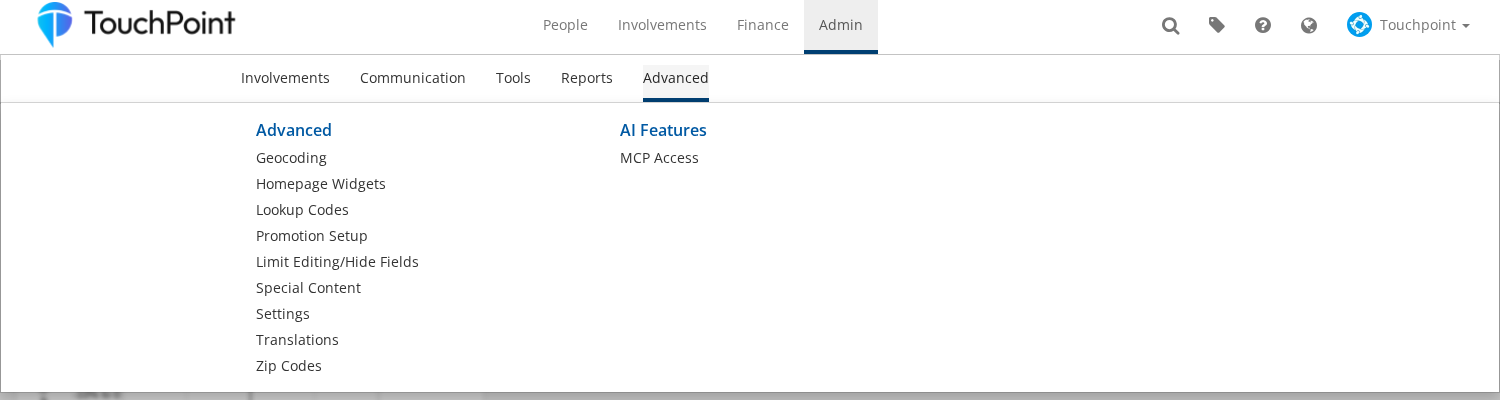
The MCP Access link in the Admin menu
Note
If you do not see the AI Features section in the Admin menu, the AI Features have not
been turned on for your database yet. This is controlled by the SupportMcpFeatures
setting, which TouchPoint Support enables for you on request. Until it is on, the menu
section is hidden and the three MCP roles do not appear on the user-edit screen.
Enabling the Server
The top of the page shows whether the MCP server is currently enabled for your church, along with the endpoint URL your staff will use in their AI clients.
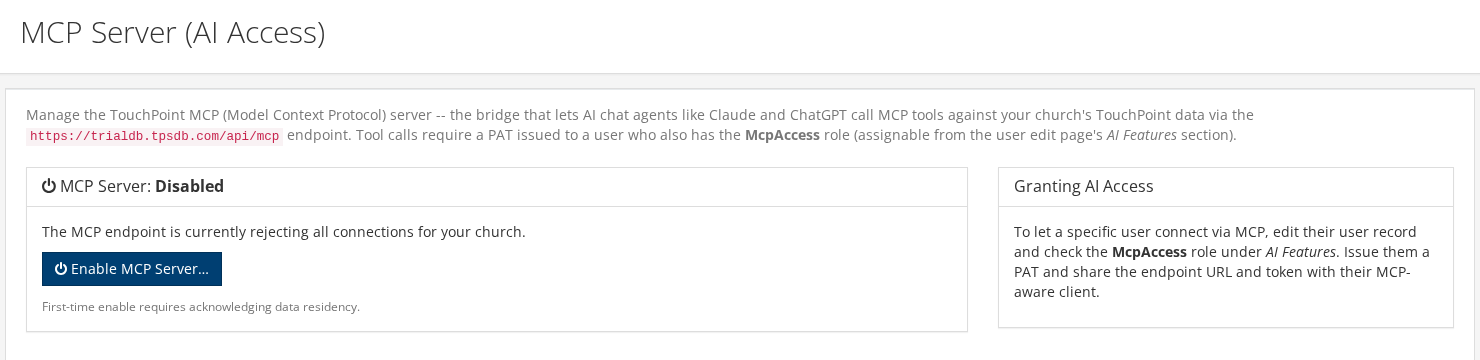
The MCP server status panel, with the server disabled
The first time you enable the server, TouchPoint asks you to acknowledge how data is handled once it leaves TouchPoint for an AI provider. Click Enable MCP Server, read the disclosure, check the acknowledgement box, and click Acknowledge & Enable.
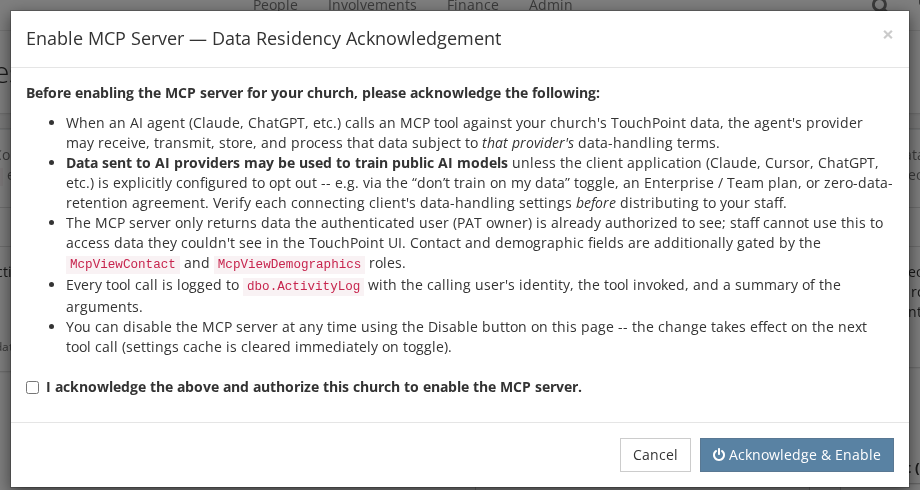
The one-time data residency acknowledgement
You can disable the server at any time with the Disable MCP Server button. The change takes effect on the very next tool call — no restart or waiting period. Disabling does not erase the acknowledgement, so if you enable it again later you will not be asked to acknowledge a second time.
Important
Disabling the MCP server does not revoke the Personal Access Tokens your staff created. It
stops all MCP connections, but those tokens still work for the Rest API. If you need to cut
off a specific person entirely, remove their McpAccess role and revoke their tokens.
Operational Settings
The Operational Settings section controls what MCP agents are allowed to do and how much data they may pull at once. Click Save Settings after making changes; they take effect immediately.

The operational settings for MCP tool calls
Allow Write Actions
Off by default. When it is off, MCP agents can only read data — every tool that would create or change something is refused. When you check it (and the server is enabled), agents may also:
add and complete tasks
log call, message, and email touchpoints
create and update Special Content (HTML, email templates, SQL and Python scripts)
add, update, and find-or-create people, and update family records
add and drop involvement members, and change a member’s member type
Each of those writes is still gated by the appropriate role on the user the agent is acting as, and each one is audit-logged. We recommend leaving this off at first, reviewing the activity log to confirm the read tools behave the way you expect, and then turning it on.
Max Results Per Tool Call
The default page size for list and search tools. A hard ceiling of 500 is enforced regardless of what you enter here. Lower values keep responses small and focused, which is usually better for an AI agent; higher values mean fewer follow-up calls when your staff work with large lists.
Rate Limit (Calls / Min)
The maximum number of MCP tool calls one token may make per minute. This is a safety valve against a runaway agent looping on a tool.
Granting a User Access
Granting the MCP roles is done from the person’s user account, not from the MCP page. Go to the person’s record, choose the System tab, and open their user account. In the Roles section you will find an AI Features group.
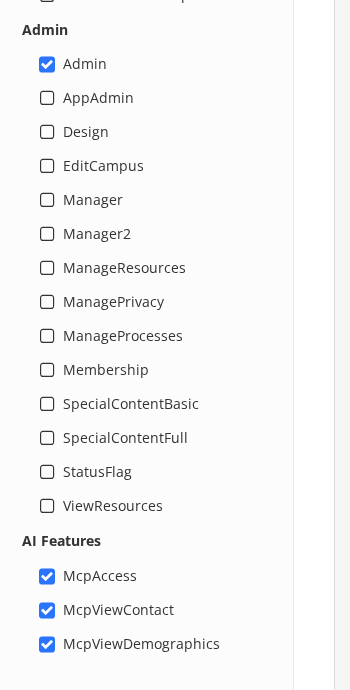
The AI Features roles on the user-edit screen
McpAccess
Required. Without it, the user’s Personal Access Tokens are rejected by the MCP endpoint even when the server is enabled.
McpViewContact
Un-masks phone numbers, email addresses, and mailing and family addresses in MCP responses.
McpViewDemographics
Un-masks date of birth, age, gender, marital status, family position, and similar fields.
Without the two de-masking roles, those fields still come back — but with the value
[redacted]. Names and identifying fields such as the person’s ID are always visible to anyone
with McpAccess. This lets you give a staff member useful AI access without handing an AI
provider your congregation’s contact information.
Managing MCP Users
The MCP Users section at the bottom of the MCP Server page lists every user who currently holds
the McpAccess role, so you can see at a glance who is able to connect. The two check-box
columns let you grant or revoke the de-masking roles without leaving the page; each change saves
as soon as you click it.

Users with MCP access and their de-masking roles
To add someone to this list, or to remove their MCP access entirely, edit their user account as described above.
Reviewing What the AI Agents Did
Every MCP tool call is recorded in the activity log with the tool name, the user it ran as, the person it touched (when applicable), and a summary of the arguments. Failed attempts are logged too, so a blocked write still leaves a trail.
To review the log, go to Admin > Tools > Activity > Activity Log and enter MCP: in the
Activity filter — every MCP entry is named MCP:<tool_name>, such as MCP:find_person or
MCP:add_task_note. You can also go straight to the filtered view with the URL
/LastActivity?activity=MCP:.
See also