Email Drafts
When preparing to send an email, you have the option to Save as a Draft. These are the following options available relating to Drafts:
Creating and saving a Draft before sending an email
Editing and/or Sending a Saved Draft
Sharing Drafts
Create and Save a Draft
- Step 1
Go to your People Record. On the Blue Toolbar, click the Email icon > Create/Edit Saved Draft.
Note
You can actually create a new draft or edit an existing one by selecting that option (Create/Edit Saved Draft) from anywhere that you see the Blue Toolbar.
- Step 2
Select the appropriate Template, and compose your email, including the subject.
See also
- Step 3
Click the Save as Draft button at the bottom of the email draft.
- Step 4
Enter the name of the Draft and click Submit.
Note
Only for new drafts do you enter the name. When saving edits to an existing draft, the draft will be saved with the original name (followed by a version number if UseEmailDraftVersioning is set to true). See the section Multiple Versions of Saved Drafts below.
At this point, you can click Send Test Email (to me), which will send to yourself, or you can leave the page. The draft will be saved. You can continue to return and edit the draft until you are ready to send it.
Note
Depending on the links included in the draft, the links may not work in a Test Email, especially if they are authenticated Special Links. For best testing of Special Links, consider sending a real email to yourself rather than a test one.
Saving Draft after Finding Target Audience
If you find your target audience, select a saved draft, make changes to that draft, and then click Save Current Draft, the recipient list will be removed and you will see the count change to 0. At this point, if you send the email it will go only to you. This is to keep you from making edits and accidentally sending your email to your list before you are ready.
Edit a Saved Draft
Any user with the Access role can access saved drafts or create a new one by going to their profile and selecting the Blue Toolbar > Envelope Icon > Email > Create/Edit Draft. They can also access Team Drafts based on the permissions for the template that was used (more on that below). A user with the Admin or EmailTemplates role can navigate to Admin > Communication > Email Templates and select the Saved Drafts tab. They will see any Saved Drafts that have been saved by any user.
We display the following information for personal Saved Drafts:
Name of the draft
Role indicating which users can use this draft. Other users will see the draft in their Team Draft folder if they also have the role assigned to the original template.
Created date
Option to clone the draft
You can also check boxes next to drafts and opt to delete drafts.
When an Admin is viewing drafts under Admin > Communication > Email Templates, they will also see the owner of the draft. They can opt to delete a draft but cannot clone a draft from this view.
Multiple Versions of Saved Drafts
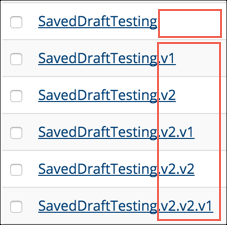
If you save a draft multiples times, you might need to revert to an earlier version, so TouchPoint will save those versions for you when you have the administration setting UseEmailDraftVersioning set to True. You, of course, name your draft the first time you save it, and open that the next time you want to edit it. When you save that version, it will be named [name of draft]v.1. Your original will be named just [name of draft] without a version number. If you always select the latest version, the numbering will look something like the image below.
This allows you to select any version you want in case you want to revert to an earlier version.
Multiple Versions of the Same Draft
Send a Saved Draft
- Step 1
Go to your recipient list - that is, the Involvement, Tag, or Search Results to whom you want to send the email, and select the Blue Toolbar > Email Icon > Individuals or one of the other options offered.
- Step 2
Click My Drafts tab on the Select Template page, and then click on the draft you want to send.
Note
Saved Drafts will be listed on either the My Drafts, Team Drafts, or Shared tabs.
- Step 3
Verify that your email message is complete, and then note the following options/actions:
Click Save Current Draft.
If you do not want to send the email, this will save the changes to your draft and you can repeat steps above when you are ready to edit it again or send it.
Click Send Test (to me).
This will send a test to you for proofing. Close the Test Email Sent box to continue. At that point, you can select one of the other options, either Save Current Draft or Send. You can use the test email as often as needed to view your email as your recipient will see it.
Click Send.
This will send the email to your recipient list. By default, the draft will be saved, until you go to Create/Edit Saved Draft and delete it.