Emailing Files, Images (Pictures), or Videos
Instead of sending attachments, TouchPoint uses HTML email to allow you to upload a picture, video, a PDF, an mp3 audio file - whatever you want - and then insert a link to it in your email. By using this method, the email message is small, because a link is sent rather than the actual picture, video, or PDF.
See also
Why send links instead of attachments?
When sending a mass email with large attachments, each recipient gets an email with the entire attachment. Let’s say that you send a really cool looking, large picture to 500 people. Because TouchPoint sends each person their own message, that large picture would be duplicated 500 times! This would cause problems on our email server, not to mention all the extra storage and traffic! Using our method, only one copy is saved on our server. And the download does not happen until your recipient opens the email or click the link.
Important Caveats
- Do not use special characters.
You will be uploading a file located on your own computer. Please name the file so that it does not contain any spaces, or special punctuation marks such as apostrophes, quotes, parentheses, commas, or slashes. The only special characters that you can use are underscores, dashes, and periods. The web server is not as flexible on file naming conventions as your personal computer.
- Do not use extremely large images.
You should resize your image first before you upload it, because it will be displayed using the full image resolution. Many digital cameras take pictures that are HUGE! That’s great when you are looking at it on your computer, but you don’t want it to display that big in an email. Therefore, you need to resize the image using whatever software you have on your computer.
You can use the online resizer tool at https://www.picresize.com/ in case you have no other way to change the size. It handles both resizing and cropping. This online re-sizer is not that good for resizing several pictures, but for a few (1-4) at a time, it is quite useful.
Instructions for Using Email Builder
Images (if they are not too large, i.e., greater than 32MB) can be embedded in the email. Files can be uploaded to our servers and linked to in the email. The same size limit applies when uploading a file to our servers - it must not be larger than 32MB.
- To send a picture
One of the content types in the editor is Image. Drag the Image icon to the desired location in your email.
Click on the newly-created Image area to pull up the Image properties in the right panel.
Click the Upload Image button and select the image file from your computer, OR enter the Image URL of an image stored on a server.
- To send a video
One of the content types in the editor is Image. Drag the Image icon to the desired location in your email.
Click on the newly-created Image area to pull up the Image properties in the right panel.
Click the Upload Image button and select the image file from your computer.
Enter the URL of the video in the Image URL field.
Note
Many email clients to not support embedded video, so we recommend using a static image/thumbnail of the video and linking to the video itself on YouTube, Vimeo, or some other video hosting provider. This ensures that every email client that can display images will provide access to the video.
- To send a file (such as a pdf, doc, or mp4)
Click the Upload File button at the top of the editor window.
Click the Choose File button and select the file from your computer.
Click the Submit button. When the file has been uploaded, its URL will be entered in the dialog box. Click the Copy and Close button, then paste the URL as the link for the desired text, button, or image in your email.
Instructions for Using the Older Editor
Note: See the previous section if you are using the mobile-responsive Email Builder.
Note the two icons highlighted below, one for creating a link to upload a file (red balloon) and the other for embedding an image (blue balloon).

Email Toolbar
- To send a picture
Place the cursor in the body of the email where the image will go.
Then click the Image icon on the toolbar (blue balloon is pointing to it).
Click the Upload tab and then click the Choose File button.
Browse to the image file on your computer and click Open.
Click the Send it to the Server button.
Click the green OK button and your image is displayed.
- To send a video
Place the cursor in the body of the email where the image will go.
Click the Image icon on the toolbar (blue balloon is pointing to it).
Click the Upload tab and then click the Choose File button.
Browse to the image file on your computer and click Open.
Click the Send it to the Server button.
Click the Link tab and enter the link to the video in the URL field.
Click the green OK button and your image is displayed, with a link to the video.
Note
Many email clients to not support embedded video, so we recommend using a static image/thumbnail of the video and linking to the video itself on YouTube, Vimeo, or some other video hosting provider. This ensures that every email client that can display images will provide access to the video.
- To send a file (such as a pdf, doc or mp4)
Select/highlight the text in your email that will be the hyperlink you want the recipient to click on.
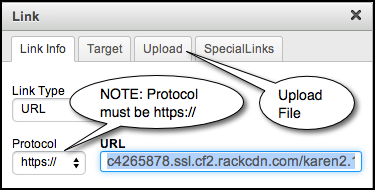
Click the Hyperlink icon (red balloon is pointing to it).
Click the Upload tab and then click the Choose File button.
Browse to the image file on your computer and click Open.
Click the Send it to the Server button.
Click the green OK button and your link is displayed.
Important
The Protocol should be https://
Latest Update |
9/5/2023 |
Add instructions for sending videos