Create a Meeting (legacy)
Note
This article outlines creating legacy meetings in Involvements.
For specific details on legacy meeting pages:
See also
If your church is using the Rooms & Reservations Calendar (additional set up required), see the following articles.
How to Create a Meeting for One Involvement
- Step 1
Go to the Involvement > Meetings tab.
- Step 2
Click Create New Meeting button and enter or select the following:
Select the Schedule. If you have only one Schedule on the Involvement, it will display. If the Involvement does not have a Schedule, you will not need to select one. Just continue below.
Select Date and Time using the calendar date picker.
The Attend Credit will automatically be set based on the Schedule you selected, if you have multiple schedules. If you have only one Schedule or no Schedule, select Every Meeting.
Only check the Group Meeting box if you are entering only a headcount instead of entering individual attendance.
Click OK
This will open the meeting page, where you can record attendance.
See also
How to Create Meetings for Multiple Involvements
You can use this method for Involvements that do not have Schedules or for which you need ad hoc meetings on a different day / time than the schedule.
- Step 1
Go to Involvements > Manage > Search
- Step 2
Select the Program and Division. Add any other filters needed to display only those Involvements for which you want to create a meeting on the same date and time.
- Step 3
Select Create Meetings from the Gear Icon on the Blue Toolbar.
Select the Meeting Date and Time.
Click the Create button.
Note
There is a checkbox for No Absentee Records. Normally, you will not want to check this box. Check it only if you are creating ad hoc meetings, and do not want a member’s absence to be counted in his attendance percentage.
This will open an Attendance Detail page displaying all the Involvements for which you created a meeting.
If you are creating meetings for something such as Vacation Bible School, you can repeat the process and create the meetings for each of the other days of the week that you will meet.
To Change the Date of a Meeting
If you happen to create a meeting with an incorrect date and/or time, and you have not yet recorded any attendance, just delete the meeting. If you have recorded attendance, your TouchPoint Admin can correct the date/time for you.
- Step 1
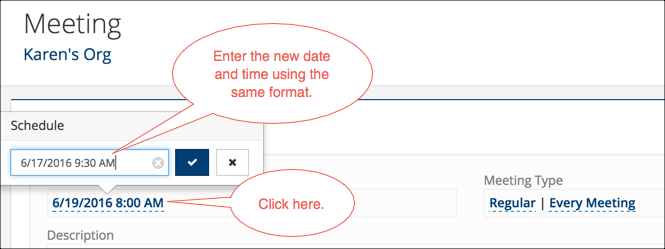
Go to the Involvement and click the Meetings tab and then click the date of the meeting that needs to be changed.
- Step 2
Click on the Pencil Icon next to the Meeting dropdown menu. This will be under the name of the Involvement.
- Step 3
Enter the correct date/time, making sure you use the same format. Example: 11/4/2025 11:00 AM
Click OK.
Note
If the meeting has any Other Attends associated with it, those Other Attends will still remain, even though the meeting for that date/time no longer exists. If those Other Attends are important to you, just delete the meeting and start over.
Facts about Meetings
If you are using a bar code scanner for recording attendance using printed roll sheets, you do not need to create the meeting. Scanning the meeting bar code at the time you are ready to record attendance creates the meeting.
See also
Exception - VBS and other Registrations
For events such as Vacation Bible School, if you want Involvements to display for Check-In so that you can register guests who have not pre-registered, you will need to create the meetings ahead of time. If you do not create the meetings, the Involvements will not display as available for Check-In. See link below to read tips about VBS.
See also
You can create ad hoc meetings for Involvements without regular weekly meetings and record individual or headcount/group attendance.
You can create meetings individually, one Involvement at a time, or you can create the meetings for multiple Involvements at the same time.
If you plan to use Check-In and the Involvement does not have a weekly schedule, you must create the meeting before the event in order for it to display in TouchPoint Check-In.
If you are entering headcounts only, you will always create the meeting at the time you are ready to record the headcount and the guests.
Unless your database has the setting to disable this feature, you can add a headcount after entering individual attendance to count those who were not marked present. Otherwise, you must change the meeting type to headcount and then enter the total count.
See also
Administrative Settings - Regular Meeting Headcount
Latest Update |
10/15/2025 |
Clarified legacy versus new meeting pages