Promotion Setup
Be sure to review the steps for Annual Promotion before proceeding with Promotion Setup.
See also
Your system administrator—that is, the user with the Admin role—must set up your Promotion structure/grid. This is a one-time setup that will be used year after year. If your Involvement structure changes, you can change the setup.
The setup will basically be a grid with the following information.
- Sort
The Sort is used to determine the order in which the Promotion levels/groups appear in the setup. It is helpful visually to have them sort from youngest to oldest classes, or vice versa.
- Description
Describe the action of that Promotion level. Example: 3 Yr. Olds to 4 Yr. Olds; or 11th Grade to 12th Grade.
- From Division
This is the Division from which you are promoting the individuals.
- To Division
This is the Division into which you are promoting the individuals.
Video Demonstration
Link coming soon.
Create Promotion Structure
- Step 1
Go to Admin > Advanced > Promotion.
Click the + Add Promotion button. This will create a promotion group at the top of the list. All the fields will say empty.
Tip
If you prefer, you can continue clicking +Add Promotion before you proceed to Step 2, until you have created as many promotion levels/groups as you will need. Then follow the instructions below to add the details.
From the dropdown menu, select the Program for which you want to setup promotion - Example: Bible Fellowship or Life Groups.
By selecting the Program, you are filtering which Divisions will display in the From Division and To Division dropdowns.
Most churches promote only their Sunday School classes, but you can promote Children’s Choir or other groups. You just need to set up separate Promotion Types for them.
- Step 2
Enter the necessary information as follows for each promotion level/group, and click the blue check mark to save changes.
Click inside the Sort field and enter either 1 or an A to indicate the sort order.
You can use numbers (1,2,3,etc.) or letters (A,B,C,etc.).
If you have multiple Campuses that will all use Annual Promotion, you will need a separate setup for each Campus. In order to distinguish the different Promotion Setups, you will want to include the name of the Campus (or a code) as part of the Sort name.
Example: Main-A; Main-B; etc. and North-A; North-B; etc.
Click inside the Description and describe the group you are promoting. Example: 1st Grade to 2nd Grade
Click inside the From Division and select the current Division for the first age group.
Click inside the To Division and select the Division for the classes into which you are promoting those classes
Note
Some churches will have a Preschool Division that includes Birth - 5 yr olds while others may have a Division for each age group, such as Bed Babies; 1 Yr Olds; etc. Just remember that if both age groups are in the same Division, select that same Division for the From and the To Division.
- Step 3
Click the +Add Promotion button again.
Proceed as you did in Step 2.
Repeat until you have a promotion level/group for all age groups.
Note
Each time you click +Add Promotion, a new line will be added above the previous line. You will refresh your browser page when you are finished to get them sorted in the correct order.
- Step 4
Proceed to Admin > Involvements > Promotion to manage the students. See below article for instructions on this step.
This step can be done by those with the Admin or ManageOrgMembers user role.
See also
To give you an idea of possible scenarios, we have some screenshots from Excel below as well as a sample Promotion Setup page. Your setup will depend on how you have your Involvements arranged in Divisions.

Example 1 Using 3 Divisions
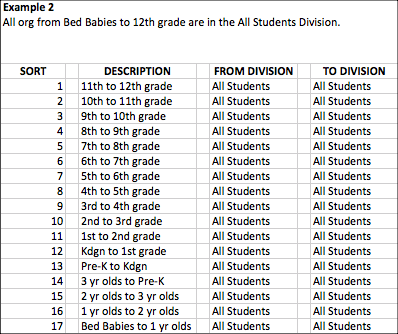
Example 2 Using 1 Division
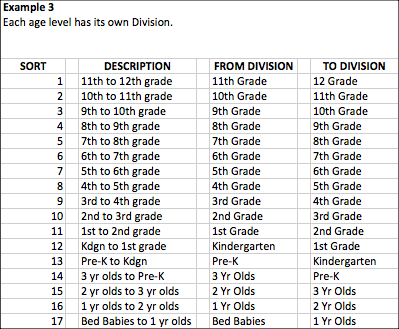
Example 3 Using 1 Division per Age level
This is a sample Promotion Setup Page with three different groups. The top group is for Worship Care, next is for a smaller Campus, and following those is the setup for the main Campus. You will notice that we have a set up for moving some children from their existing class into another class in the same age group - 4 yo to 4 yo, for example.
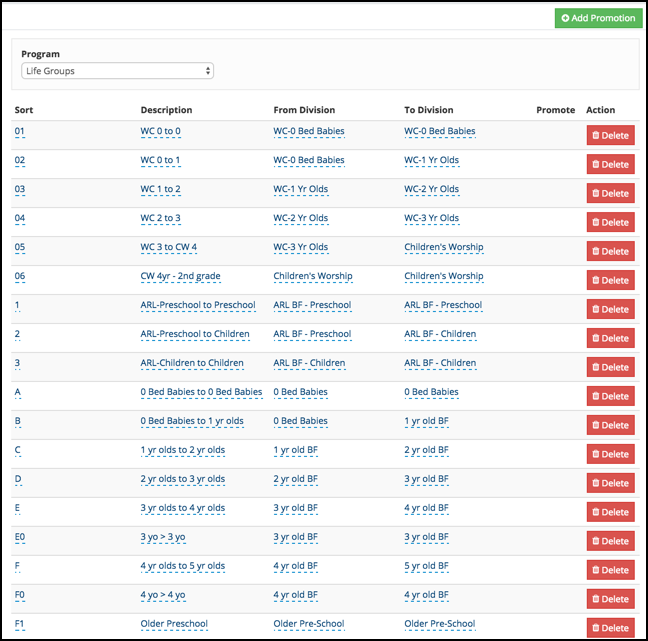
Sample Promotion Setup Page
When done with Promotion Setup, refer to the Annual Promotion article for the next step or proceed to Promotion Prep.
See also
Latest Update |
06/18/2025 |
Updated Organizations to Involvements, added article links