My Tickets Customization
This article provides additional guidance on creating a custom My Tickets page. Using TouchPoint Ticketing is a pre-requisite.
How to Customize the Ticket
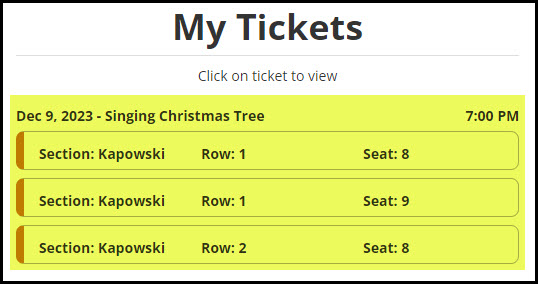
There are two files that control the look of the online Ticketing tickets: JSON and CSS files. The default file containing the fields included in the main My Tickets Page and the header of each ticket (highlighted in the screenshot below) and the QR code on each ticket is found under Administration > Advanced > Special Content > Text called MyTicketsOptions.json.
This is the file that will control ALL ticketing involvements globally. If you don’t have this file, you can create the file under Special Content > Text, call it MyTicketsOptions.json, and paste in the following code:
{ dateFormat: "MMM D, yy", showQR: true, qrCode: "https://my-QR-code-image.url", showRow: true, showSection: true, showSeat: true, showTime: true}
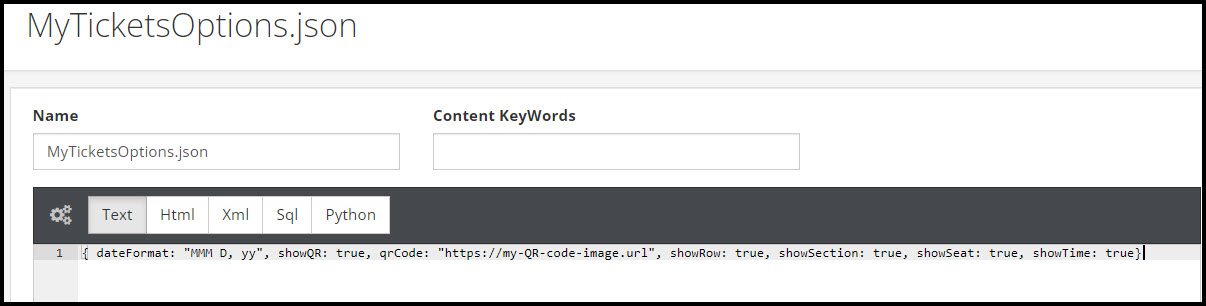
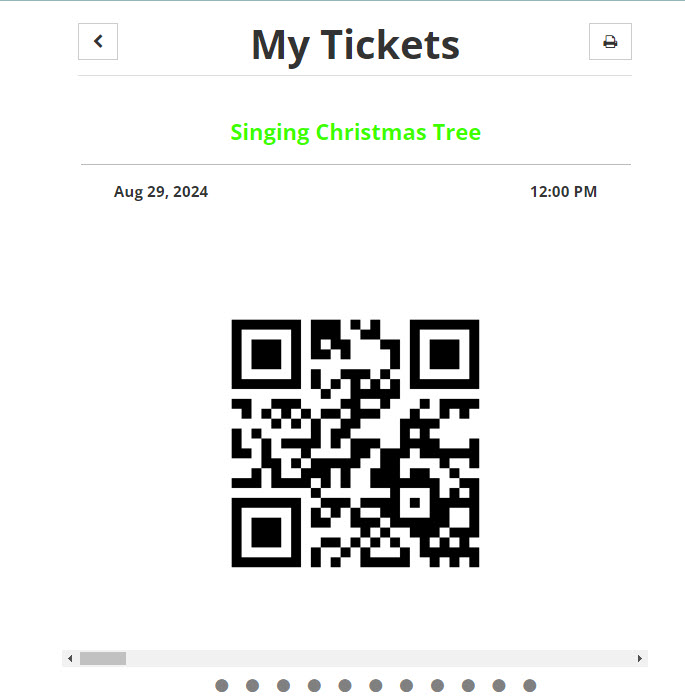
To hide a field, change True to False in the code and click Save Content. When showQR: True, a QR code will show on each ticket. When showQR: False, the image represented by the URL following “qrCode:” will appear instead of a QR code. Below is an image of ticket when showQR: true:
Note
This process will only control the online My Tickets page, not the ticket as represented within an email if you are still the {seatingtickets} replacement code (which we no longer recommend).
You can create custom JSON per Involvement by creating an Ad Hoc Multi Line Extra Value called MyTicketsOptions. For the EV value, paste in the code from the global JSON file with any changes you wish to make for that Involvement.
The colors and image on the main My Tickets page are controlled by the MyTicketsOptions.css file found at Admin > Advanced > Special Content > Text.
If you don’t have this file, you can add the Text file and be sure to call it MyTicketsOptions.css. This file and any other versions you create with the starter code options provided below will also need to be given the keyword ticketdesign to be recognized by the Ticket Design dropdown in the Involvement.
As our Support Team can’t provide CSS assistance, you would need to use your in-house staff with CSS knowledge to customize the page beyond what we provide below. These are some of the most common attributes that you may want to customize. NOTE: You can use the color name or its HEX code.
Colors:
Change the My Tickets Title Color:
h1 {
    color: blue;
}
Change the Event Name (which reflects the Involvement name):
.order > div > label,
.title-container > label {
    color: blue;
}
Change the Background Color of the Event Name:
.order > div:has(>label) {
    background-color: yellow;
}
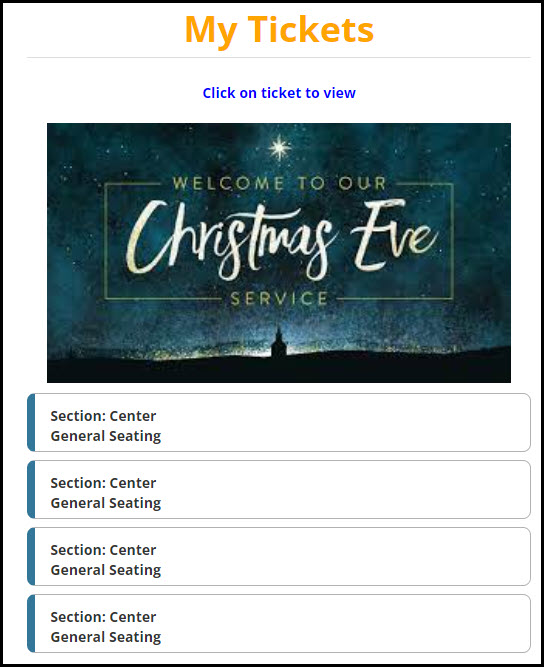
Add an Image in place of the Event Name:
.order > div:has(>label) {
    background-image: url(https://c4265878.ssl.cf2.rackcdn.com/pr3197.2310241425.Christmas_Eve_Service.jpg);
    background-position: bottom center;
    background-size: contain;
    background-repeat: no-repeat;
    height: 260px;
    margin-bottom: 10px;
}
.order > div > label {
    color: transparent;
}
Change the left border color on list view of ticket page:
.my-tickets .seat {
    border-left-color:  blue;
}
Change the color of the Transfer and Release buttons:
.btn-primary {
    background-color: #c00!important;
}
.btn-primary:active,
.btn-primary:focus,
.btn-primary:hover {
    background-color: #a00!important;
}
Click on Ticket text
Change the color and verbiage of the text at the top that says “Click on ticket to view, transfer or release”:
div.col.text-center:has(label.mt-15.red) {
    color: blue!important;
    font-weight: bold;
    padding-top:15px;
}
div.col.text-center:has(label.mt-15.red):after {
    content: 'Click on ticket to view';
}
label.mt-15.red {
    display: none;
}
General Admission ticket:
Remove the row and seat:
.order .seat > div:nth-child(2):not(:has(label)),
.order .seat > div:nth-child(3):not(:has(label)),
.seat-detail .body-container > div:nth-child(3):not(:has(label:nth-child(2))),
.seat-detail .body-container > div:nth-child(4):not(:has(label:nth-child(2))) {
    visibility: hidden;
}
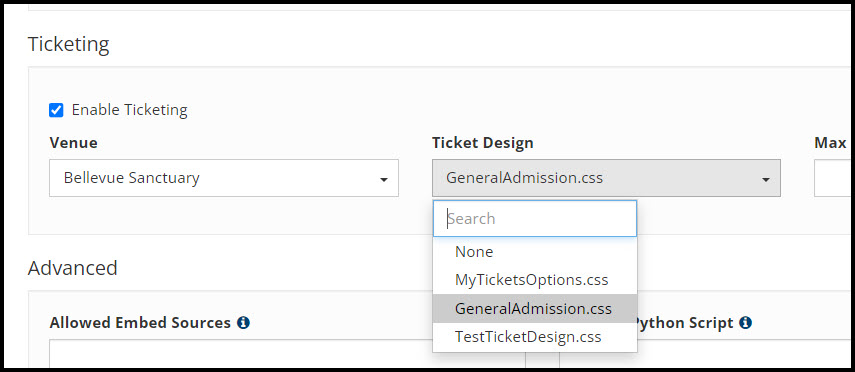
Once you have created or updated your Special Content CSS files and tagged them with the ticketdesign keyword, you will be able to pull that design into your Involvement:
Another option to custom My Tickets page for a specific event/Involvement, you can create an Ad Hoc Multi Line Extra Value in the Involvement called MyTicketsCSS, with the value being the CSS code that you created. Example with image added:
The Extra Value will look similar to this:
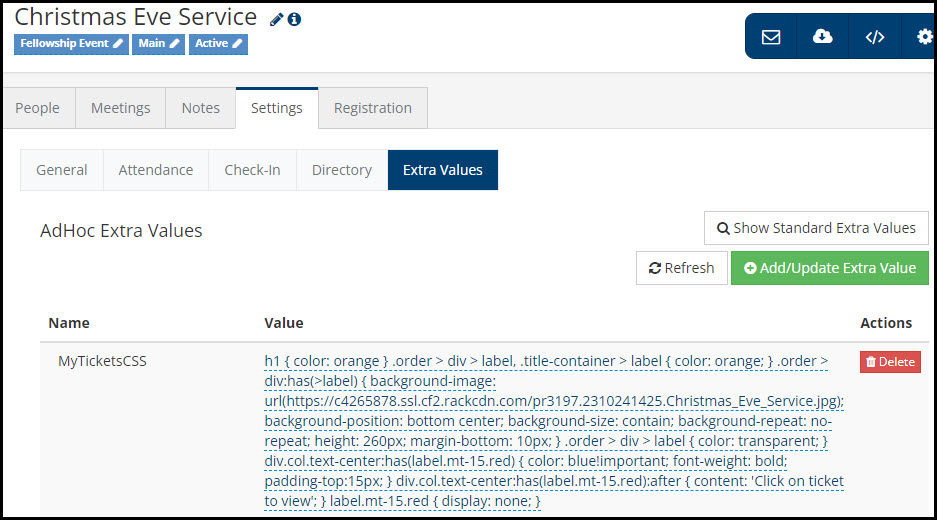
Then in the Ticket Design dropdown, choose “NONE” to use the MyTicketsCSS Extra Value data.
Note
It may be easier to construct all your code at one time and then paste the finished product into the Extra Value field.
See also
Updated |
08/28/2024 |
Added information about updating CSS and JSON files