My Tickets Page
When event attendees register for a Ticketing Involvement, the “Thank You” screen will provide a link to their online My Tickets page, showing their tickets purchased for this registration session.
In the confirmation email of the Involvement, use this replacement code:
{mytickets:1234,Please follow this link to view all your e-tickets.}
This will provide attendees a link to access ALL of their electronic tickets for that Involvement. They can then print their tickets out to bring to the event.
See also
Note
We recommend you use {mytickets:1234,Please follow this link to view all your e-tickets.} replacement code and no longer use {seatingtickets} for a better user experience and flexibility in ticket customizaion.
When the attendee clicks on the link in the confirmation email, they will see a view similar to this:
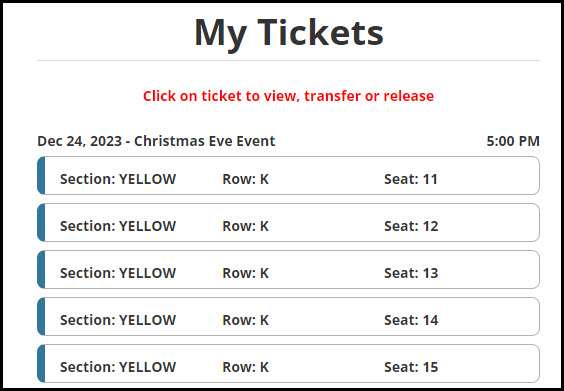
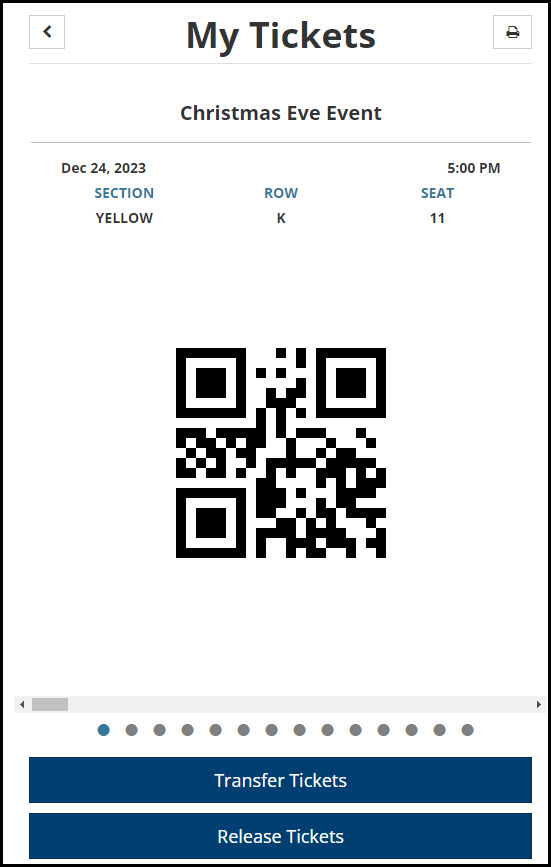
When they click on a ticket, a scroll bar will allow them to access all the tickets for the event. To allow the attendee to Release or Transfer their tickets, turn on the following settings found in the Involvement under Registration > Settings & Fees (in a Registration Form):
Allow Release My Tickets
Allow Transfer My Tickets
Note
At this time only use the Allow Release and Allow Transfer options for a Reserved Seating event, not for General Admission. Someone with the ManageTransactions role who has access to a Ticketing involvement can release a Reserved Seating ticket in the Tickets tab of the Member Dialog for the registrant as well.
When attendees click to Release or Transfer tickets, they will be presented with a list of tickets to select:
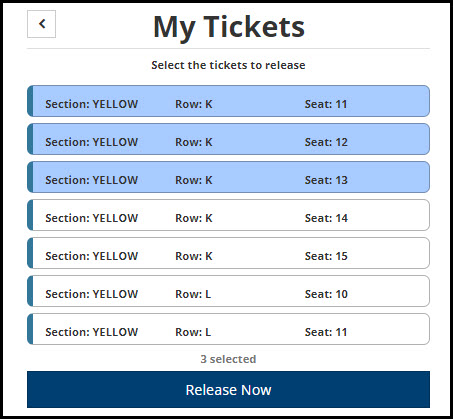
After they click the Release Now button, they will be asked “Are You Sure” and will need to confirm they want to release the ticket(s).
Note
A refund will not be issued if someone releases a ticket. You may want to limit Releasing Tickets to free events.
We recommend you use {mytickets} replacement code in the confirmation email rather than using {canceltickets}. The {canceltickets} will only allow the attendee to cancel ALL tickets, where {mytickets} allows them to choose single tickets for release.
If they want to Transfer the tickets instead, they will need to enter the required fields of First Name, Last Name, and Email Address. If there’s not a matching record in TouchPoint, a new record will be created with an Entry Point of TicketsTransfer.
The person to whom the tickets are transferred will receive an email. The email is found under Admin > Communication > Email Templates and is called Transfer Ticket Template. We recommend you customize this email with your church branding and content. Just make sure to maintain the My Tickets link.
Transfers can be tracked using the Ticket Sales Report, found under Involvements > Reports > Ticket Sales.
See also
Tickets can be customized to omit certain fields or change colors/images.
See also
Last Updated |
12/29/2025 |
Update menu location, removed mention of retrieving tickets in the app