Manage Subscription Registration

If you have more than one emailed newsletter for your church, you will want to create a Manage Subscription registration so subscribers can control their subscriptions themselves. This makes it very easy for someone to subscribe or unsubscribe, without having to totally unsubscribe from the sender.

https://i.tpsdb.com/./2018-05-15_08-26-37.png

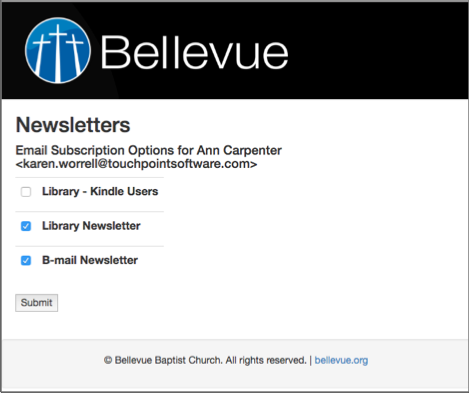
Sample Subscription Page

Note

As you create the Involvements mentioned below, place them in a common Program and Division so you can associate the newsletter Involvements with the Manage Subscriptions Involvement. This works just like selecting the pick list for a User Selects type of registration.

Creating Newsletter Subscription Involvements

Step 1

Create one Involvement for each of your newsletters.

  • Leave the Registration Type set to No Online Registration. Subscribers will still get enrolled in the Involvement.

  • You do not need an email confirmation, as there is a confirmation in Administration > Special Content or under Email Templates that is used for this purpose. It is named OneTimeConfirmation. The title is Your link to manage your subscriptions. Your System Admin can edit it if you want to make any changes.

  • Also, you do not need to set any instructions on these Involvements as the subscriber will see a special subscription page like the sample image above.

Tip

You can include the frequency of the individual newsletters in the name of the Involvement - for example: Weekly Church Newsletter, or Monthly Next Gen News.

Step 2

Create an Involvement to serve as the Master Involvement for your Newsletter Subscriptions.

Note

You can name it whatever you like, but make it something that describes its purpose. For example: Manage my Church Newsletters or Manage my Subscriptions.

  • Set the Registration Type to Manage Subscriptions.

  • Select the Email From people under the Messages tab.

Step 3

On the Newsletter Subscription Involvement (the Master Involvement), go to Registration > Registration and click Choose Involvements to add Involvements to the Pick List. The Choose Involvements link is active without clicking Edit.

Search for and select each newsletter Involvement and then click Update Selected.

Tip

You may want to enter the name or Involvement ID# and click Search if you do not see the Involvement in the list.

Step 4

When you are ready to send each newsletter, go to the Involvement for that specific newsletter and send to the members. If you plan to schedule it for a later date, we recommend selecting Email > All Current Members. This will send only to those still enrolled at the time your email is actually sent. Also, it will include anyone that has subscribed between the time you scheduled it and the time it is actually sent.

See also

Schedule Email

Sending Newsletters

Each newsletter is a stand-alone email in that you send only to the Involvement members for that specific newsletter Involvement. All of your newsletters do not need to be on the same schedule. In fact, it may be a good idea to coordinate sending them on various days and times, even if they have the same frequency. This will keep a subscriber that subscribes to multiple newsletters from getting all of them in his inbox at the same time. One might be a daily Bible Reading Newsletter that is sent early every morning. You could then have your weekly newsletters arrive later in the day to increase the open rate.

Publicize Your Newsletters

Email with Register Link

One of the best ways to get started and notify your congregation of your newsletters is to send a Register Link (use the Involvement ID for the Master Involvement) in an email to those in your congregation who might be interested in any of your newsletters.

Be sure to include a brief description of each newsletter letting them know the frequency, if that is not part of the Involvements’s name.

This will allow the email recipient to select one or more of the newsletters to which they want to subscribe.

A word about mass emails

Please create a meaningful search in order to find the proper audience for your advertising email. Do not just email everyone in your database. For Newsletter Subscriptions, you may want to add age as a condition, so that you do not include children. You might also want to search for all church members or all enrolled in your Main Fellowship classes. Be intentional with your target audience and you will get better results.

Caution

Manage Subscriptions is intended for individuals. So do not send a Register Link2; just send a normal Register Link. Even if you send a Register Link 2, only the subscriptions for the individual to whom you sent the link will display. The family list will never display.

Post a Link on your Website

Keep a link on your website, so that newcomers to your site can subscribe at any time. Also, this allows current subscribers a place to manage their subscriptions, especially if you do not include a Register Link inside each newsletter.

How Manage Subscription Works

When someone clicks uses a Register Link from an email, he will be presented with a page that lists all available newsletters as in the image above. These are the Involvements in the pick list on the Master Involvement.

Using the checkboxes, the person can select (or deselect) any newsletter and then click Submit. He will be enrolled in each Involvement for the newsletter he selects. If he deselects a newsletter for which he has previously been subscribed, he will be dropped from that Involvement.

If he used a link from your website, he can login if he has an account and go directly to the Manage Subscriptions page. Or, he can enter his Name, Date of Birth, and/or Email Address to find his record in the database. In this case, he will be emailed a link to manage his subscriptions.

If the record is not found, he will provide more information to create a new people record just like other online registrations. In this instance, the person will see a message that a link has been sent to him.

After someone subscribes or manages his existing subscriptions, he will see an online message, and will also receive an email confirmation.

Notes about your Newsletters

  • Create a template for each newsletter so that your readers recognize the ‘branding’ when they receive it.

    See also

    Email Templates

  • The confirmation email subscribers receive is found under Administration > Email Templates. It is named ConfirmSubscriptions and your System Admin can edit it to customize it for your church. (If it has the word Draft in the title, remove the word to activate the template).


Latest Update

09/08/2022

Update terminiology to Involvements, removed Special Links information.