Building Check-In
TouchPoint software not only has a secure Check-In for classes and events, it also has a Building Check-In mode. This requires you have a Status Flag saved search that is used to determine who can check into the building. See the following help article for a fuller explanation of how Building Check-In works for those checking in as well as for the attendant at the check-in desk.
Building Check-In Process
This type of Check-In was created to be used in an activities building / gym where you want to monitor and control who comes into the building. Each church sets the parameters that fit their needs.
Example: Church member or anyone enrolled in a Life Group who is 14 yrs old or older.
By using an age requirement, the child must be with an adult. This would require a saved search (Status Flag) created with your criteria. You can also create an Extra Value and include it in your search to allow certain people access when they do not fit the normal criteria.
The designed setup uses dual monitors - one for the person checking in (which displays the keypad), and the other for an attendant behind the desk. The attendant screen displays a picture and any notes about that person.
Building Check-In allows for members to bring guests, if you want. You can place a limit on the number of guests one person can bring into the building.
Unlike normal Check-In, Building Check-In does not use Involvements and meetings. It uses a set of Activities that each church creates in Special Content. When a person checks in, TouchPoint captures the date and time along with the Activities selected through the Check In Activity Log. The system also records if the person brought any guests. It is a great way to help you evaluate how your building is being used.
See also
Like normal Check-In, Building Check-In uses a phone number for the person to check-in for a quick and easy process. A new record can be added at the kiosk if the member brings a guest who is not in the database. Also, you can edit an existing record and take a photo, if you have a camera attached.
Create the Saved Search
This search will be used to determine who can check into the building as a ‘Member’. You will save the search as a Status Flag.
- Step 1
Create a new search, adding the conditions you want as qualifiers for someone to check into the building.
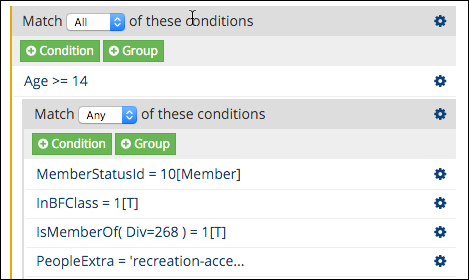
The screenshot above is an example of a saved search. It requires everyone to be at least 14 years old and match any one of the following criteria:
- Member of the church- Enrolled in a Main Fellowship class- Enrolled in an Involvement in the Program Recreation and the Division Recreation- Have the Extra Value Building Access set to TrueNote
This search is using a Standard Extra Value named
Building Access. See Extra Value for more details in using this.- Step 2
Save your search. Give it a name (e.g.
Building Access) and be sure to check the box next to Status Flag.Tip
Status Flags update automatically each morning. If you are going to test Building Check-In the same day you initially create this status flag (saved search), you will need to manually update status flags in order for anyone in the results to be able to check in today. An Admin can do this by navigating to Admin > Tools > Update > Status Flags.
See also
Setup Building Check-In Profile
Under Admin > Involvements > Check-In > Profiles you will create a Building Profile. Click the green Add box and add the following information:
- Step 1
Enter the Profile Name you want to use.
- Step 2
Under the General tab and Mode field, select Building Mode.
- Step 3
Enter a Logout Code and Admin Code.
- Step 4
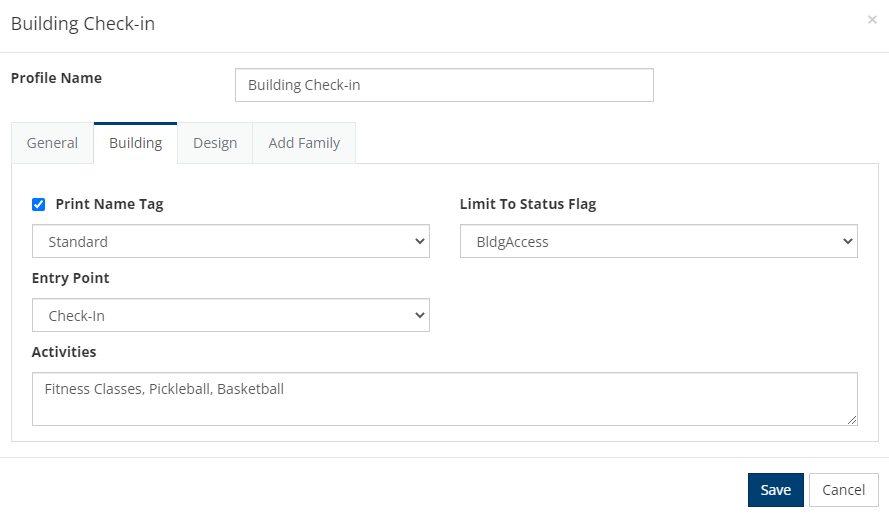
Under the Building tab, you can choose to use a Print Name Tag, select the Limit to Status Flag, choose the Entry Point, and add the Activities. For the Activities, make sure to enter them by their name and with a comma, then space after any other added activity. For example:
Fitness Classes, Pickleball, Basketball- Step 5
Enter the information you would like under the Design tab and Add Family tab and when finished building this profile, click Save.
Other Options
- Extra Value
You can create a Standard Extra Value to be included as a condition in your Status Flag saved search. You would use this if you need to give access to people who will not fit the criteria in your search. Name it Building Access (or something similar). You will set the value to true for anyone that needs access is not included in your search results. Making it a Standard Extra Value means that it will display on every people record in your database. It does not come into play until you give it a value.
You can also use this to block someone from having access to check in, by setting the value to false. This would be used for someone who would normally have access based on your saved search, but, for some reason, needs to be prevented from coming into the building.
See also
Using Building Check-In
To run Building Check-In, in a web browser enter your database URL followed by /checkin. For example https://mychurch.tpsdb.com/checkin. The Check-in login screen will be displayed.
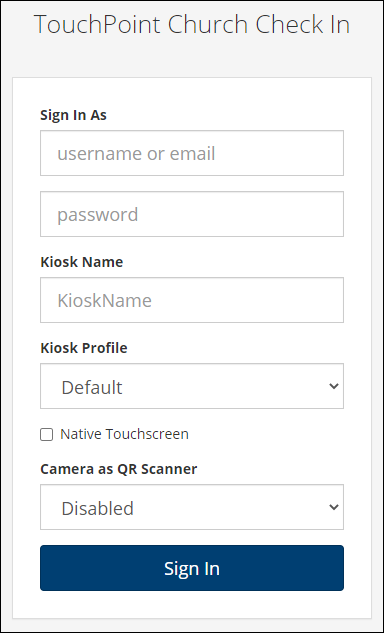
- Sign In As
The credentials you use to sign in must be for an account that has the Checkin role. This is the only role needed to use the Check-In system. We recommend you create a people record to use exclusively for logging into Check-In.
- Kiosk Name
Enter the unique name for the Building Check-In kiosk. If you opt to print labels, the print server that will print labels for this kiosk must have this exact name (case sensitive) entered in its list of kiosks for which it will print.
See also
- Kiosk Profile
Select the Building Check-In profile you created.
See also
- Native Touchscreen
Check this box if you are using a touchscreen device, such as iPads, Android tablets, Microsoft Surface Pros, Dell Latitude tablets, or Windows PCs with separate touchscreen monitors. This will disable the touchscreen keyboard on the main Check-In page so that it does not pop up on top of the TouchPoint Check-In keypad.
Note
If you are using a Windows PC with a separate touchscreen monitor attached, go to Windows Settings > Devices > Typing and make sure the option named Show the touch keyboard when not in tablet mode and there’s no keyboard attached under the Touch keyboard section is set to On.
Tip
If you are using an iPad or Android tablet, we recommend running Building Check-In as a Web App so that it shows up as an icon on your home screen. To do that, follow these steps:
Open your web browser (Chrome or Safari) and go to
https://mychurch.tpsdb.com/checkinwheremychurchis the name of your database.If you are using Chrome, tap the Menu (3 vertical dots) at the top-right of the browser and select Add to Home Screen. If you are using Safari, tap the Share icon and select Add to Home Screen.
In the Add to Home Screen box that pops up, tap the Add option. Depending on your phone, you may need to tap an additional Add to Home Screen button to complete the process.
You should now see a TouchPoint Check-In shortcut on your home screen.
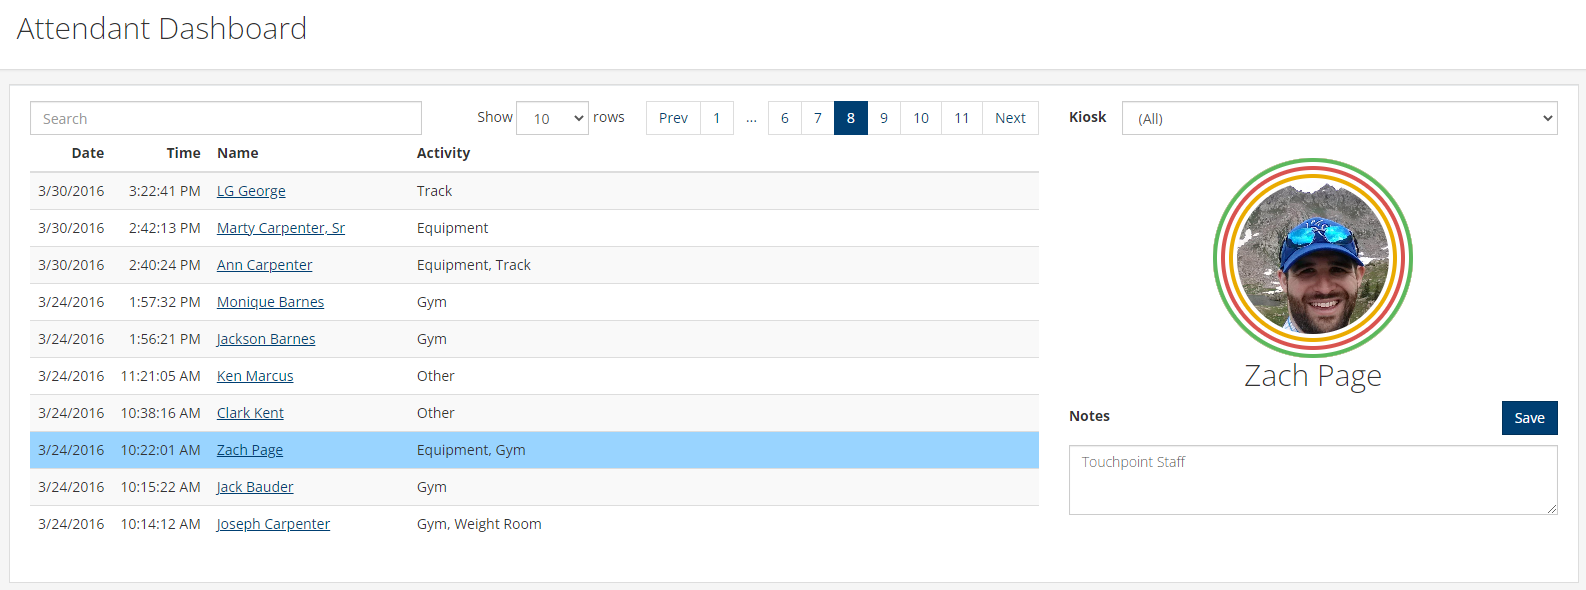
The Attendant Dashboard can be accessed on the attendant’s screen by navigating to Admin > Involvements > Check-In > Attendant Dashboard.
How it Works for the Attendant
When someone enters their phone number, the Attendant will see the individual’s photo on the right side of the Attendant Dashboard. They will also see any notes under their picture.
Because matching a person with their photo is an important feature of Building Check-In, the Attendant will want to take a photo if there is not one on the person’s record.
On the left side of the screen is a running history of that day’s check-in activity. If someone cannot check in, they will see a message giving the reason.
If the Attendant needs to add a note he can do so on the Attendant Console.
- Step 1
Click the line of history (on the left side of the screen) that relates to the person about whom you need to add a note.
- Step 2
Place your cursor in the notes field and enter the text.
- Step 3
Press Save.
Note
The Attendant must have the Checkin role. Building Check-In notes are saved and can be edited on the people record under Involvement > Registration > Building Checkin. Any changes made to the notes can be found under System > Changes.
How It Works for the Person Checking In
- Step 1
A member enters his or her phone number and presses the green search button.
- Step 2
The family associated with that number is displayed.
The member then presses the checkmark beside the Activity and then the green Check In button to check in.
Note
If a person is not on the Status Flag tied to this Check-in Profile, they will not be found. If they have a family member that is on the Status Flag but they themselves are not, the attendant can check in the family member not showing by using the Admin Code and searching for that family.
Latest Update |
7/3/2026 |
Fixed typos