Mobile App Setup
Below you will find all the settings and features you will use to build and customize your app.
Mobile Admin Settings
The Mobile App Settings are found in the database under Admin > Communication > Mobile App > Settings and are accessible to users with the AppAdmin role.
- Features > Feed
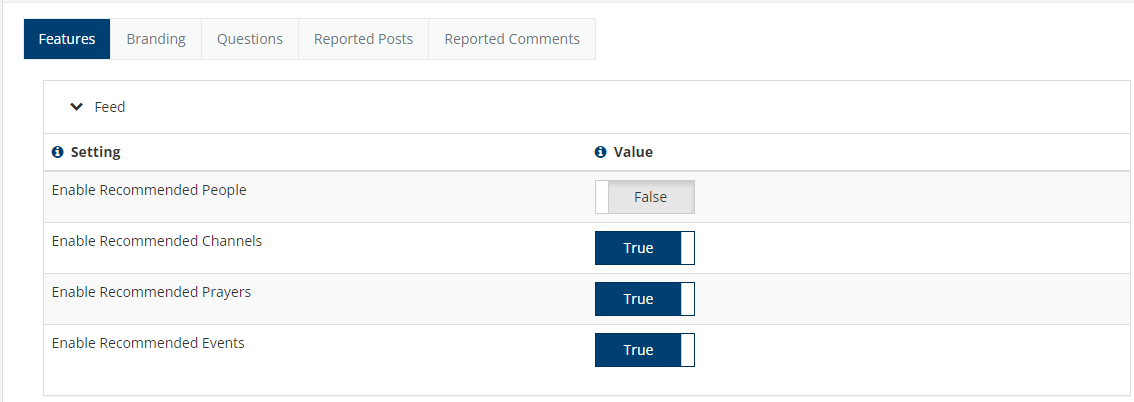
Enable Recommended People - Make True to enable recommended people
Enable Recommended Channels - Make True to enable recommended channels
Enable Recommended Prayers - Make True to enable recommended prayers
Enable Recommended Events - Make True to enable recommended events
Enable Live Stream Widget - Make True to show active livesteam in feed
Enable Pre Check-In Widget - Coming soon
Enable Attendance Widget - Mark True to show attendance option in feed for meetings occurring within an hour
Enable System Message Carousel - When marked True, system messages will be displayed in a carousel. When marked False, system messages will display as individual posts.
- Features > Involvements
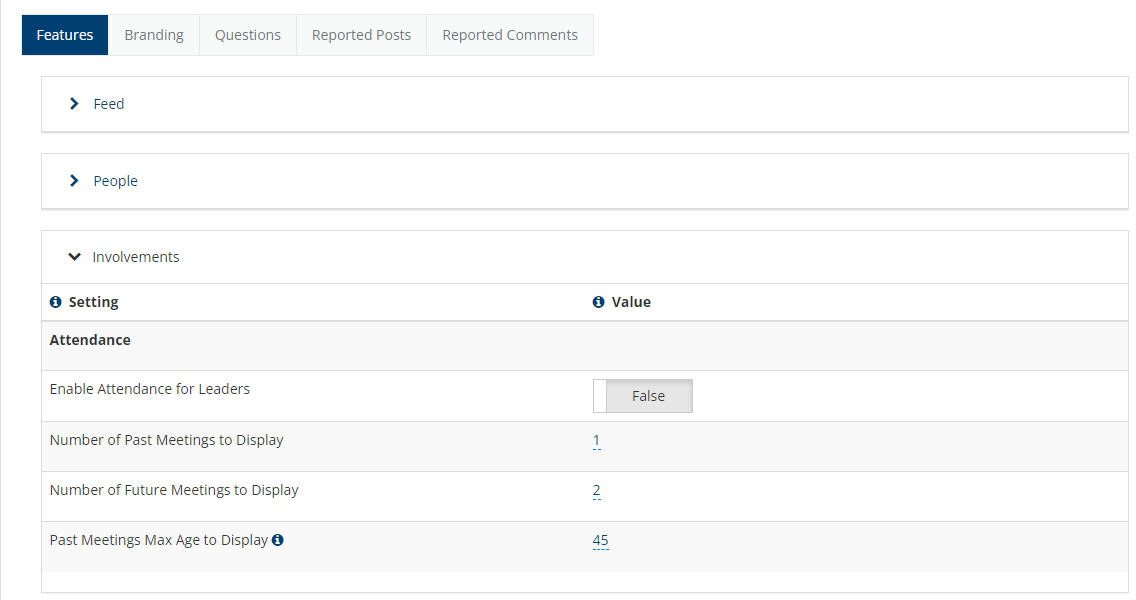
Enable Attendance for Leaders - Make True to enable Involvement leaders the ability to take attendance
Display Meetings Days in the Past - The number days to look back for past attendance meetings.
Display Meetings Days in the Future - The number days to look forward for future attendance meetings.
Enable Pre Check-In - Enable Pre Check-in
- Features > Directories
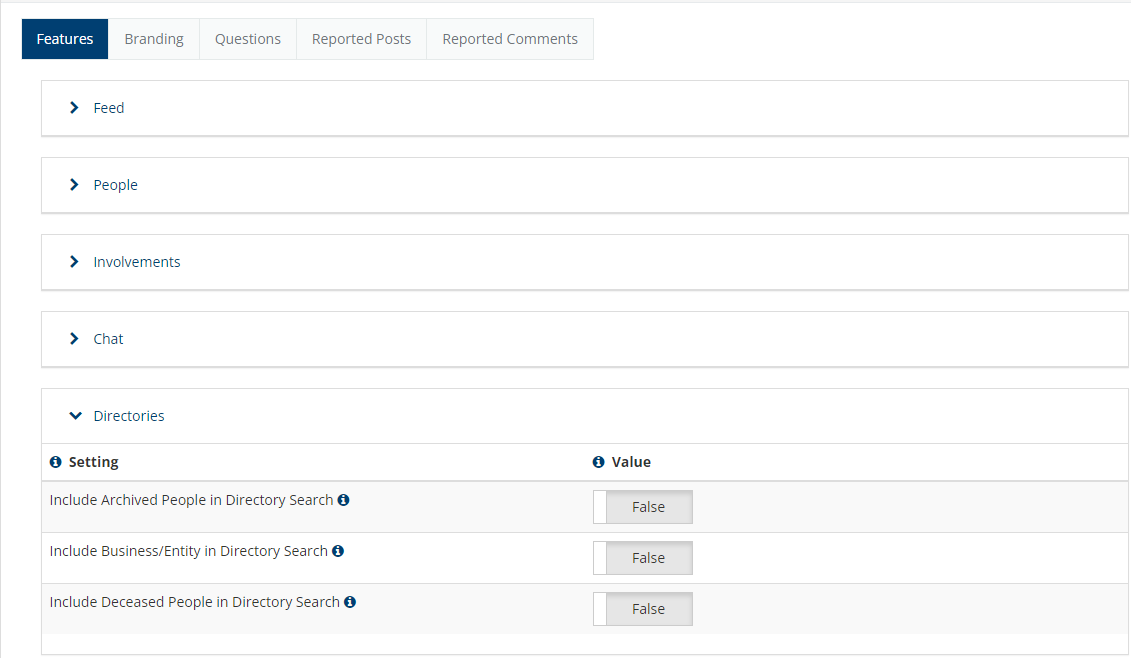
Include Archived People in Directory Search - When true, archived people will be included in directory search results
Include Business/Entity in Directory Search - When true, Businesses/Entities will be included in directory search results
Include Deceased People in Directory Search - When true, deceaseed people will be included in directory search results
Minimum Age Restriction - Children with no age and children under the age set in this setting will be filtered out of directories. Note: if a person and/or directory allows family members to be shown, children will be visible on their family members records but their profile will not be clickable.
- Features > Profile
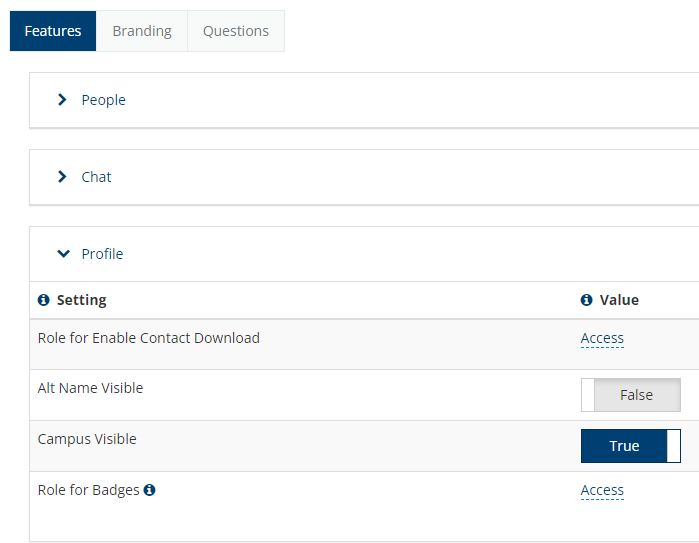
Role for Enable Contact Download - This is the role that is required to download contacts
Alt Name Visible - Make Alt Name visible
Campus Visible - Make Campus visible
Role for Badges - This is the role that is required to see badges in the mobile app
Show Deceased Family Members - When true, deceased family members will show in a persons profile
- Features > Events
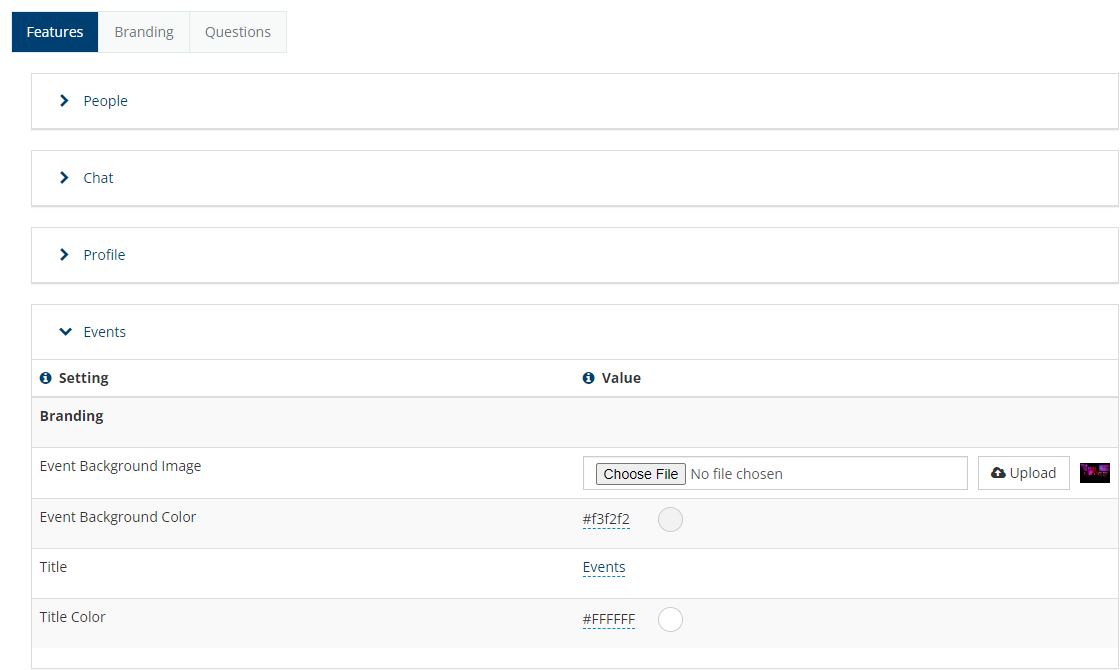
Event Background Image - Add branded background image for events page NOTE: Please try to keep file size under 1 MB
Event Background Color - Add color hex for background on events page
Title - Add your title for the events page
Title Color - Add color hex for events page title
- Features > Prayers
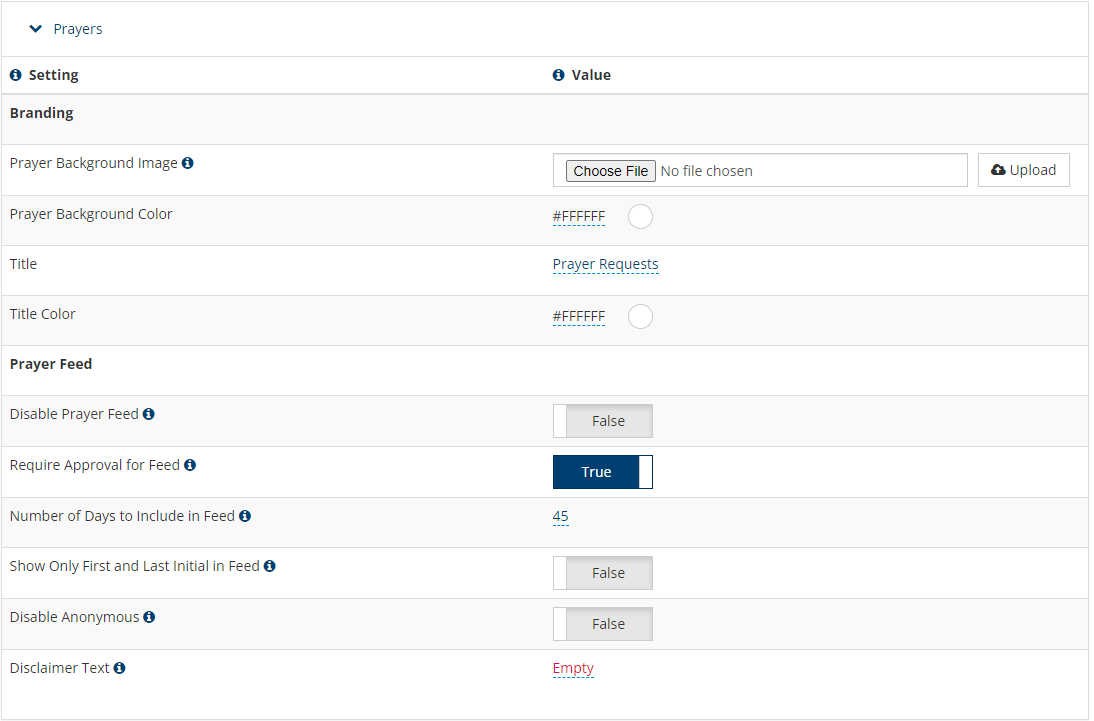
Prayer Background Image - Add branded background image for prayers page NOTE: Please try to keep file size under 1 MB
Prayer Background Color - Add color hex for background on prayers page
Title - Add your title for the prayers page
Title Color - Add color hex for prayers page title
Disable Prayer Feed - Setting to True will hide the prayer feed from the menu and a person’s profile.
Require Approval for Feed - When set to True, any prayer request submitted will require the “Include in Feed” keyword to be added for the request to show in the app feed. When set to False, all prayer requests submitted will automatically have the keyword “Include in Feed”. To remove a prayer from the feed, remove the “Include in Feed” keyword.
Number of Days to Include in Feed - Prayer requests that were submitted prior to this many numbers of days will be included in the feed (if approved or auto-approved).
Show Only First and Last Initial in Feed - If set to True then only the first name and last initial will show for a person in the feed, and you can’t click on a person’s name to get to their profile. The prayer request will be associated to the person on the web side.
Disable Anonymous - Setting to True will prevent a user from submitting an anonymous prayer request through the app.
Disclaimer Text - When present, this text will display above the submit prayer request button in the mobile app.
- Features > Channels
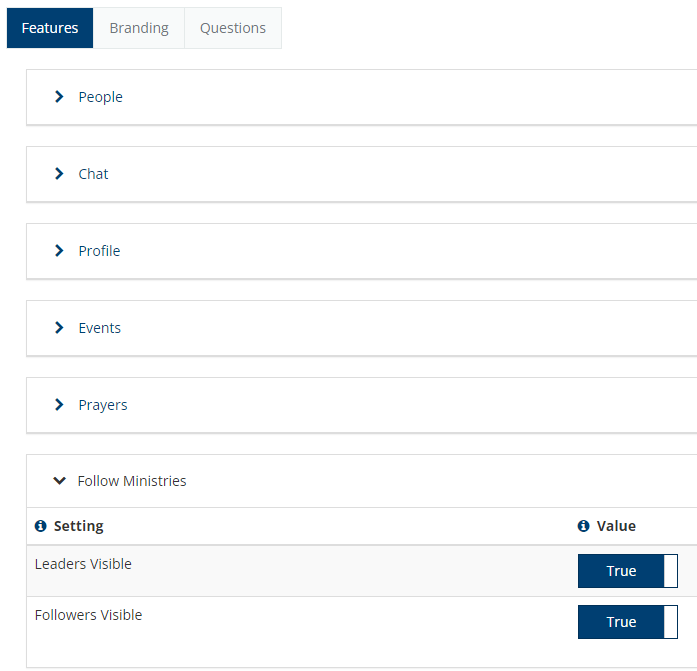
Leaders Visible - Mark True to make leaders of channels visible
Followers Visible - Mark True to make followers of channels visible
- Features > Giving
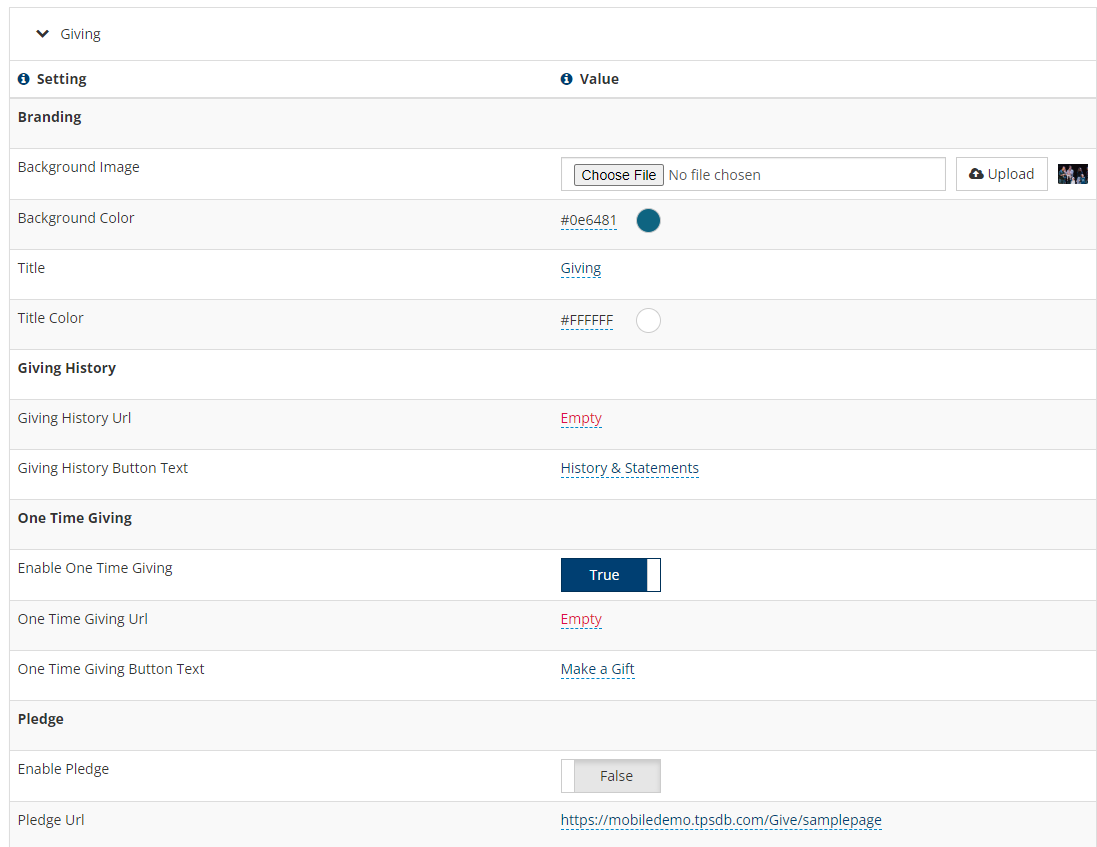
Background Image - Add branded background image for giving page NOTE: Please try to keep file size under 1 MB
Background Color - Add color hex for background on giving page
Title - Add your title for the giving page
Title Color - Add color hex for giving page title
Giving History URL - Add giving history url
Giving History Button Text - Add your own giving history text for giving history button
Enable One Time Giving - Select True to enable one time giving option
One Time Giving URL - Add giving url for your giving page if giving is made outside of your TouchPoint database
One Time Giving Button Text - Add your own giving text for giving button
Enable Pledge - Select True to enable pledge giving option
Pledge URL - Add giving pledge url for your giving page if pledge giving is made outside of your TouchPoint database
Pledge Button Text - Add your own giving text for pledge giving button
Enable Recurring Giving - Select True to enable recurring giving option
Recurring Giving URL - Add recurring giving url for your giving page if recurring giving is made outside of your TouchPoint database
Recurring Button Text - Add your own recurring giving text for recurring giving button
- Features > Media
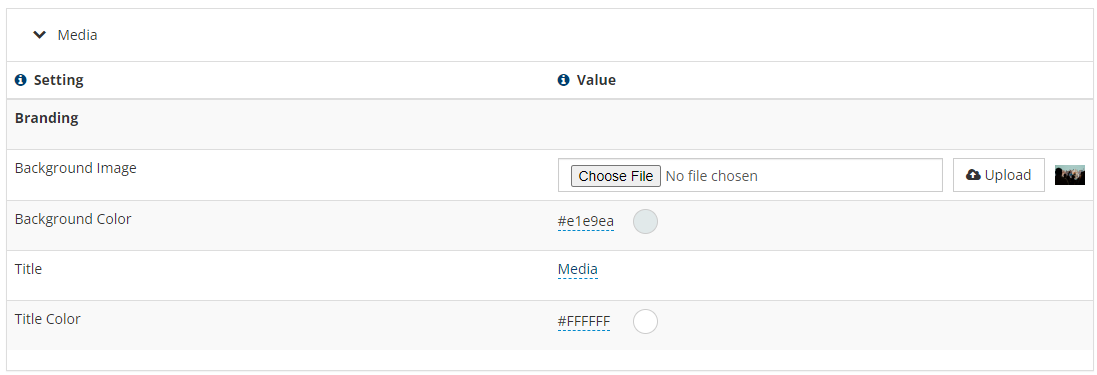
Background Image - Add branded background image for media page NOTE: Please try to keep file size under 1 MB
Background Color - Add color hex for background on media page
Title - Add your title for the media page
Title Color - Add color hex for media page title
Remove ‘All’ Filter - When true, the ‘All’ filter will be removed from media categories
- Features > Campus Segmentation
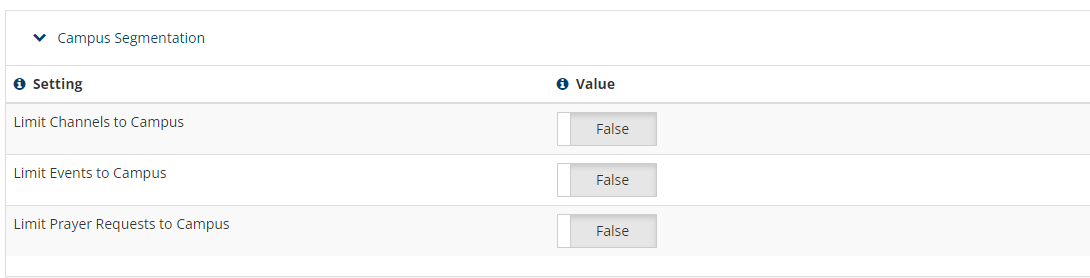
Limit Channels to Campus - Mark true to limit channels to campus
Limit Events to Campus - Mark true to limit events to campus
Limit Prayer Requests to Campus - Mark true to limit prayer requests to campus
- Branding > Application Listing
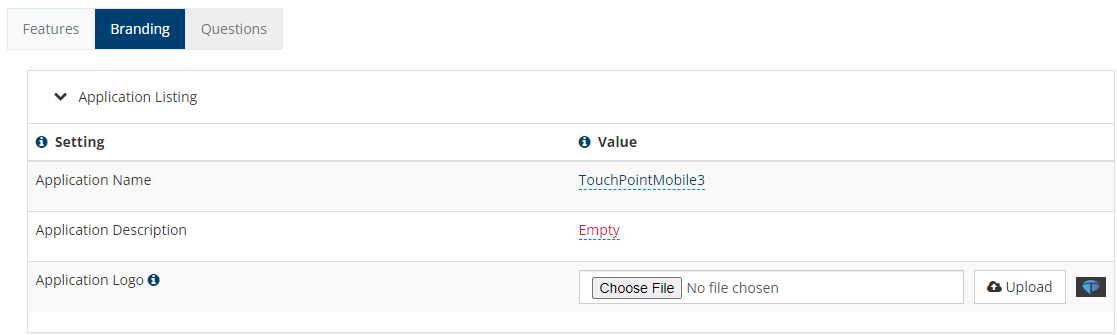
IMPORTANT NOTE: Any changes to logos under the Application Listing section will not show right away in the app since they require and app update. If changes are made to this section after you have your app, please reach out to our team so we can send in the updates to the app stores for approval which may include a fee.
Application Name - Name your custom app, has a 30 character limit
Application Description - Add description of your app that will show in the app store
Application Logo - Upload application logo file which must be 1024 px by 1024 px with no transparency and no rounded corners
Feature Graphic - Your feature graphic must be a PNG or JPEG, up to 15 MB, and 1,024 px by 500 px
- Branding > Logos
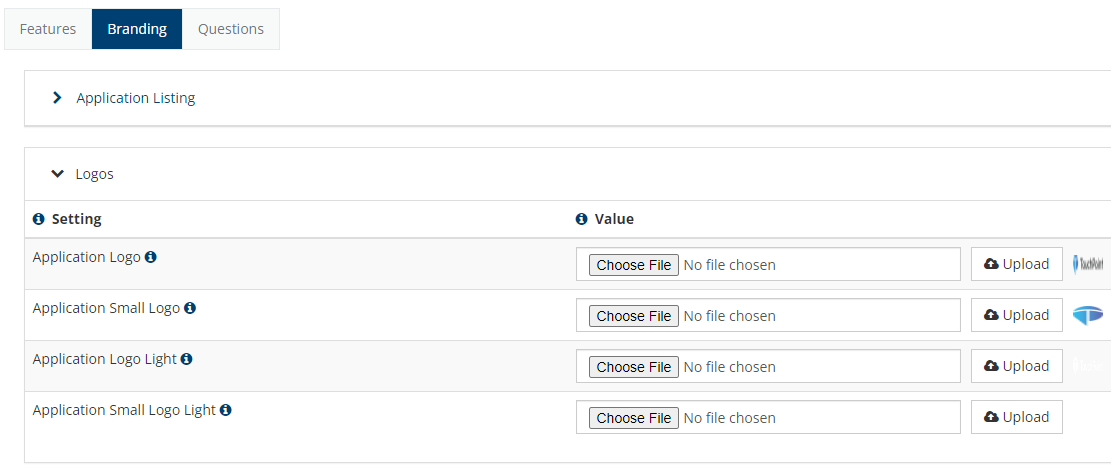
Application Logo - App logo on feed page
Application Small Logo - Small app logo
Application Logo Light - App logo used for dark background
Application Small Logo Light - Small app logo used for dark background
- Branding > Colors
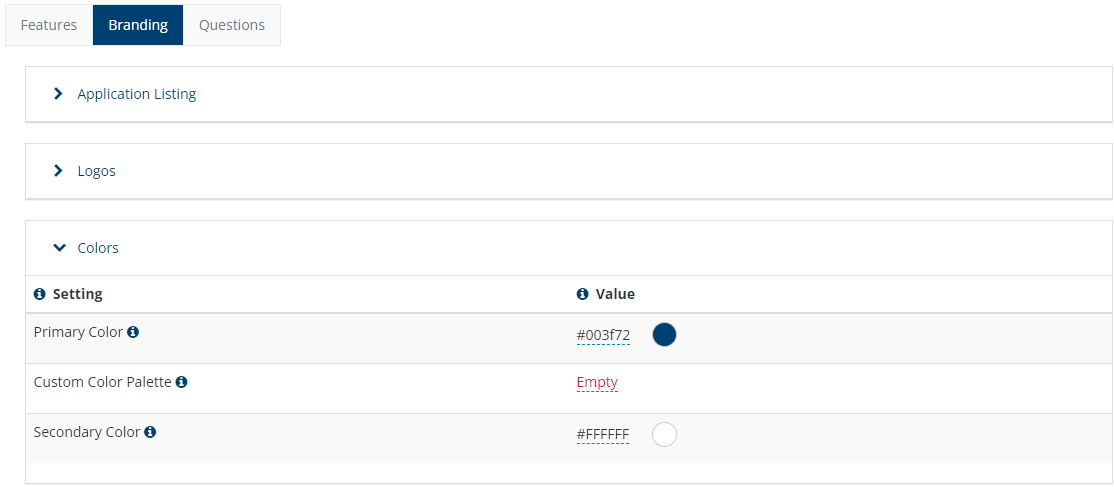
Primary Color - Add color hex for app primary color which needs to be a darker color than the secondary color
Custom Color Palette - This should only be used when you want to override the palette that is auto generated based on primary brand color
Secondary Color - Add color hex for app secondary color which needs to be a lighter color than the primary color
- Branding > Login
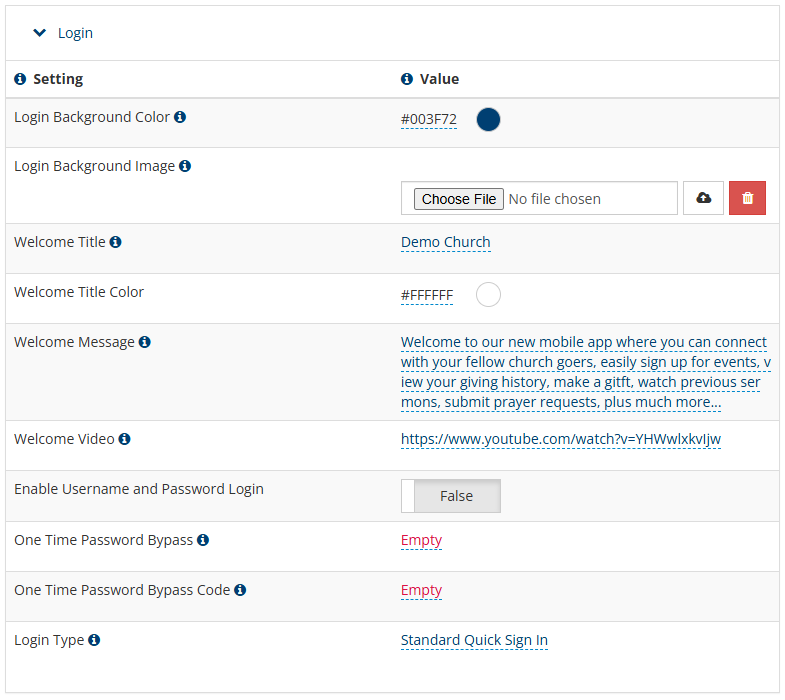
Login Background Color - Add color hex for background on login page
Login Background Image - The background image used on the login screen in the mobile application. The image should be no larger than 1080x1920 pixels and under 1 MB in size.
Welcome Title - The title used in the application’s login and welcome screens.
Welcome Title Color - Add color hex for title color on the welcome page
Welcome Mesaage - The message used in the application’s login and welcome screens.
Welcome Video - The video used in the application’s login and welcome screens.
One Time Password Bypass - A comma delimited list of phone numbers that will bypass the OTP process. These numbers will be able to enter the value set in the One Time Password Bypass Code setting to enter the mobile application.
One Time Password Bypass Code - This setting is used to specify the code required when a One Time Password Bypass number is used. When blank, any value can be entered and will be accepted from a number on the bypass list.
- Branding > Footer
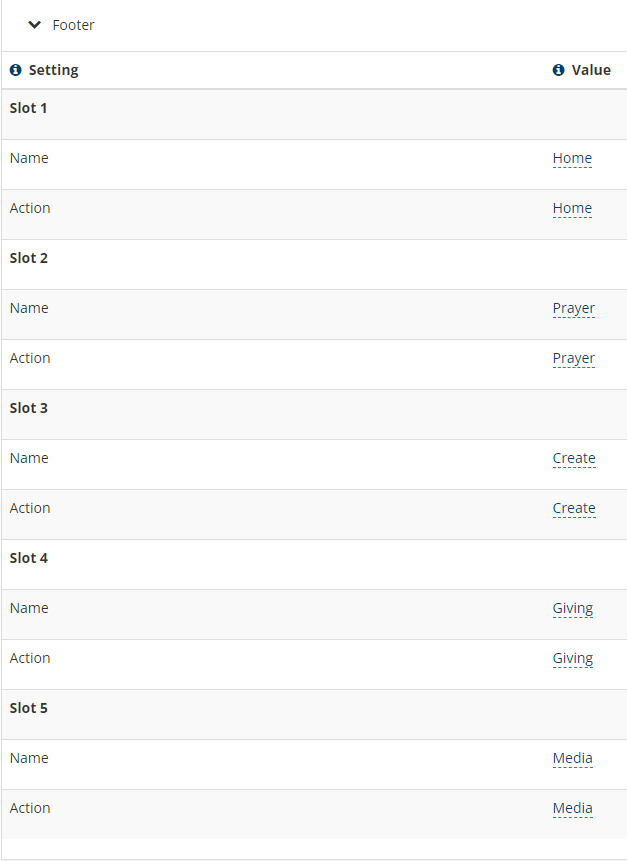
Actions - Currently unavailable.
Value - Select from drop down menu the destination of choice for the footer link.
IMPORTANT NOTE: At least one of the selections must be Home.
- Branding > Default Background

NOTE: The default background picture will show up if there is not a background picture in place for the following pages: Media, Giving, Events, and Prayer.
Background Image - Add default branded background image NOTE: Please try to keep file size under 1 MB
Background Color - Add color hex for default background
Title Color - Add color hex for default title color
- Questions - Coming Soon
Recommended Image Sizes
Below are the recommended image sizes for the app under Mobile App Settings:
- Branding > Application Listing
Application Logo
This is the logo used in the app stores and what is displayed on your phone home screen.
The application logo must be 1024 x 1024 pixels with no transparency and no rounded corners.
Note - This will soon become two settings - one for iOS and one for Android since Android handles icons differently (based on device manufacturer).
Play Store Feature Graphic
When you open the Google play store on an Android device this is the header graphic.
Must be a PNG or JPEG, up to 15 MB, and 1,024 x 500 pixels
- Branding > Logos
Application Logo
Used in the following locations:
Splash Screen Logo
Feed header
Recommended size:
We resize to a height of 200px
No greater than 1 MB (can be smaller)
Application Small Logo
Used in the following locations:
Used in a loading screen
Default hero image for channels if one does not exist
iOS notification (this will be its own setting soon)
Recommended size
We resize to a height of 200px
Ideally this would be a square badge image
No greater than 1 MB (can be smaller)
Application Logo Light
Used in the following locations:
Background on the logo screen
Typically a white or light version of the app so that it overlays on a background or dark image
Recommended size
This should be the same size as the Application Logo
We resize to a height of 200px
No greater than 1 MB (can be smaller)
Application Small Logo Light
Used in the following locations:
Recommended widgets
Used on events card if no background image
Android notification (this will be its own setting soon)
Recommended size
This should be the same size as the Application Logo
We resize to a height of 200px
Ideally this would be a square badge image
No greater than 1 MB (can be smaller)
- Branding > Login
Login Background Image
Recommended size
This sizes to the width of the device and fades into the background color
No greater than 1 MB (can be smaller)
- Branding > Default Background
Background Image
Recommended size
This sizes to the width of the device and fades into the background color
No greater than 1 MB (can be smaller)
- Features > Events
Event Background Image
Recommended size
This sizes to the width of the device and fades into the background color
No greater than 1 MB (can be smaller)
- Features > Prayers
Prayer Background Image
Recommended size
This sizes to the width of the device and fades into the background color
No greater than 1 MB (can be smaller)
- Features > Giving
Giving Background Image
Recommended size
This sizes to the width of the device and fades into the background color
No greater than 1 MB (can be smaller)
- Features > Media
Media Background Image
Recommended size
This sizes to the width of the device and fades into the background color
No greater than 1 MB (can be smaller)
Other notable recommended images sizes in the app:
- Registration/Channel Image
Location: Under Registration > Mobile Sites > Photo
Recommended size
This sizes to the width of the device and fades into the background color
960 px (wide) x 450 px (high)
No greater than 1 MB (can be smaller)
- Channel Badge
Location: Under Registration > Mobile Sites > Badge
Used as the hero image for channel posts
Recommended size
Ideally this would be square
100 px x 100 px
No greater than 1 MB (can be smaller)
- Banner Image
Location: Under Admin > Communication > Mobile App > Banners
Recommended size
960 px x 540 px (though, different heights will result in different aspect ratios)
No greater than 1 MB (can be smaller)
- Mobile/Giving Tip Images
Location: Under Admin > Advanced > Special Content
Recommended size
No larger than 270 px x 270 px
Media & Resources
- Setting up Media & Resources
Media & Resources are added to the database and then are populated in the app for specific users determined by the creator of those resources. For more information on this process refer to the Media & Resources article.
- Specifics on how media & resources work within the mobile app
Media & Resources are found in the app in these two locations:
The hamburger menu in the upper right corner
The footer of the app on the Media icon
How is content organized?
In the above article you’ll see how to organize content into Tabs and Groups, this translates into sections and groups in the mobile app.
What types of media are supported?
Livestream - Livestream resources can be set as either one time or recurring and will show only during a specified window. You simply enter the livestream link and details and we take it from there. Available live streams will show at the top under Live.
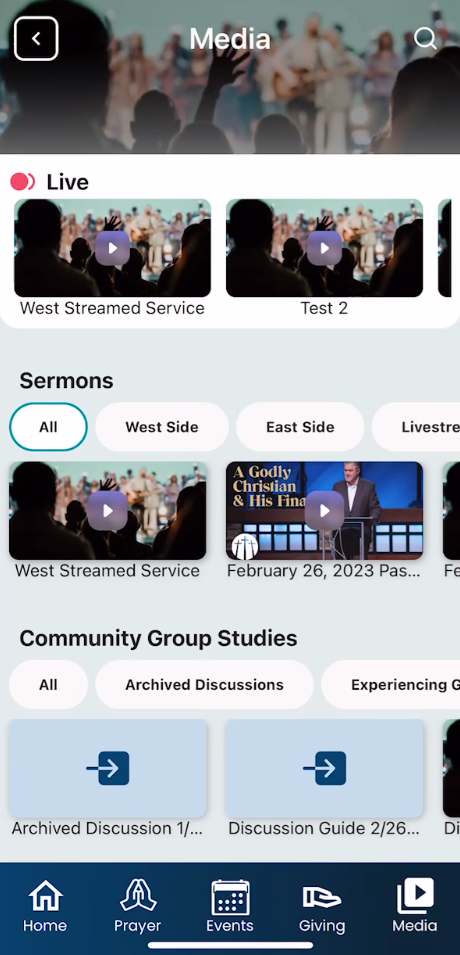
Audio - Enter a URL to a hosted audio file (I.e. mp3) or optionally you can add a speaker and date.
Video - Enter a URL to a hosted video file (mp4 or m3u8), Vimeo or YouTube Link or optionally you can add a speaker, date and link to the giving page of your choice.
Note
For Vimeo and YouTube videos, the URL required must be a direct link to the video itself and the URL should not include additional information as if it were from a playlist or some grouping. Correct Example Link https://vimeo.com/(videoID) and this is the same for YouTube videos.
Weblinks - Include any weblinks.
PDF - Upload one or more PDF documents.
Freeform - This resource can be used to embed any HTML content of your choosing. Note: Make sure your content is mobile responsive so that it displays properly in the app.
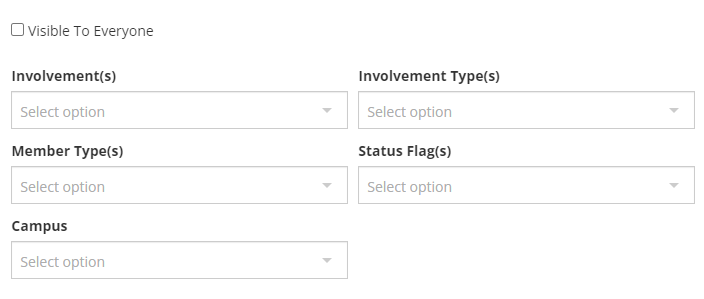
Who has access to what resources?
Options include - Visible To Everyone (default) or a combination of the following pictured below:
Events
- Overview
The mobile app has 2 ways to set up registrations, depending on the needs of the event, that enable a quick and easy registration process for users. Since the user is known by the app, it still remembers the login and process and saves several steps for the person registering.
- Registration Types
For registrations requiring payment and/or additional questions besides just knowing who is planning to attend you have two options:
Regular Registration - This links out to a registration form where the user is already logged in and can simply enter the final details necessary, make a payment (if needed) and register.
RSVP Registration - This simply allows the user to RSVP with a simple click of a button. No additional information is gathered besides who is registering.
- Settings specific to Involvement Registrations
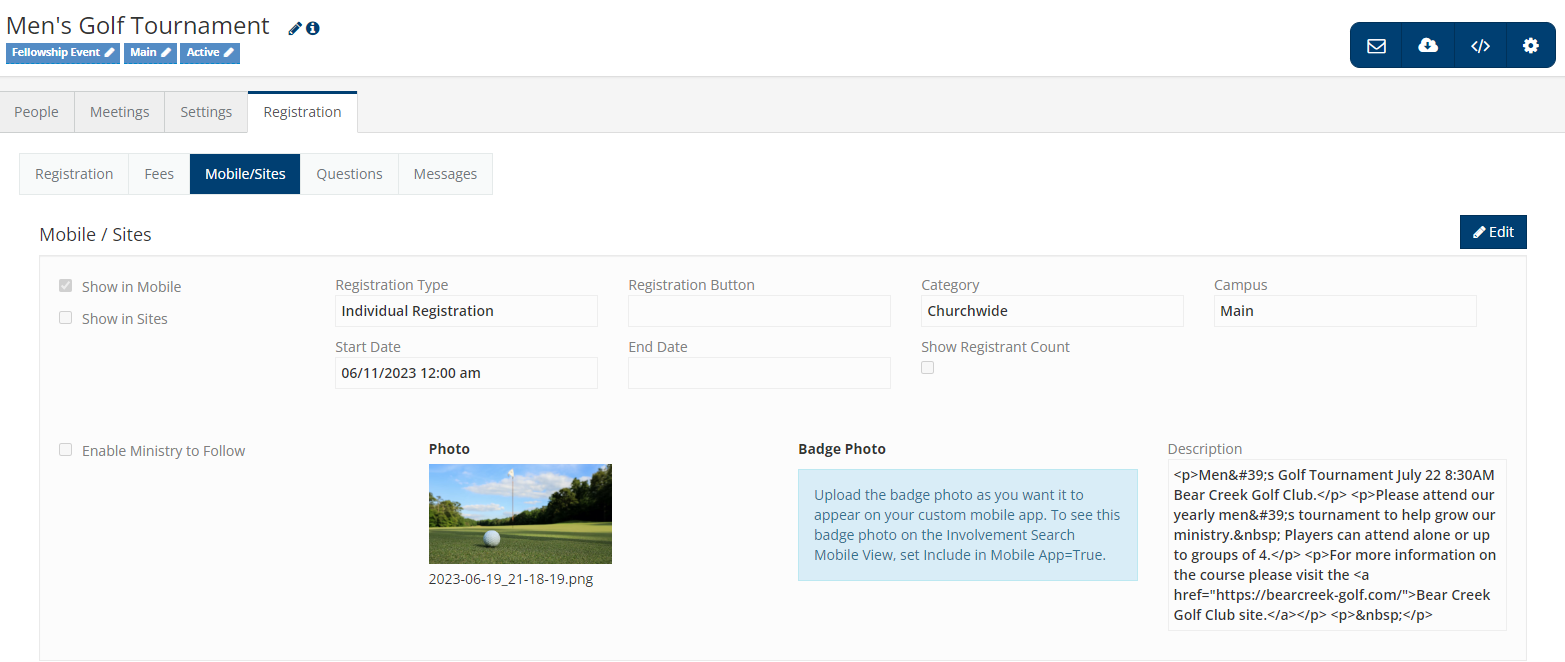
Show in Sites - Shows the Involvement in TouchPoint Sites if you have Sites enabled on the database
Show in Mobile - Shows the Involvement in the app on a person’s profile by checking this box
Registration Type - This allows you to set which type from the list above.
Registration Button - You can customize the registration button text to your liking, the default text is Register
Category - Events can be organized by category for ease of finding/sorting. An admin user can customize these categories and set the sort order in the lookup codes.
Campus - This determines which users see which events. Users will only see events that match the campus on their record and events that are set to not specified.
Start Date - This determines when the event will be listed in the mobile app.
End Date - This determines when the date after which the event will no longer show in the mobile app.
Show Registrant Count - This determines whether the list of registrants will be visible to other users who might also be interested in registering.
Enable Mobile Channel - Check this box to display the Involvement in recommended channels and the Discover tab on the channels screen.
Photo - Upload a photo that shows in the app in the following places:
User Profile > Involvements
Events
Recommended Events
Events Screen
Event Page Header
Channels
Recommended Channels
My Channels > Followed Channels
My Channels > Discover Channels
Channel Page Header
Note
If a channel or event does not have a channel photo, the image set in the Application Small Logo Light setting (Admin > Communication > Mobile App > Settings > Branding > Logos) will be used.
Badge/Channel Photo - Upload a photo that shows in the app in the following places:
Top of the Channel Page Header
In the place of a profile picture for Channel Posts
Note
If a channel does not have a channel logo, the channel photo is used.
If a channel does not have a channel logo or photo, the image set in the Applications Small Logo Light setting (Admin > Communication > Mobile App > Settings > Branding > Logos) will be used.
Description - This setting allows you to add a description and include any other necessary event details.
- Event order
Events will display in the following order:
Next meeting date
Next scheduled meeting date
Involvement name
- Managing/Viewing all Events/Registrations in One Place
There will be a new tab on the Involvement Search Page that will allow a user to view and manage all registrations in one place but for now please use the Mobile 2.0 View tab. (stay tuned)
Note
Sort Order is not used in the Mobile 3 app
Start Date is the same as the Registration Start Date
End Date is the same as the Registration End Date
In App Giving Page
A partner church must be approved through Benevity or Candid to accept donations within a mobile application. Without this approval, giving pages must be opened outside of the application. To allow the application to open giving pages within the app, you can register and create an account at benevity.com or through candid.org
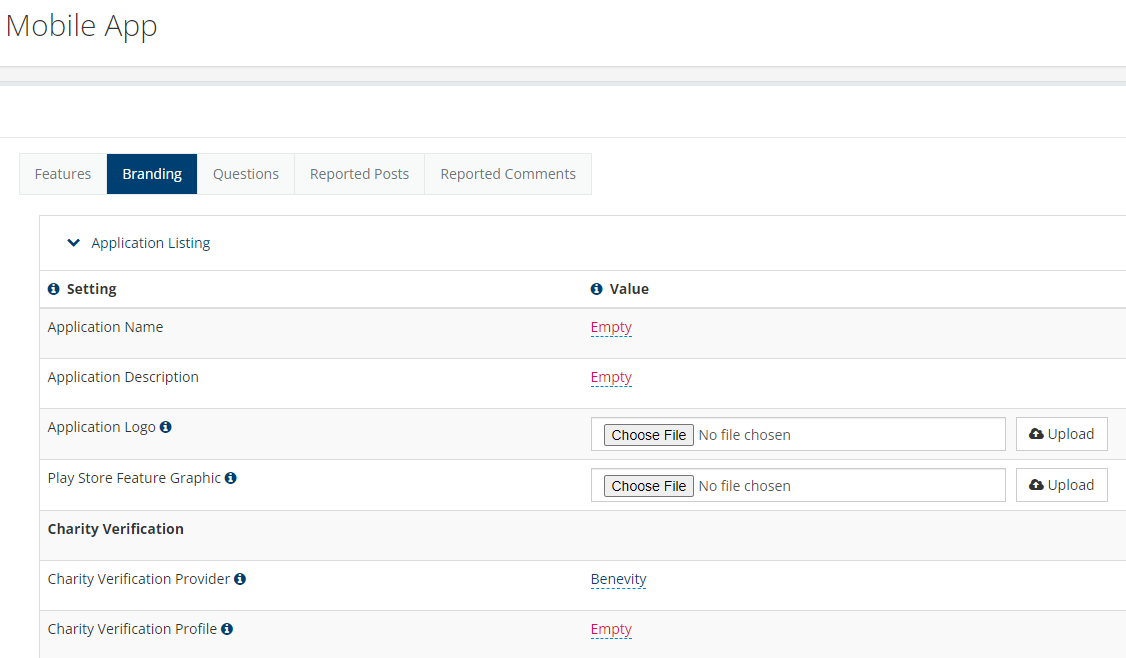
After you have registered, in your TouchPoint database you will need to add your Charity Verification information. This is found under Admin > Communication > Mobile App > Settings > Branding > Application Listing > Charity Verification.
- The following Settings will need to be completed:
Charity Verification Provider - Select your Charity Verification Provider, Benevity or Candid. If None is selected, giving links will open in a mobile browser outside of the application.
Charity Verification Profile - Supply a link to your Charity Verification Profile. This may be required when publishing your application to the app store and is found on your Benevity or Candid profile page URL.
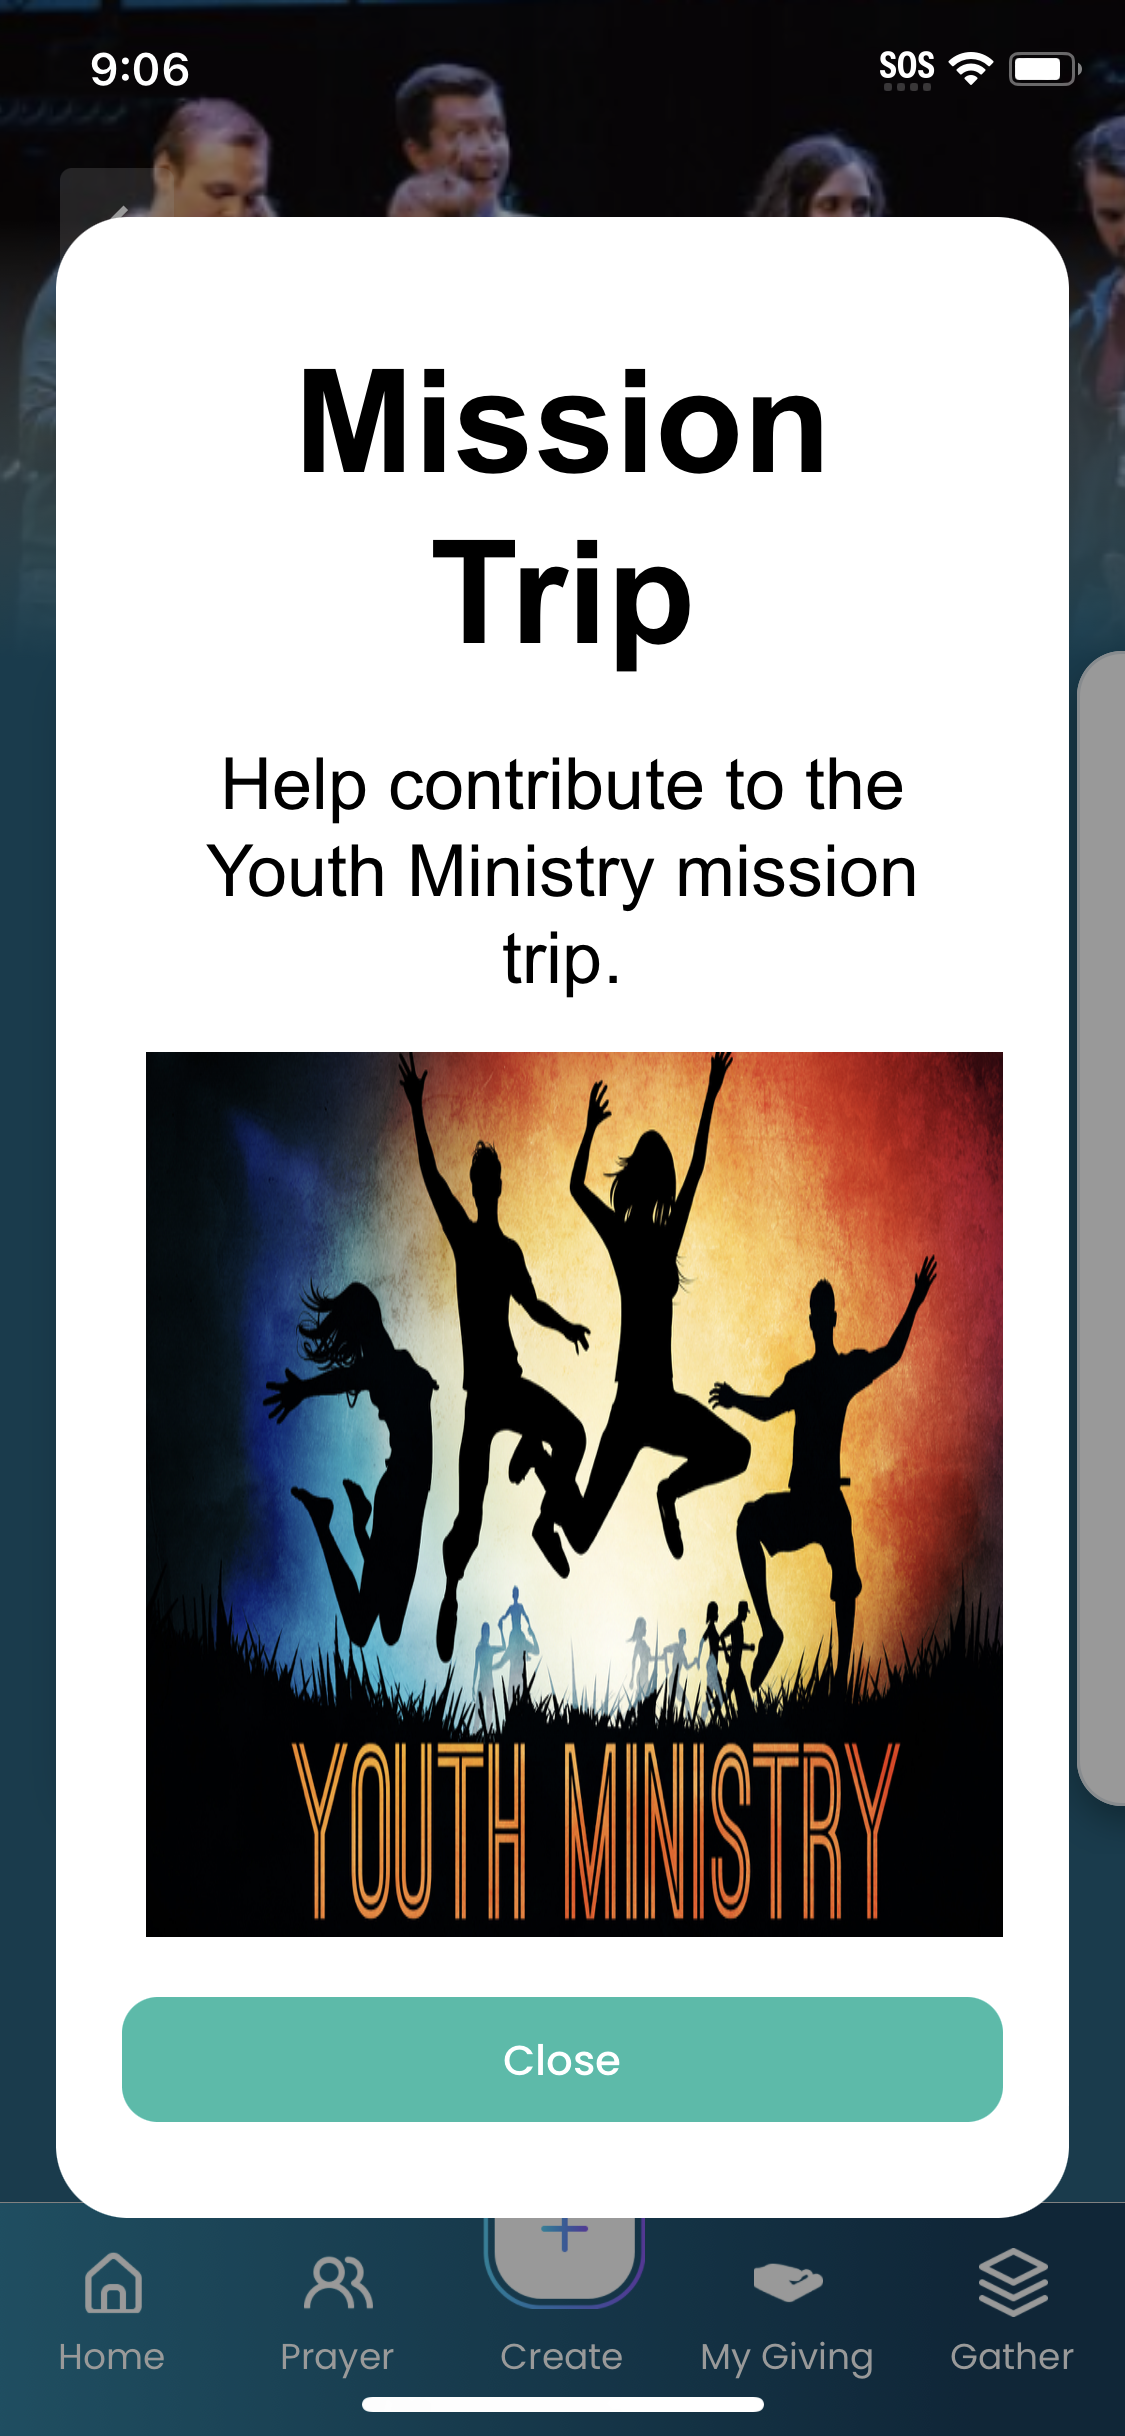
Giving Impact Cards
- Overview
Giving Impact Cards are the first thing a user sees when a person clicks on the giving link in the footer and are intended to inspire people to deeper levels of generosity. Cards can be completely customized by each church, and you set which people see which cards based on what you know about them.
- Examples to how you might set up Impact Cards
Missions - If a person has been on a mission trip, expressed interest in missions, or made a gift to missions in the past you might consider showing them a Missions impact card that visualizes the impact of your mission’s programs (i.e. stories of changed lives, impressive stats, etc.).
Children’s Ministry - If a person has children or serves in the children’s ministry you might consider showing them a Children’s Ministry impact card that visualizes the impact of the children’s ministry.
Other example of Impact cards to consider:
Year-to-date giving updates
End of year giving appeal
Special giving Initiatives - Campaigns, disaster relief, etc
Ministry Specific Updates
Top Donor Impact
How a first-time gift makes a difference
This feature is only limited by your imagination.
- Where and how to set up impact cards?
Impact cards are managed under Admin > Advanced > Special Content > then select in Keyword Filter Mobile Giving where there are 3 example cards you can use as a template to create your own cards and can be set up by anyone with the Admin and/or one of the Special Content roles.
This will display two new settings:
Mobile Rank - If a person has more than one impact card to display on their giving page this determines the order of the cards.
Status Flag - People that meet the criteria for this flag will see the specified card. Note: Make sure you leave the status flag blank on at least one card so that each person using the app will have a default card.
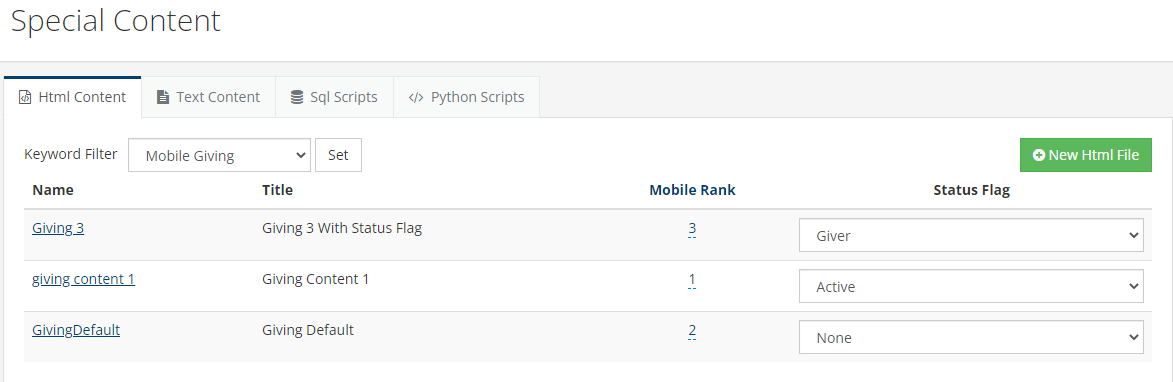
Any new HTML file you create needs to have the keyword set to Mobile Giving
Customize the card using HTML and add photos, text, and graphics to make it appealing and interesting. Make sure you test the card to ensure the content is mobile responsive and easy to view on the mobile device.
Mobile Tip Cards
- Overview
Mobile Tip Cards are the first thing a user sees when a person has logged into the app and is intended to give tips on navigating the app. Cards can be completely customized by each church and there are some templates in place you can choose to use or create your own.
- Examples to how you might set up Mobile Tip Cards
Profile - Use this card to explain how a user can get to their profile and keep their information up to date
Giving Page - Direct users to the giving page
Events - Direct users to the registration events page
Directories Explain how directories work and how a user can access their directories
This feature is only limited by your imagination.

- Where and how to set up Mobile Tip cards?
Mobile Tip cards are managed under Admin > Advanced > Special Content > then select in Keyword Filter Mobile Tip where there are 6 example cards you can use as a template to create your own cards and can be set up by anyone with the Admin and/or one of the Special Content roles.
This will display the 6 example cards and can choose to create them how you like

Any new HTML file you create needs to have the keyword set to Mobile Tip
Customize the card using HTML and add photos, text, and graphics to make it appealing and interesting. Make sure you test the card to ensure the content is mobile responsive and easy to view on the mobile device.
Messages & Push Notifications
- Messages & Push Notifications
Messages can be pushed to a person in the mobile app using the Blue Toolbar envelope icon under Mobile > App Message/Notification. Add a Start Date/Time for when you want the message to send. An Expiration Date/Time can also be used to determine when you would like the message to be removed from the feed.
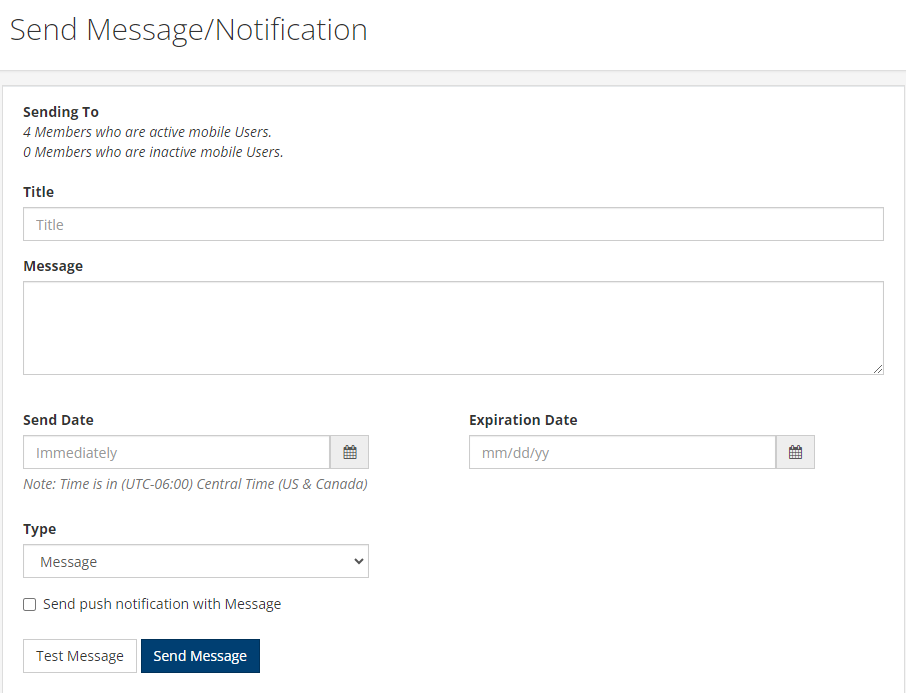
Messages can be created and sent if a few different ways:
Standard Message - Send a standard message
Alert Message - Send a alert message that will show in yellow at the top of the user’s feed
Include Push Notification - You can also send a Push Notification with the Message if needed, not all messages would require a push notification. If a user has notifications enabled for your church’s app and General notifications set to on in their settings, then they will get a push notification.
- How are messages sent?
Messages are either sent from the Blue Toolbar or automated through the process builder
When sending from the Blue Toolbar you’ll see who (from your selected list of recipients) has either:
Logged into the mobile app - These individuals will get the message
Logged in and has push notifications enabled - These individuals will get the message and a push notification
Not a mobile user - These individuals will not get a message or push notification
From here you can add a title, message and select from one of the calls to action (coming soon).
- Who can send messages?
Currently, any user with the AppAdmin role is able to send messages from the Blue Toolbar.
- Messages Log
All sent/schdeuled messages can be tracked under Admin > Communication > Mobile App > Messages Log
- History on a person’s communications tab
Under the Communications and Messages tab, you will be able to see the messages for that individual.
Directories
- Customizable Directory Overview
Sadly, we are past the days when we used to be able to print a directory with all attendee’s contact information for everyone to see. Data sharing and privacy concerns make sharing contact information a real challenge.
The good news is that the way we’ve set up Directories/People Search in the mobile app allows you to set very granular permissions based on relationships that exist within the church. A congregant can then manage their specific privacy preference and override (share more or less) based on their comfort levels.
- Examples
You can now uses directories based on how people are involved and make decisions about what should be shared based on how intimate the group is.
All Regular Attendees - This is likely your largest group and might allow people in this group to see other people’s names and photos only.
Members - This is a more committed group and could allow additional information to be shared like basic contact information.
Sunday School Class - These people are more likely to know everyone in the group and you might allow more information to be visible like family member names.
Small Group - This is likely your most intimate and connected group and it might be appropriate to let fellow members see all the available fields about each other.
Note
You can set as many or as few groups as you’d like. If someone is in more than one group with another person, the group that allows more data to be visible will define what is visible between the two individuals. The Involvement Directory settings will only apply to users with the MyData role.
- How to set up
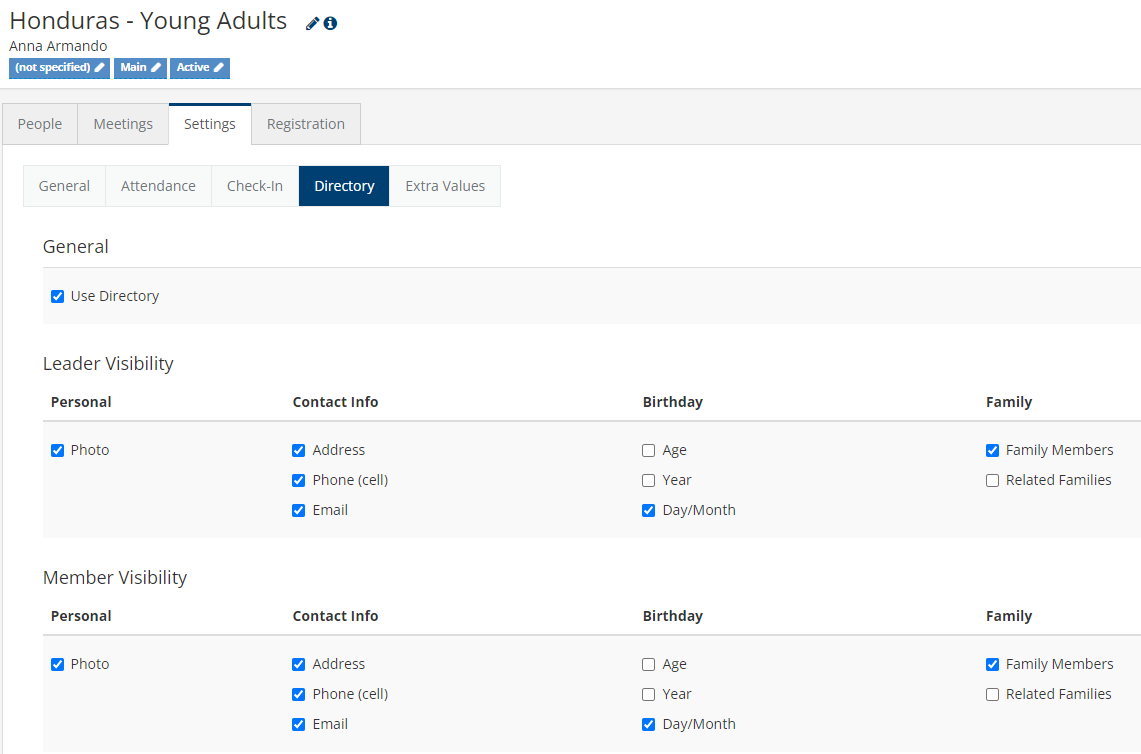
Directories are enabled on a per Involvement basis using the setting seen above.
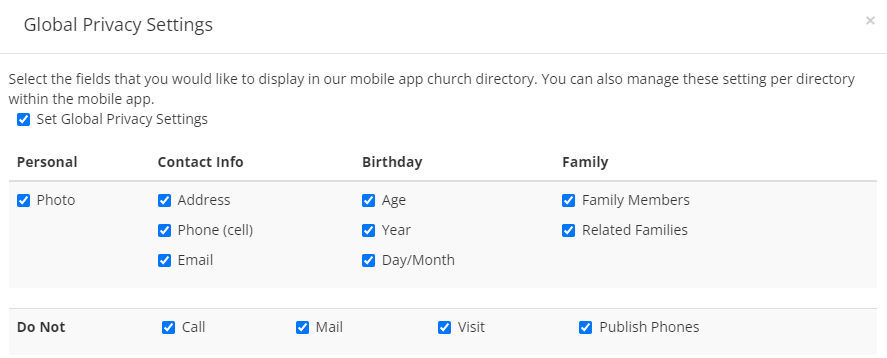
Available Fields - each directory can set which fields are visible by default (a user can override)
Age
Day/Month
Year
Address
Email
Phone (cell)
Family Members
Related Families
Any individual who is a member or leader of an Involvement directory will have access and what information is shown about them can be customized. Please see our documentation about using and setting up this feature.
Report to see which Involvements have directories enabled coming soon
- Managing Privacy settings for a person
A person can set specific privacy settings per Involvement or set a default that applies to any directories they are on.
In Mobile
Under the Directory Search and after selecting a directory, click the three vertical dots in the upper right corner to choose the global settings for all directories or the directory settings for that specific directory. Toggling these options lets the user override the default settings set by the leader of the directories.
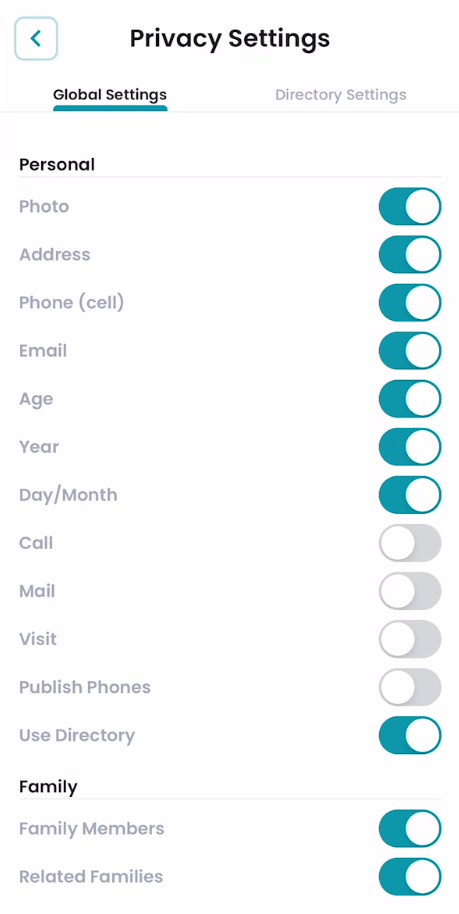
On Web
Per Involvement Settings are managed in the system dialogue box for each Involvement previously mentioned in the “How to Setup” section
The default can be controlled on the person’s profile under the tab Personal > Privacy Settings
- Directories Report
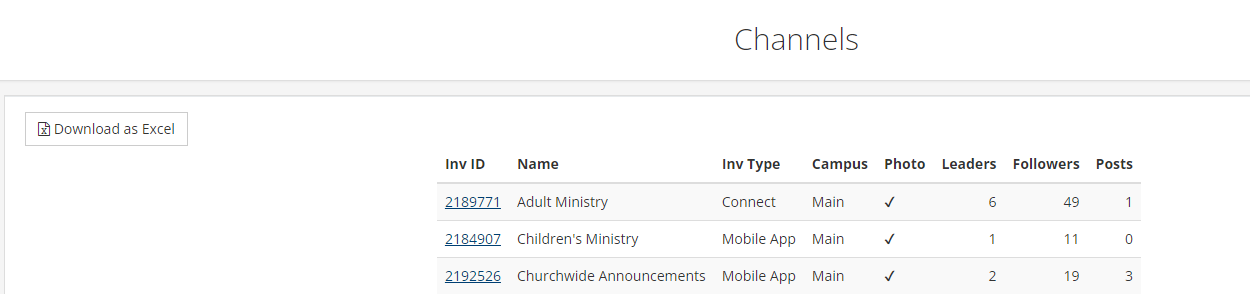
Under Admin > Communication > Mobile App > Directories Report you can view a list of the current enabled directories and details about them.
Clickable Involvement ID link
Name of Directory
Involvement Type of Directory
Campus
What information is available to view about the members in the directory
Number of people in the directory

Channels
- Overview
Channels allow a mobile app user to customize the content that shows up in their feed based on what they follow. This creates a dynamic and personalized feed on what the user is interested in versus the traditional method of sharing all communications with everyone. This tool can be paired with the process builder (read more below) to “pre-build” interests for a user based on their Involvements or what you know about them.
- Public vs. Closed Channels
There are two types of mobile channels:
Public - These channels are discoverable by anyone with the app. Anyone can click to “Follow” the channel and it will join them as a member of that Involvement. When they uncheck “Following”, they will be moved from a current member of the Involvement to a previous member of the Involvement.
Note
All public channels should be built with the No Online Registration registration type.
Closed - These channels exist for the purpose of communicating with a set group of individuals. Those individuals join the Involvement either through a registration form or by being manually added to the Involvement. There is no option for a member to stop following the channel on their own. They would need to be manually dropped from the Involvement.
Note
Involvements created using the Registration Form or Join Involvement registration types and marked as a Mobile Channel, will be forced to be a closed channel, with no option to change that.
Involvements created using the No Online Registration registration type can optionally be set as a closed channel.
- Examples
Your church can completely configure this feature and set which channels are available to users. Here are some examples of channels you might want to setup.
General Church Updates
Campus or Location Specific Ministries
Children’s Ministry
Nursery
Pre-school
Elementary
Youth Group
Demographic or Interest Based
Men’s Ministry
Women’s Ministry
Singles Ministry
College & Early Career
Senior’s Ministry
Faith & Work
Sports Ministries
Leadership Channels
Discipleship
Scripture
Demographic or Interest Based
Small Group Leaders
Elders
Deacons
When first setting this feature up we recommend that you begin on the smaller side and only create channels that have active leaders who will post interesting and relevant content that will engage the intended audience and keep them coming back for more. You are only limited by imagination as to what you want to set up.
- Pair with Process Builder
Set up a saved search and use the process builder to automatically add anyone that meets the set criteria to the Involvement.
An example would be to add all men over the age of 21 automatically to the Men’s Ministry Involvement
If there isn’t a clear search condition that matches a particular ministry consider automatically adding anyone that has participated in that ministry on an ongoing basis.
Automating who initially follows a channel can ensure that when someone logs into the app for the first time they have relevant content immediately. It can also prevent people from falling through the cracks that aren’t as good at managing their interest or preferences.
NOTE: If you plan to use the above recommendation to automatically add people to Involvements based on what you know about them or their activity, it is important that you build into the search to not add people that are already previous members of the Involvement. This will prevent you from re-adding someone that decides to unfollow a ministry at some point in the future.
- Configuration
We recommend creating either a new Program/Division and/or Involvement Type to organize all the “Channel” Involvements before you start creating them. This will help you stay organized and see all available options in quick view.
Settings:
Per Involvement (Involvement > Registration > Mobile/Sites)
Enable Mobile Channel - Check this box to display the Involvement in recommended channels and the Discover tab on the channels screen.
Closed/Private Channel - By default, anyone can follow a mobile channel. If you want to limit who can see a channel, check this box and it will not display in the recommended channels or the Discover tab on the channels screen. Only members of the Involvement will be able to see the channel.
Note
Involvements created using the Registration Form registration type will automatically be set as Private and cannot be made Public.
Photo - Upload a photo that shows in the app in the following places:
User Profile > Involvements
Events
Recommended Events
Events Screen
Event Page Header
Channels
Recommended Channels
My Channels > Followed Channels
My Channels > Discover Channels
Channel Page Header
Note
If a channel or event does not have a channel photo, the image set in the Application Small Logo Light setting (Admin > Communication > Mobile App > Settings > Branding > Logos) will be used.
Badge/Channel Photo - Upload a photo that shows in the app in the following places:
Top of the Channel Page Header
In the place of a profile picture for Channel Posts
Note
If a channel does not have a channel logo, the channel photo is used.
If a channel does not have a channel logo or photo, the image set in the Applications Small Logo Light setting (Admin > Communication > Mobile App > Settings > Branding > Logos) will be used.
Mobile Admin Settings
Leaders visible - This determines whether the leader’s photos and names are displayed on the channel’s page in the mobile app
Follows visible - This determines whether the followers of a channel’s photos and names are displayed on the channel’s page in the mobile app
How campus impacts “Channels” - A user will only see “Channels” that match the campus of the signed in user and those that don’t have a campus. If you’d like a channel to show up across multiple campuses then leave the campus setting as not specified.
Who can post on behalf of a channel? - Anyone you set as a leader member type in the Involvement will be able to post on behalf of the channel in the app. You can set as many or as few leaders as you’d like. Based on the setting above, remember that leaders of the channel might be visible to anyone who follows the channel.
How? - After navigating to the channel’s name, a leader can click on the three dots in the upper righthand corner to “Post”
- Channels Report
Under Admin > Communication > Mobile App > Channels Report you can view a list of the current enabled channels and the details about them.
Latest Update |
7/22/2025 |
Updated Events and Channels sections