Record by Family Attendance
TouchPoint has multiple ways to take attendance. One of them is the Record by Family Attendance feature, formerly known as Ticketing Attendance.
- Record by Family Attendance
There are two ways to take attendance using Record by Family Attendance:
Enter a person’s name in the Find Name field or the People ID # in the Wand Target field.
Scan a Barcode that has been sent via email to those who register online.
Regardless of which method you use, there are other options as well. These are controlled by the 2 checkboxes on the Ticketing Attendance page. Prior to recording attendance decide if you need to check either one, both or neither of them. See below for further explanation of these options.
Checkbox Options
- Require Org Member
When this is checked, you cannot record attendance for anyone who is not enrolled as a Member of the Involvement. If you enter the name, PID # or scan a barcode for a non-member, you will see a message that they are not a member of the Involvement. Therefore, you cannot record their attendance.
This would be used for ‘closed’ events with limited seating or with fees, such as a workshop, concert, etc. This is usually an event for which a person enrolled using online registration.
This is probably the type of event for which you would include a barcode in the confirmation, have them print it to use as a ticket, and use a scanner as the participants arrive.
If you do not check the box, anyone who is not a member of the Involvement will be recorded as a guest.
- Require Registered
When this is checked, you cannot record attendance for anyone who is not already registered for that Meeting.
This would also most likely be used for a ‘closed’ event for which a person paid a fee or there is limited seating. It is possible for someone to register for a meeting and be enrolled in the Involvement (using an RSVP link). Not all members would necessarily be registered.
If you do not check this box, registration will be ignored.
Registration for a Meeting
Registration can be done manually after the meeting has been created.
Go to the Meeting.
Select All from the drop down menu below the Description and check the Editing and Register boxes next to Enable.
Then, for each person you wish to register, click the commitment, select Attending, and click the blue checkmark.
Registration can also be captured by using an RSVP Link.
- Require Both
If you check both options, you can record attendance for only those who are members of the Involvement AND who have already registered for that specific Meeting.
See screenshots below for examples of the onscreen messages relating to non-members, those not in the database, and those not registered.
Tip
There are also sounds associated with the prompt messages to indicate whether or not you were successful in marking the person present. A higher pitched sound when you are successful; a lower pitched sound when not successful.
Recording Attendance by Name
If you track attendance for your worship service and have several hundred people enrolled in the Involvement who write their names on the attendance pad that is passed down the row, this is an excellent way to record their attendance. It also works very well for large events at which the attendees complete a registration card when they arrive.
This allows you to find anyone in the database and record their attendance (if you do not check the 2 requirement boxes). If you have guests that are not found in your database, use the Add Guests button and follow the usual procedures.
See also
- Step 1
Create the Meeting if it is not already created. If it already exists, click the date of the Meeting.
See also
- Step 2
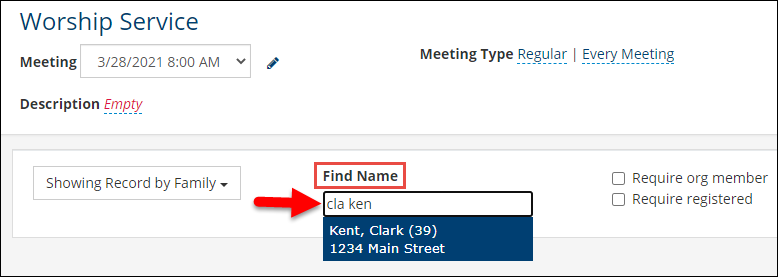
Select Record by Family from the drop down menu below the Description.
- Step 3
In the Find Name field, enter all or part of a name (first name [space] last name or last name [comma] first name). As you type, a list will appear. If the name you want is at the top of the list, just press enter. Otherwise, use your mouse or arrow keys to select the name.
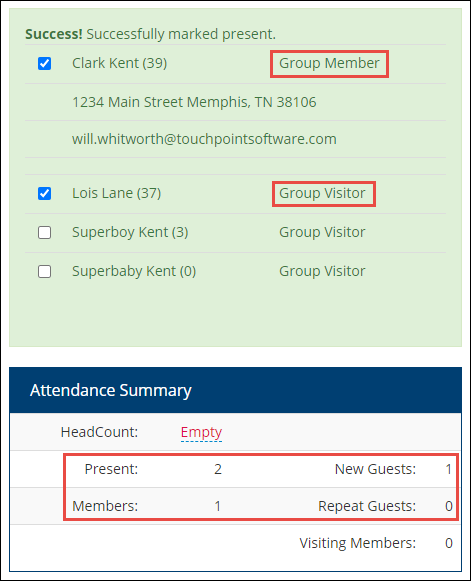
You will see the following message letting you know that the person was marked present. Any family members of that person will be displayed as well, with checkboxes so that you can record their attendance without having to enter each name individually. Each name will have an indicator of whether they are a Group Member or a Group Visitor. Also, the Attendance Counts will update.
Note
This type of attendance does not display a list of members or registrants. It will display a message letting you know if the person was successfully marked present or not. That message will go away when the name is entered and selected. The Attendance Count will change as you continue to add members and/or guests. If a name is not found in the database, a message to that effect will display.
- Step 4
Continue entering names until all attendance has been entered.
- Step 5
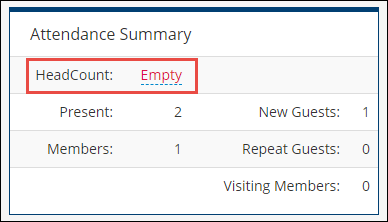
If the headcount from your event or meeting is greater than the number of individuals you recorded present, you can enter the headcount in the Meeting Header. Just click beside Headcount in the Attendance box, enter the total headcount number, and then click OK.
See Screenshots below for other possible scenarios.
- New Guests Not Found
If the person is not in the database, click the Add Guests button and proceed as usual to search and add the person.
See also
Using Barcodes with Ticketing Attendance
If you have large events for which people register online, you can quickly check in those who attend by using a barcode (that you insert into the email confirmation) and barcode scanners (using the Ticketing Attendance feature). One church used this recently and was able to check in 500 attendees in minutes using 2 scanners.
Barcode Email Replacement Code
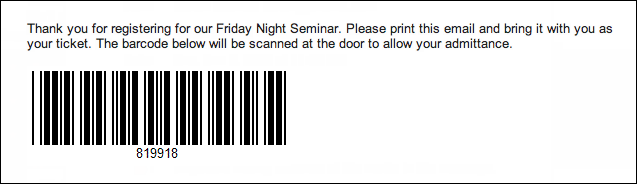
Insert this email replacement code {barcode} in the email confirmation for an event, instructing your registrants to print the
confirmation and bring it with them to the event to be used as their ticket. Your email would be similar to this:
Thank you for registering for our Friday Night Seminar. Please print this email and bring it
with you as your ticket. The barcode below will be scanned at the door to allow your admittance.

{barcode}
Here is what the email will look like for the registrant (notice the People ID # is printed below the barcode):
Recording Attendance with Scanner
When you are ready to check in your attendees:
- Step 1
Create the Meeting, if it is not already created. If it already exists, click the date of the Meeting.
- Step 2
Select Record by Family from the drop down menu below the Description.
- Step 3
Select the requirements - see above for explanation.
- Step 4
Make sure your cursor is in the Wand Target box and using a barcode scanner (the trigger kind works well), swipe the bar code as each person arrives with their confirmation.
If the person has the confirmation on their smart phone instead of the printed email, you can enter the People ID # into the Wand Target box. It will be the number below the barcode in the confirmation.
Note
This type of attendance does not display a list of members or registrants. It will display a message letting you know if the person was successfully scanned or not. That message will go away when the next barcode is scanned. The Attendance Count will also be updated with each person you add.
Tip
Multiple scanners can be used at the same time. If a barcode has already been scanned at another location, you will get a message to that effect.
Screenshots
- Select Meeting Requirements
See the beginning of this article for explanations about the requirements.

- Successful
This is the message when a member is successfully marked present. The AttendanceCount indicates 1 Member and the number Present includes the New Guest as well as the Member.
- Not Enrolled
This is what displays if the person does not meet the requirements (in this case, is not a Member of the Involvement. The message is the same regardless of which requirement they do not meet.

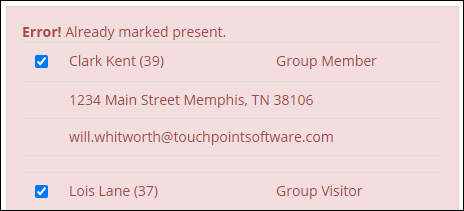
- Already Marked Present
This is what displays if the person has already been marked present or has been checked in:
- Person not found
This is what will display is the person cannot be found in the database.

Latest Update |
03/30/2021 |
Change Ticketing Attendance to Record by Family Attendance