Managing the Volunteer Calendar
If you have not already reviewed them, you will want to see the other help articles relating to volunteer management, to give you a broader overview.
Alternate Simple Calendar View
There are two options for viewing the Volunteer Calendar - the original view (for which most of the documentation refers) and the Simple Volunteer Calendar which is described in a separate stand-alone article outlining the differences and how to manage the calendar using that view. Both options are accessed from the blue Toolbar > Gear. Choose either Volunteer Calendar or Simple Volunteer Calendar.
Important
The meetings for the org you use for the Volunteer Calendar are created by the Time Slots on the Registration > Questions tab. Volunteers are recorded as ‘Attending’ a specific future meeting based on their placement in the calendar time slots. Their attendance (when they actually attend) can be recorded using self-check-in or manually using roll sheets.
If your volunteers did not select their own time slots by registering online, you will use the Volunteer Calendar to place your volunteers in the appropriate time slot.
Note
When you set up a Volunteer Calendar, be sure to enter a First Meeting Date and a Last Meeting Date on the Settings > Attendance tab. If you do not enter these dates, the calendar will begin on the next Sunday and go for 7 months.
There are 2 lists: With No Commitments and With No Commitments. This makes it easy to see who still needs to be placed on the calendar.
Place Individual Volunteers in Time Slots
If the volunteers are not in small groups, and have not selected their own time slots online, use this method to move them to the calendar.
- Step 1
Enroll all of your volunteers in the organization you are using for this Volunteer Calendar, making sure that the organization is set up correctly as a volunteer calendar.
See also
Enlist Volunteers for step-by-step instructions.
- Step 2
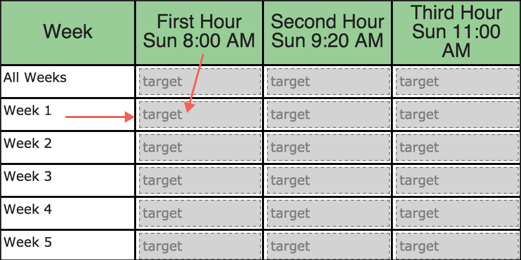
On the org page, go to the Blue Toolbar > Gear > Volunteer Calendar. Click on an individual’s name in the list under the With No Commitments heading. This will highlight the name in dark orange.
- Step 3
Once the name is highlighted, find the target where the appropriate Week and Time Slot intersect, (at the top of the page) and click where you see target.
As soon as you click in the Target box, that person or persons will be added to the Calendar for all of those weeks and time slot.
- Step 4
Continue in this fashion until you have assigned every volunteer to a time/week on the calendar
Tip
You can select and assign more than one person at a time. Everyone whose name is highlighted in dark orange will be placed on the calendar when you click the ‘target’. See below regarding moving groups of people.
- Step 5
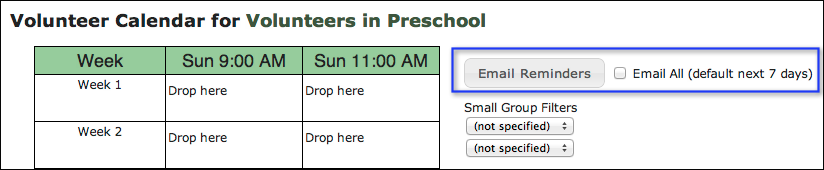
After you have assigned everyone to his specific Week and Time on the calendar, click Email Reminders, making sure you select Email All in order to send to everyone. The default is to send reminders only to those who have commitments within the next 7 days. If you email all, everyone with assignments on the calendar will receive the Reminder Email (on the Registration > Messages tab) along with a list of all of their assignments.
Place Groups of Volunteers in Time Slots
If your members are in sub-groups based on a time and week preference you can use the Sub-Group Filters on the calendar.
- Step 1
On the Volunteer Calendar, filter your list by selecting the appropriate sub-group filter/s. Example: one time slot (such as 8:00 AM) and `one week (such as Week 1). Once your list is filtered, only those in Week 1/8:00 AM will display.
- Step 2
Click on the heading With No Commitments to highlight that heading. Then click the appropriate target at the top of the page (Week and Time) that corresponds to the Time and Week in your filter. This will put everyone in the list on the calendar in that week/time slot for the entire calendar.
- Step 3
Continue until all time slots and weeks have been filled and there are no more ‘uncommitted’.
Note
If you use the filters, but do not want to place everyone on the calendar (perhaps you have more than you need), use the filter, but select only the individuals as directed above.
- Step 4
After you have assigned everyone to their specific Week and Time on the calendar, click Email Reminders, making sure you click Email All in order to send to everyone. The default is to send reminders only to those who have commitments within the next 7 days.
Remove a Volunteer’s Commitments
If you need to remove a person from the calendar, you can remove all commitments or just one.
- Remove All Commitments
Click the person’s name under the heading With Commitments until it is highlighted. Then click in the box labeled ‘Drop here to remove commitments’.
- Remove One Commitment
Click the person’s name in the week for which you need to remove their commitment. Then click in the box labeled Drop here to remove commitments.
Removing Time Slots
If you need to change or remove an existing time slot after volunteers have already been assigned to it, in addition to deleting or changing the time slot on the Questions tab, you will also need to delete all future meetings for that time. Once a person is committed to a slot, a future meeting gets created. Removing commitments will not remove the existing meeting. If no one has been assigned to that slot, the meeting will not exist yet. To delete the meetings, go to the Meetings tab and select Show Future Meetings, then click the Delete button beside those you need to delete.
Request More Volunteers
The leader can send an email when extra volunteers are needed for a specific time slot.
- Step 1
Click the Request Volunteers link on the calendar inside the time slot for which you need more volunteers.
This will open an email that gives you several options in regard to the email recipients.
- Step 2
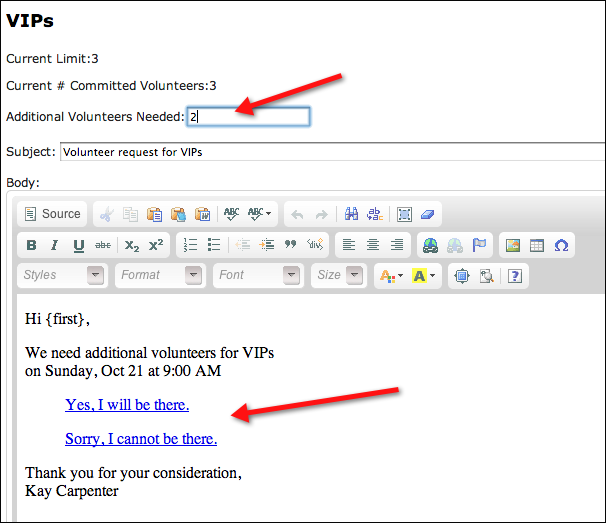
First, enter the number of additional volunteers needed. You will see displayed the Current Limit (needed for a full slot)
You can customize the message or use the default.
- Step 3
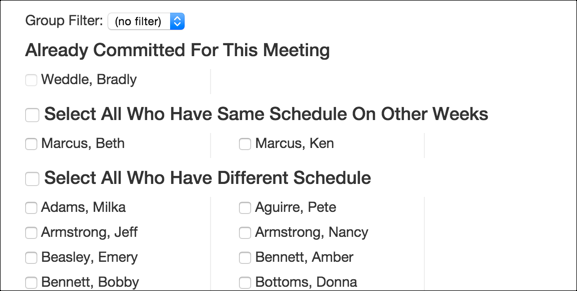
Just under the body of the email, you will see those already committed for that time slot.
Next, is a list of those who have commitments for the same schedule, but on other weeks. You can Select All for this list, or pick specific individuals.
The next option is a list of those volunteers who have commitments for a different schedule. You can Select All for this list, or pick specific individuals.
- Step 4
After selecting the individuals, click Send Emails. As soon as the requested number of needed volunteers has been met, anyone clicking the link “Yes, I will be there” will see a message that the slot has been filled.
The org administrator sending the emails will receive an email with a link to monitor the status of the request.
You can edit this email as well as two other volunteer emails if you prefer them to say something other than the default text. See Customize Volunteer Emails.
Volunteer’s Commitment page
A leader can access a volunteer’s commitment page from the Volunteer Calendar. This is handy is someone calls in and needs the leader to change their volunteer times, or if someone new calls to volunteer.
Normally, you would have your volunteers manage their own commitments and request a substitute when they cannot be there to fulfill their commitment. But there will be times that you may need to do that for them.
Leader Managing Commitments for Volunteer
- Step 1
For a new volunteer, add the person to the organization and then go to the Volunteer Calendar.
For an existing volunteer, just go straight to the calendar.
- Step 2
Click the Registration Page link beside the volunteer’s name in the list.
Check or uncheck the commitments as needed.
- Step 3
Click Submit. If you want to send the person a confirmation email with their new commitments, check that box before clicking Submit.

Note
The number in parentheses beside the checkbox indicates how many volunteers are still needed for that day. That number comes from difference between the Limit on that Time Slot in the Settings for the volunteer org and how many are committed to that slot already.
Time Slots with the necessary number of volunteers assigned will say Filled. That’s when the number committed matches the number in the Limit.
Notice the Get Sub link. That is explained in a separate help article.
See also
Latest Update |
11/13/2020 |
Modify image link with secure protocol.