Scheduler Overview
TouchPoint’s Scheduler feature allows you to organize people/teams to easily see who has committed for something. See the following suggestions for how you can use the Scheduler feature.
Use Case - Volunteer Scheduler
Let’s imagine you have a Worship Band composed of individuals who serve during Sunday morning worship services. You can create Teams for Vocals, Guitarists, Keyboards, and any others for musicians needed during your worship service.
Use Case - Food Sign Up
Your Sunday School Class is hosting a putluck dinner, and you need a way for everyone to indicate what food items they would like to contribute. You can create Teams for the different food items needed, such as Main Dish, Side Items, Drinks, etc.
Use Case - Nursery Drop-Off Reservations
If your church has a large number of babies/children being dropped off on a given morning, it may make more sense to create time slots for parents to indicate when they intend to drop off their kids. You may or may not need to create multiple Teams for this.
Use Case - Baptism Schedules
Our final example: If your church needs churchgoers to sign up for a date and time to receive their Baptism, the Scheduler will be a great tool for you. Create the various Time Slots for Baptisms. You may not need Sub-Groups for this Scheduler option.
These are just a few examples of ways in which you can use the new Scheduler feature. Now that you’ve got some examples, let’s move on to the setup.
Administrative Settings
There are a few scheduler related settings to be aware of. These are found under Settings > Features > Volunteer Scheduler.
- Committed Reminder Text (COMING SOON)
The default text message for committed reminders.
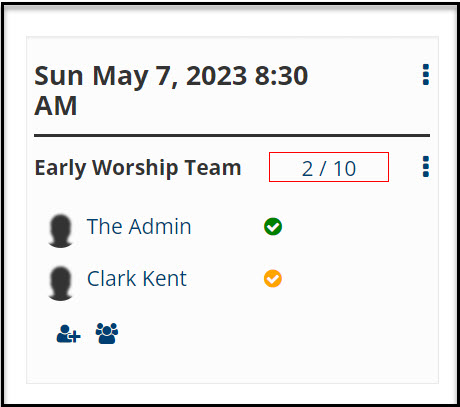
- Show Commitment Indicators
Setting this to True will add visual indicators on the scheduler tab to let you know whether a person is Committed or Scheduled.
- Uncommitted Reminder Text (COMING SOON)
This is the default text message for uncommitted reminders.
Note
Text reminders are coming, but are not available yet. The two settings above related to text message reminders are ready for when that feature is rolled out.
Scheduler Setup
- Step 1
Navigate to Involvements > Manage > Add New Involvement.
Note
Scheduler Involvements must be newly created Involvements. You cannot repurpose a previously existing Involvement. In addition, you cannot copy a Scheduler Involvement like you can with other Involvement types.
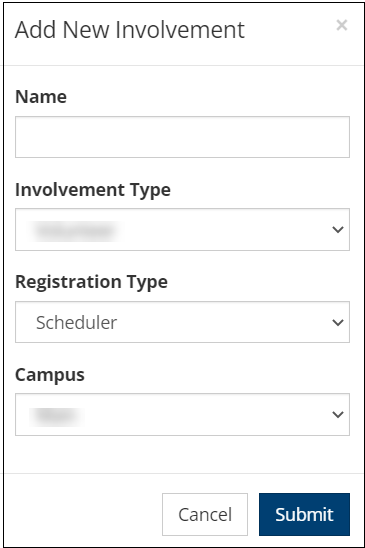
Name - This should be the name of your Involvement.
Involvement Type - Choose your Involvement type.
See also
Registration Type - Choose the Scheduler Registration Type.
Warning
Once this Registration Type is selected, you are unable to change to another Registration Type.
Campus - Choose the Campus associated with your Scheduler.
- Step 2
Now that your Scheduler Involvement has been created, you will see checkboxes for the required items that need to be configured for your Scheduler to appear. These are the bare minimum requirements.
As these items are configured, these boxes will be checked. You may return back to the Scheduler tab and refresh the page to see your Scheduler once these steps have been completed. See details for all settings below.
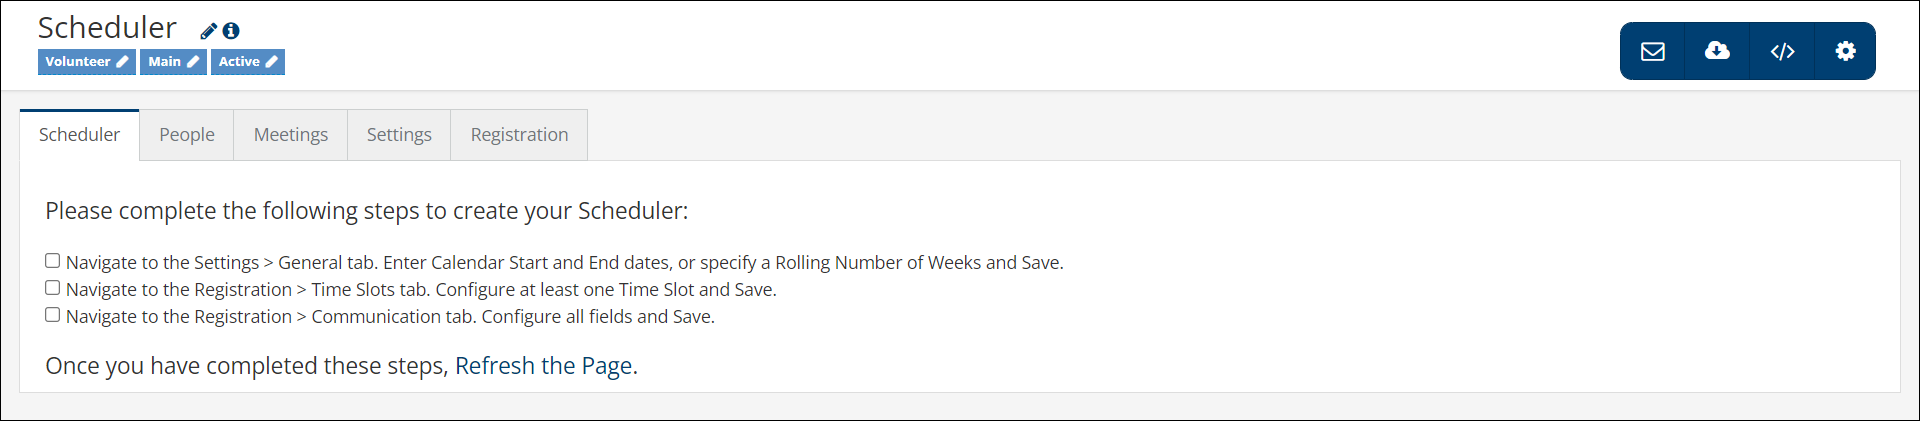
Note
If you checked or plan to check Only use ad hoc on the Registration > Time Slots tab, you can skip the first check box related to Calendar Start/End Date or Rolling Number of Weeks. You may want to use this option if your Scheduler doesn’t repeat (i.e. only takes place one day or one weekend)
Scheduler - Part 2
Latest Update |
5/3/2023 |
Added information regarding administrative settings.