Involvement Settings for Check-In
Before you go live with TouchPoint Check-In, you will need to configure your Involvements. The Admin role or appropriate OrgLeadersOnly role is required to configure Involvement settings.
Important
In order for Check-In to function at all, Allow Check-In must be selected and the Involvement must have a weekly Schedule, or you must create the meetings ahead of time.
In addition to those mentioned above, there are other settings that relate to Check-In. On each Involvement:
- Assign a Schedule at Settings > Attendance (required, unless you create the meeting ahead of time)
In order for an Involvement to display in Check-In, it must have either a Weekly Schedule or you must create the meeting beforehand.
- First Meeting Date
If this is an ongoing Involvement for which you promote members, you can enter the date for promotion to reset the list of guests.
Important
When testing Check-In, be sure that the first meeting date is not a future date. It must be the current date or earlier.
- Roll Sheet Guest Weeks
Enter the number of weeks that you want guests to remain associated with a class for Check-In and to print on the roll sheet. This will be the number of weeks after their last visit. The default is 3 weeks if nothing is entered.
See also
The FAQs in Printing Roll Sheets
- Location
The Location field is located on the Settings > General tab. Enter the room number for the class in that field so that it will display on the labels. This is especially important for the guest labels that the parents keep, so they will know the room number for their child.
- Time Zone Setting
Make sure the LocalTimeZone administration setting is correctly set for your location. It can be found at Admin > Advanced > Settings on the System tab and in the Administration section.
See also
Then go to the Settings > Check In tab and adjust the following settings as needed.
- Allow Check-In (Required)
Check this box in order for the Involvement meeting to display for Check-In. This can also be edited on the Involvements > Search page. Click where you see No and change it to Yes in the Self Check-In column, then click the blue checkmark to save your changes.
See also
- Number of Check-In Labels
Enter a whole number for the number of child labels you want to print for each class member. Some of the classes for younger children like having an extra label to affix to a diaper bag. The default is 1 (if you leave the field blank). You can enter
0if no labels are needed for that class.- Number of Worker Check-In Labels
Enter a whole number for the number of labels you want to print for each leader in the class.
- Suspend Check-In
This checkbox is used to remove a class from the first screen that displays when searching for a class for a guest during Check-In. However, the class will still display (by design) if you are in Administration Mode.
- Class Filled
Unlike the other Check-In settings, this checkbox is on the Registration > Registration tab, not the Check In tab. If it is checked for an Involvement that is set up for Check-In, that Involvement will not display when you search for a class for guests to visit, even if you are in Administration Mode.
Note
Any guest who visited recently enough to still have their name printed on the roll sheet (that is, they visited within the Roll Sheet Guest Weeks setting) will be able to check in, just like members can. So, this checkbox can be used for classes that are too full to allow any more new guests.
- No security label required
Check this box if you do not need a security label. Even if this box is not checked, security labels do not print for adults. This is useful when children are old enough to not need a security label to be picked up.
- Allow Non-Campus Check-In
Check this box if you want the Involvement meetings to display as available for Check-In to anybody, regardless of the campus where they are checking in. It will use the Start and End Birthdates (if you use those), and will display only for those that fit the age criteria. The meeting will actually display beside the name of everyone (that fits the age range) on the family list, regardless of whether they are a member of that Involvement or a recent guest. It is designed to make it very easy for someone to check in without needing to use Administration Mode, select Visit a Class, and then select the class. This works best if the Involvement does not have a Campus designated. This will allow the Involvement to show up in the pick list for someone that does not fit the normal age requirements, yet you want to allow them to check in. Allow Check-In must also be selected on the Involvement.
Use Case for Non-Campus Check-In
This is not the normal way you want to set up Check-In. It is designed for a very specific use case.
Example: A church-wide work day on a Saturday. Using this method, you are able to keep everyone enrolled in the same Involvement (or actually make several Involvements available), while allowing people to check in at the Campus where they will work. Also, anyone not already enrolled can easily check themselves in as a guest.
When using this you would create the meeting ahead of time, not assign a Schedule.
Caution
You would NOT want to use this for a meeting that will happen on a Sunday morning or any other time that you have a lot of classes for people to check into, as it will be confusing for all those checking in for your normal classes.
See also
- Start and End Birthday
These dates determine which Involvements are displayed in Check-In for guests who are looking for a class to visit, so that the appropriate class for their age is displayed.
These dates can also be edited on Involvements > Search. Just click on the date (or where you see N/A) to display the calendar. Select the date and click the blue checkmark to save your changes.
See also
Tip
You can download this Excel Spreadsheet to help you calculate the birth dates. Click the image below to see what it looks like.
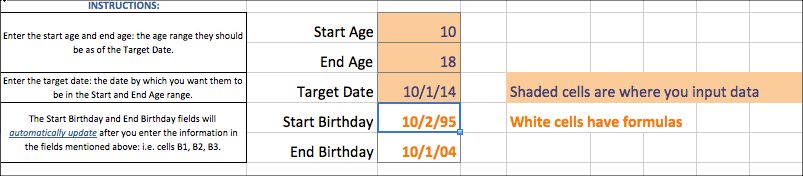
Calculate Birth Date Ranges Screenshot
- Early Checkin
This setting will override the system-wide setting of the same name. Enter the minutes before the class start time that Check-In will be allowed.
- Late Checkin
This setting will override the system-wide setting of the same name. Enter the minutes after the class start time that Check-In will be allowed.
On the Settings > General tab, adjust these settings:
- Grade
Populate the Grade level for the class, if applicable.
- Use
Choose either Date of Birth or Grade to designate how classes in Check-In will be filtered when adding or joining a guest to a class. The Date of Birth option will use the settings for Start and End Birthday on the Settings > Check-In tab.
This option, along with Grade and Birthday Start/End can also be edited on Involvements > Search. Just click under the Use column to select the option from the dropdown.
Latest Update |
7/3/2026 |
Added role requirements, fixed typos and grammar