Merging Duplicates
When you discover that a person in your database has two records (what we call a duplicate), you will want to merge the information from one record to the other and delete the duplicate record.
This merge process should only be done after someone has verified which two records are duplicates, decided which record to keep, and which information is correct. The normal rule of thumb is that you keep the older record or the one that has church membership information, such as Decision or Baptism, or the one that is in the correct family.
Be sure to read the article about the tools in TouchPoint for finding duplicates. That article also contains 3 short videos demonstrating the various parts of the process including actually merging duplicate records.
See also
Important Information about Data
Related Families information is (by design) not moved during either merge process. If this information is applicable to the record you are keeping, add that manually before the duplicate is deleted.
Contributions, Involvements, and other information (see below) is not merged until the Admin (or a user with Manager2 role) completes the Part 2 process using the Merge Fields and Move Related Records button.
Family - If the record you are keeping is not in the correct family, you will need to add them to that family. This is not done during the merge.
The Merge Controller has 2 parts.
Because clean data is vital to ministry, we divide this process into 2 parts, which are intended to be performed by different users. Part 1, by the person with Manager role; Part 2, by the person with Manager2 role. We believe that having a 2nd set of eyes look at the records is important before a record is completely merged and deleted. There is no ‘undo’ button.
- Part 1
Once the duplicates have been identified, the user with Manager role (typically the New People Manager) decides which basic information to move to the other record and then moves that information using the Merge Controller. This merges what is on the person’s basic tab and includes their family address.
- Part 2
Once the basic information has been merged, the next part of the process must be done by the user with both Manager and Manager2 roles to complete the process. This is the process that will move the Involvements, Attendance, Registrations, Contacts and Contributions. This is also when, by default, the duplicate record is deleted. You can uncheck the Delete box, but we recommend you ultimately delete the duplicate record.
For some churches, this entire process (Part 1 and Part 2) will be handled by the same person. If that is the case in your church, that person must have both the Manager and Manager2 roles or be the system Admin.
In these cases, they can select the radio buttons for the appropriate basic information, then use the red Merge Fields and Move Related Records, never using the blue Merge Fields button.
Part 1 Process
Once the duplicates have been identified, and the Manager knows which record to keep, he can start the merge.
- Step 1
Go to the people record whose information will be moved. This is the duplicate, the record that will ultimately be deleted. We refer to this as the From Record.
Select Blue Toolbar > Gear > Merge this Duplicate. This will open the standard Search dialog box.
- Step 2
Using the Search dialog, find the record you want to keep. This will be called the To Record. This is the record that will receive the merged information.
Click the name of the correct person to open the Merge Controller.
Tip
The Duplicate tab will list possible duplicates. You can use that to find the People ID# for the record you want to keep. Enter that ID# in the search box, to easily find the exact record.
- Step 3
On the Merge Controller, use the radio buttons to select the correct information. That will be the data on the From Record that you want to move or the information on the To Record that you want to keep. If neither record has the correct information, select the radio button in the Alternate Value column and enter the correct information or select it from the drop-down.
Tip
Some fields will not be displayed if both records have the same information in those fields. To force the display of all fields, check the box to Show all fields.
To choose all the radio buttons for the From Record, click the radio button beside the People ID# for that record.
If you realize that you want to change which record you keep, click the Swap link on the right. The From Record will become the To Record.
Below the radio button selections is a section to Move Other Records. You will find checkboxes to include Involvements, Ticket Orders, Emails, Tasks, and other important options.
Tip
On the Merge Controller page, the People ID #s for each of the records is a toggle link which will open a new tab for each person’s record. This allows you to keep 3 tabs open and move back and forth from the Merge Controller to viewing the full record for each person. It makes it easy for you to verify any information that is not included in the Merge Controller.
- Step 4
When you have the fields selected, click the blue Merge Fields button in the bottom left of the page.
This will merge the selected items into the To Record. Verify that the personal information is now correct. If you made an error, go to the System > Changes tab and reverse any changes that you made in error.
- Step 5
After you are satisfied that the To Record is correct, you are ready to complete the process by notifying the Manager2 user, so they can complete the merge and delete the From (duplicate) Record.
An easy way to notify that user is to copy the URL of the Merge Controller page before you click the Merge button. Paste that link into an email. Or you can give them the PID #s for each record. Just be sure that you are explicit about which record to keep.
Merge Process Part 2
After receiving notification from the Manager, the Manager2 user will complete the Merge/Delete process as follows:
Note
If you are using the URL as described above, you will skip steps 1-2, as you will already be on the Merge Controller page with the correct records.
- Step 1
Find the From Record and select Blue Toolbar > Gear > Merge this Duplicate.
- Step 2
Find and then select the To Record using the Search dialog box. Enter the PID# for that record to find the exact one you want. This will open the Merge Controller.
- Step 3
Verify that the Delete box is checked and then click the red Merge Fields and Move Related Records button.
If you prefer to delete the record later, you can uncheck the Delete box and later use the Delete Person link under Blue Toolbar > Gear menu. However, you must request the Delete role from TouchPoint Support. The preferred method is to delete the duplicate during the merge process.
This Part 2 merge will move information you select from the From Record to the To Record and then delete the From Record. The information moved can include:
Involvements (Current and Previous)
Attendance History
Transaction Records
Contributions
Ticket Orders
User Accounts
Volunteer Records
Volunteer Scheduler
Extra Values
Reg Records
Managed Giving
Payment Info
Background Checks
Check-in Times
Mission Trip Support
Scheduled Payments and Methods
Emails
Text Messages (SMS)
Involvement Member Documents
Registrations
Member Documents
Tasks
Email or Text Opt-Outs
Contacts
Status Flags
Engagement Scores
Mobile Data
Sermon Notes
The process takes a few seconds, so wait until the screen refreshes. It will display the remaining, merged record.
Extra Values During a Merge
When merging duplicate records, all Extra Values from the From Record are moved to the To
Record. If both records have an Extra Value with the same field name, the system cannot
overwrite the existing value, as that could result in data loss. Instead, it preserves both
values by renaming the moved Extra Value, appending _mv (short for “moved value”) to the
field name.
For example, if both records have an Extra Value named Allergies, the To Record will end
up with two Extra Values: Allergies (the original) and Allergies_mv (the one brought
over from the From Record).
Tip
After the merge, review any Extra Values with _mv in the name on the merged record.
Manually reconcile the values by keeping the correct information, then delete the _mv
version to keep your data clean.
Note
If you realize that the two records are not actually duplicates, you can press the Mark as Not Duplicate button on the Merge Controller page. This will flag those as not duplicates of each other. It will not remove either record from the Duplicates tab on the people records, unless you change enough information about the person so that it no longer meets any of those criteria. However, it will prevent the 2 records from displaying when you run the Admin Find Duplicates process. If needed, press the button again to Mark as Duplicate.
.
Batch Process
If your System Admin runs the Find Duplicates batch process, the results page will have the links already formed to take you directly to the Merge Controller.
In these cases, you would begin with Step 3 for Part 1 above.
Because the Duplicate Result page is viewable by the System Admin only, the Admin could copy everything on that page, and paste the information (links to the Merge Controller) into an email and send them to the Manager.
See also
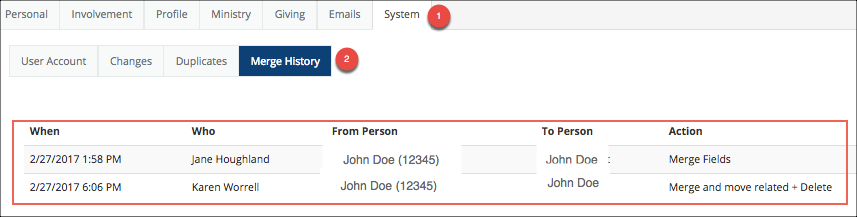
Merge History Tab
Every people record has a tab under the System tab named Merge History. After you merge a record, you will see information on this tab indicating which user made the merge and when. If you are using the 2-process method, you should see 2 rows for each completed merge as in the image below. Notice the 2nd row indicates that the duplicate record has been deleted.
Latest Update |
06/15/2026 |
Added Extra Values During a Merge section, updated moved items list to match current software, fixed typos