Scheduler: Registration Settings
Time Slots or Only Use Ad Hoc
- Time Slots
Time Slots will organize the individuals on the Scheduler. Within the Time Slots will be Teams, which may be further broken down by Sub-Groups. You may also choose to have just a Team with no Sub-Groups.
Note
There can only be one time slot at a particular day and time.
Example: You cannot have two time slots for Sunday at 8:00 am.
However, if there is an ad hoc meeting scheduled for a particular date and time, a time slot can be added for that day of the week and time once that ad hoc meeting has passed.
Example: You have an ad hoc meeting scheduled for 2/14/2023 at 10:00 am. That meeting happens to fall on a Tuesday. Once it is past Tuesday, February 14 at 10:00 am, you can create a time slot for Tuesdays at 10:00 am as long as there are no other ad hoc meetings scheduled on a Tuesday.
Warning
Once you click Save in the Time Slots tab, those meetings are created based on the Date Range or Rolling Number of Weeks indicate on the Settings tab. If you return to the Time Slots tab to make any changes, those changes will only take affect on meetings created beyond those that were originally created.
Example: If you have the Settings tab set to a Rolling Number of 6 weeks, once you click Save on the Time Slots tab, 6 weeks worth of meetings will be created matching those settings. If you then go back and make any changes, those changes will only be shown in the following 6 weeks. To make those changes on the originally created 6 weeks, you will need to edit each individual meeting.
- Use Only Ad Hoc
Alternately, you may wish to check the box next to Only use ad hoc. This if a great option if your event does not repeat. For example, a seasonal carnival. If you check this box, you will not have the option to add time slots. You will manually add meetings on the Scheduler tab.
- Step 1
To start, click the green Add Time Slot button or check the box next to Only use ad hoc. If you checked Only us ad hoc, you are done with the Time Slots tab.
Note
If your event is does not repeat, it is recommended to check Only use ad hoc. When you do so, you will not be able to add any time slots. You will manually enter meetings on the Scheduler tab.
- Step 2
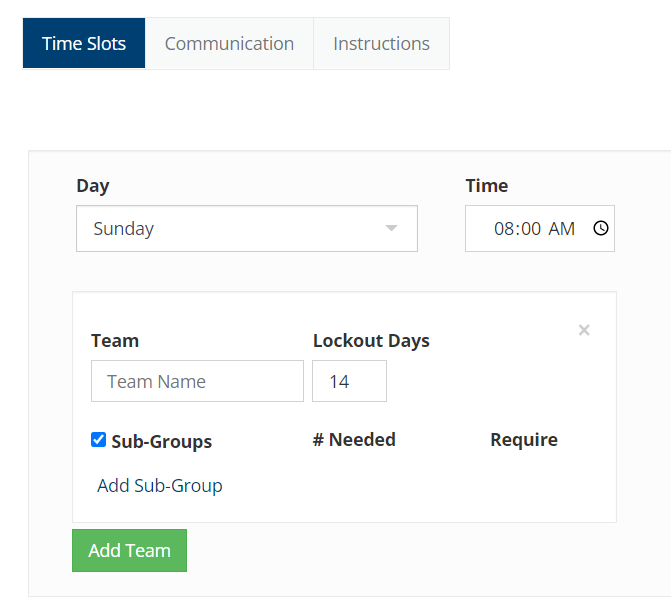
Set the appropriate Day and Time. The default will be Sunday at 8:00 AM.
- Step 3
Enter the Team Name. For example, if your Scheduler is for Worship Service Volunteers, Team Names might be “Ushers,” “Greeters,” “Welcome Center,” etc.
Note
The team names will show up in the order they are entered. There are no sort options. Keep that in mind when building your teams.
- Step 4
Set the number of Lockout Days. This is the time frame in which a person must request a sub instead of just removing their commitment for that week. If you always want them to get a sub, set the days to 365.
- Step 5
Check the box next to Sub-Groups if you want to further organize your Teams. For example, your Ushers may have Sub-Groups of Section A, Section B, Section C, etc. Your Greeters may have Sub-Groups of Main Entrance, North Entrance, South Entrance, etc.
After you have checked the box next to Sub-Groups, you will see a link to “Add Sub-Group.” A pop-up will appear, allowing you to select from the existing Sub-Groups on this involvement. If you don’t want to use any of those or if you don’t have any created yet, you may select Add New from the drop down.
After selecting to Add a New Sub-Group, you may enter the name of your Sub-Group, and then click Save. You will see the new Sub-Group listed, and you will have the ability to take further action from the drop down. You may Add a New Sub-Group again, select and existing Sub-Group, or select Save to save your progress thus far and return back to the previous page.
After you name your Sub-Groups, you may specify the Number Needed for that Sub-Group and indicate if you want to Require people to be members of that Sub-Group in order to sign up for a slot.
You may use the Add Team button to continue adding Teams until you have them all created.
Note
The sub-group names will appear in the order they are entered. There are no sort options. Keep that in mind as you build your subgroups.
- Step 6
Once you finish adding your Teams and Sub-Groups for your first Time Slot, you may use the Add Time Slot button to add additional time slots for this Scheduler. For example, if you are in need of Greeters for two services on Sunday morning and one on Wednesday evening, you would now need to add the second Sunday morning Time Slot and then the Wednesday evening Time Slot.
More about Sub-Groups
To require that registrants be members of the Sub-Group, you will need to have people added to your Sub-Groups.
Sub-Groups are created either here on the Time Slots sub-tab or on the Sub-Group Management Page.
The Sub-Group Management page is also where you will go to modify the Sub-Group name once you have already created the Sub-Group.
NOTE: Once created, sub-groups cannot be deleted from the Sub-Group Management page. They can be deleted from a time slot and/or individual meeting.
See also
More about Teams
You must have at least one Team configured for each Time Slot, but you don’t have to configure more than one.
Note
You may have the same Teams and Sub-Groups for the different Time Slots, or you may have different ones. You may also need different Numbers of Volunteers for your Teams/Sub-Groups.
- EXAMPLE
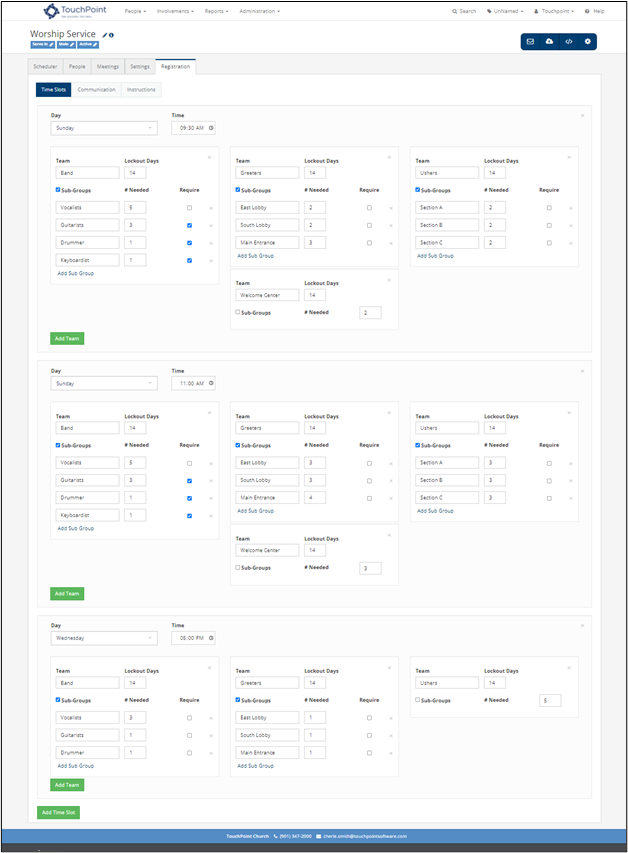
In the screenshot below, a Scheduler is being created for a Worship Service. The church holds two worship services on Sunday mornings and one on Wednesday evening.
For the Sunday morning early service, they need four teams – Band, Greeters, Ushers and Welcome Center Volunteers. The Band, Greeters, and Ushers have Sub-Groups for the position/location of those signing up, but only the Band’s registrants are required to be in that Sub-Group. In other words, they need people who are experienced and have been vetted by the church as qualified to be a Guitarist, Drummer, or Keyboardist. The Welcome Center Team doesn’t need to be further broken down; they simply need two people who are able to work during the morning hour.
The second service on Sunday morning is very similar, only slight modifications to the number of volunteers needed for some of the Teams.
The Wednesday evening service clearly operates with less volunteers. They only have three Teams instead of four, and the Ushers aren’t assigned to sections/Sub-Groups that night.
Important
If a worship service changes time, change it on the time slot. It won’t affect any of the meetings that have been created. It will only affect future meetings. You would have to edit each meeting individually. This highlights the benefit to keeping the rolling number of weeks small.
When meetings are created, there are two types. There are Meetings and Time Slot Meetings on the scheduler. The Meeting itself on the Meetings tab doesn’t get created until someone signs up or is assigned. The Time SlotMeeting doesn’t exist for attendance purposes until someone is assigned to it. The Meeting will also get created by clicking on the Meeting button from the menu.
Communication
This tab is where you configure the communication associated with your Scheduler. Click the dark blue round i on the Registration > Communication tab for more information about each message option.
- Email From
Select the person(s) to receive communication when someone registers or signs up for a spot on the Scheduler. More than one person may be listed. If there are multiple people selected, the first one will be who the confirmation email and reminder email come from.
In order for someone to show up in the list of available people, they must at least have the Access role. All selected people will be notified when a registration has occurred.
If there are no users selected, the Confirmation will come from one of the System Admins, and all users with the Admin role will receive an email notification if someone completes a registration.
Note
By default, the appropriate Template for each option below will be selected. Once you have the Email From selected, you can click Save.
- Confirmation Email
Select the appropriate Template (found in Administration > Communication > Email Templates) for your registrants to receive once they register/sign up for a slot.
- Reminder Email 1
Select the desired Template for your registrants to receive in advance of their commitment(s).
Days Before - Enter the number of days you would like your email to be sent to those registered/committed.
Time - Select the time (according to your local time zone) that you would like the email to be sent.
Disabled - Check this box if you wish to disable the reminder email. If checked, this reminder will not be sent.
- Reminder Email 2
You may send a second reminder email if you like. Use the same notes from Reminder Email 1 to configure your second piece of communication. Email Reminder 2 must be scheduled after Email Reminder 1.
- Sub Request
When a registrant uses the Request Sub option, this template will be loaded.
- Sub Confirmation
This email is sent to the person who confirms that he/she will accept the Sub Request.
- Request People
This email is sent when another person clicks on the links in the request people email.
See also
Instructions
Navigate to the Registration > Instructions tab to customize any on-screen messages that the registrant will see during the Registration process.
- Login Instructions
This message appears on the page where a person has the option to login to register.
- Options Instructions
This message appears on the page when the registrant is viewing the available slots for which to register.
Scheduler Setup - Part 4
Latest Update |
11/27/2024 |
Fix typos