Sub-Group Management
You must have the ManageGroups role in order to create, delete and manage sub-groups within an organization - i.e. to access the Manage Sub-Groups page. However, all users that can access that organization can view the groups and filter by groups to communicate with specific sub-groups in the organization. Also, sub-groups can be managed on more of a one-by-one basis using the Member Dialog for the member.
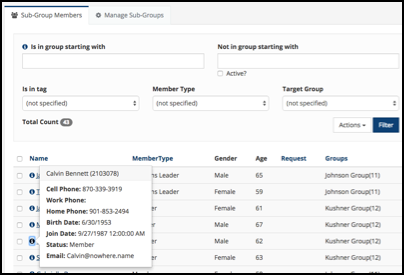
The Sub-Group Management page has two tabs: Sub-Group Members and Manage Sub-Groups.
App Attendance by Sub-Groups
If you want your sub-group leaders to be able to take attendance using the TouchPoint app, and you want to display only their group in the roll list, you can do that.
You will need to set up the org to Filter Attendance Roster by Sub-Group and set up the leaders as leaders of their sub-group on Sub-Group Management page. We have outlined the steps to follow in the article about recording attendance using the app.
See also
iPhone / Android Attendance with App See the section Sub-Group Attendance.
TouchPoint has a special function for Recreation Teams that uses Sub-Group Management to automatically put members sub-groups / teams.
See also
Org Leaders - View Sub-Group
If you want your org leaders to view initially view the sub-group of which they are the leader when they log on, you can set up your groups to do that.
- Step 1
You start by creating sub-groups with a leader(s) in each group.
- Step 2
Create a 2nd sub-group for each of the existing sub-groups, adding -sgleader after the name of the group. Example: For the sub-group of which Bob Smith is the leader, you would have one group named Smith Group and another group named Smith Group-sgleader. Your groups do not have to be named with the leader’s name. They can be Group 1 and Group 1-sgleader.
- Step 3
Add the sub-group leader(s) to both the original sub-group Smith Group AND to the new group Smith Group-sgleader.
Note
If you have multiple leaders in each group, add all of them to the sgleader group as well.
- Step 4
Notify your leaders (that have user accounts and OrgLeadersOnly role) that when they initially go to the Member tab for their organization, it will already be filtered for their sub-group.
Note
After a leader initially logs on, he will be able to remove the filter and view the entire org if he needs to. This option is to make it easier for an org leader to log on and view just his group.
Manage Sub-Groups Tab
Use this tab to manage the sub-groups themselves, not the members of the groups.
Create a group
Rename a group
Delete a group
Create New Sub-Group
- Step 1
Go to the organization and select the Blue Toolbar > Gear > Administrative > Sub-Group Management, then select the tab Manage Sub-Groups.
- Step 2
Click the green + Create Group button and enter the name of your new sub-group in the dialog box. and click Submit.
- Step 3
Repeat the two steps above until you have created all the groups you need.
Prefixes for Sub-Group Names
It is recommended that you use a prefix to distinguish sub-groups that have a different purpose. In other words, each group of sub-groups that have the same purpose would within the organization would have the same prefix. For example: for children’s camp, you could create groups for your cabins such as CB:Smith and CB:Jones. Then you would also have groups for recreation such as REC:Blue and REC:Red. Each camper would be in 1 of each of those groups. The prefix helps with filtering and with searches.
Important
If you will be using these sub-groups in a Volunteer Calendar and you want to be able to filter by that group when Requesting a Sub or Requesting More Volunteers, you must use the prefix SG: for each group. Example: SG:Greeters.
Warning
Group names should not be longer than 30 characters.
Batch Update to Create Sub-Groups
If you want the same sub-groups for multiple orgs, your System Admin can do this using the batch import. See the Sub-Group section of this help article.
Rename a Group
- Step 1
Go to the organization and select the Blue Toolbar > Gear > Administrative > Sub-Group Management, then select the tab Manage Sub-Groups.
- Step 2
Click the Rename button in the Actions column for the group whose name you want to change.
- Step 3
Enter the new name of the sub-group in the dialog box and click Submit.
Delete a Group
- Step 1
Go to the organization and select the Blue Toolbar > Gear > Administrative > Sub-Group Management, then select the tab Manage Sub-Groups.
- Step 2
Click the Delete button in the Actions column for the group you want to delete.
- Step 3
Click Yes, Delete it when prompted.
Note
While this deletes the sub-group, it does not drop anyone who was in that group from the organization itself.
Delete Multiple Groups
- Step 1
Go to the organization and select the Blue Toolbar > Gear > Administrative > Sub-Group Management, then select the tab Manage Sub-Groups.
- Step 2
Check the box beside those groups to be deleted (hold down the Shift key and click the first and last in a range to select all groups).
- Step 3
Click the red Delete Groups button above the list of groups. The button will indicate how many groups you have selected.
Note
The Delete Groups feature is very handy if you change your sub-groups every year. You can delete them all and start over, it you do not want to rename each one.
Sub-Group Members Tab
Use this tab to manage the people in the groups.
Add members to a group
Remove members from a group
Filter for those who are in a specific group or type of group
Filter for those who are NOT in a specific group or type of group
Filter for those who are in a specific group or type of group, but who are NOT in another specific group or type of group
Use a Tag to filter members to add to a group
Use Member Type to filter to add members to a group
Adding Group Members
- Step 1
Go to the organization and select the Blue Toolbar > Gear > Administrative > Sub-Group Management, then select the tab Sub-Group Members.
- Step 2
Select the sub-group you want to populate from the Target Group drop down and click Filter to move those already in that group to the top of the list. That entire group will be shaded blue. You will also know how many are in that group by the number in parentheses beside the group name in the Groups column.
- Step 3
Check the box beside each person you want to add to the Target Group.
- Step 4
When done, select Actions > + Assign Selected To Target Group.
Removing Group Members
- Step 1
Go to the organization and select the Blue Toolbar > Gear > Administrative > Sub-Group Management, then select the tab Sub-Group Members.
- Step 2
Select the sub-group you want to manage from the Target Group drop down and click Filter to move the members of that group to the top of the list. That entire group will be shaded blue. You will also know how many are in that group by the number in parentheses beside the group name in the Groups column.
- Step 3
Check the box beside each person you want to remove from the Target Group.
- Step 4
When done, select Actions > - Remove Selected from Target Group.
Filtering
There are a number of options on this page for filtering. When filtering based on the group name, this is where prefixes come in handy. You can find everyone in one type of group based on the prefix, but not in another type of group.
Filtering for Those Who ARE in a Specific Group
To display those who are in a specific group or a specific type of group:
- Step 1
Go to the organization and select the Blue Toolbar > Gear > Administrative > Sub-Group Management, then select the tab Sub-Group Members.
- Step 2
Enter the beginning of the group name (or the entire name) in the Is in group starting with text box.
- Step 3
Press the Filter button
Filtering for Those NOT in a Specific Group
To display those who are NOT in a specific group or a specific type of group:
- Step 1
Go to the organization and select the Blue Toolbar > Gear > Administrative > Sub-Group Management, then select the tab Sub-Group Members.
- Step 2
Enter the beginning of the group name (or the entire name) in the Not in group starting with text box and check the box beside Active?.
- Step 3
Press the Filter button
Filtering for Those Who ARE in One Type of Group But NOT in Another Type of Group
This is where the use of prefixes might be useful. See note above regarding the use of prefixes.
- Step 1
Go to the organization and select the Blue Toolbar > Gear > Administrative > Sub-Group Management, then select the tab Sub-Group Members.
- Step 2
Enter the beginning of the group name, the entire name, or just the prefix in the Is in group starting with text box.
- Step 3
Enter the beginning of a different group name, the entire name, or just the prefix in the Not in group starting with text box and check the box beside Active?.
- Step 4
Press the Filter button.
Note
This is a great way to ensure you have everyone assigned to the appropriate types of groups. In the example above, a camp organization, everyone needs to be assigned to a Cabin as well as to a Recreation group. This filter let’s you easily find those not assigned to one or the other, and easily assign them right there.
Filtering by Tag or by Member Type
Using these filters can be helpful when initially assigning people to sub-groups. If you want to create a group of all the leaders, you can filter based on their Member Type and add them to the Leader Group. If you have people in a Tag, you can filter for those and create a sub-group for just those people. The Tag might include those who are not in the organization, but you can still use it to find those who are in the org and in that Tag.
To use either or both of these filters, just select the appropriate Tag and / or Member Type and click Filter.
Then either add them to the Target Group or remove them from the group.
Use the Request Field
Online Registrations have a Question option named Request. The intended use is for someone signing up for a ball team, a Bible study, VBS, etc. to enter the name of a person in whose group they would like to be placed. This Request information displays in several different locations. The sub-Group Management page is just one of those places. Therefore, it can be taken into consideration when placing people in sub-groups, because it is visible on the page where you are making your sub-group assignments.
You can click the Request header to sort so that those with a request will display at the top of the page.
You can then press Control F to open a Find dialog and enter one of the names listed as a Request and press Find.
This will show you who else might have requested that same person.
It is just a way that you can view that information and use it when creating and placing people into sub-groups.
Latest Update |
11/13/2020 |
Modify image link with secure protocol.