Creating a Basic Registration
You can create a simple, no-frills registration in a matter of minutes. You must be a user with Edit role in order to do this. These instructions will not include all the possible options available on registration, in order to show you the simplest registration possible. However, we have other help articles for each tab as well as Show Help buttons on each tab. This in context help blurbs describe each item on the tab.
This video walks you through creating your first online registration.
See also
- Step 1
Create a new Organization or use an existing one.
See also
- Step 2
Go to the Settings tab and then select the following tabs to adjust the settings:
Tip
Click Show Help when on any tab to see descriptions of each item.
General tab - Click Edit and select the appropriate Entry Point and then Save Changes
- Step 3
Go to the Registration tab and use the following tabs to create the needed settings.
Registration tab - Click Edit and change the Registration Type to Join Organization
If you want the registration title to be something other than the name of the organization, enter that in the Registration Title field.
Select the Registration End date.
Then click Save Changes
Tip
Do not set the Registration Start date until after you have tested the registration, if the date will be in the future.
Messages tab - You will make several changes on this tab.
Click Edit and then Choose users to notify Search for the person who should be the sender of the email confirmation and any other users who should also receive the staff notifications.
Once you find the person, check the box beside their name and then search for the 2nd person (if needed) & do the same. Make sure that the person who is to be the sender of the confirmation is at the top of the list.
Then click Update Selected
Enter the Subject of the confirmation.
Click Edit under the Confirmation Body label and create the body of the email. Click Save (this saves only the email) Then click Save Changes. to save all changes on the Messages tab.
There are email replacement codes that you can use in your confirmation email. There is also another help article specifically about the Messages settings.
Warning
Be sure that you do not leave this tab until you have clicked Save Changes otherwise, you might forget.
- Step 4
Test your Registration. The link to post on your website is on the BlueToolbar > Gear > Administrative > Try Registration
Test your registration before you post the link or email a Register Link.
Important
Pay close attention to the message when you click Try Registration. See image below.
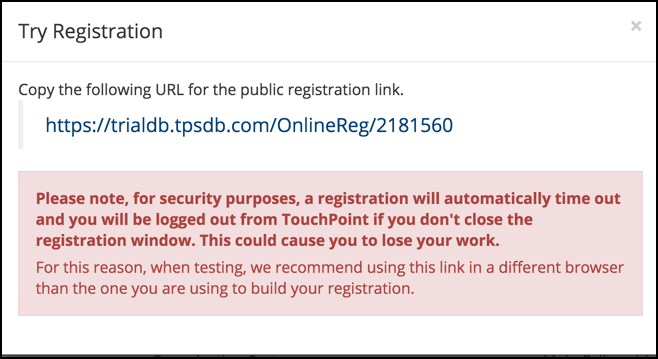
If you just click the link, it will open the registration and you will be logged in. That’s another reason why you might want to use a different browser for testing.
You should get several of your colleagues to test the Registration completely, actually registering themselves, so that they can experience exactly what your registrants will. This way you will be able to help them.
Be sure to look at the email Confirmation you receive to verify that it is coming from the correct sender.
Once you have finished, drop all the testers and remove their history.
View this 3 1/2 minute video showing you how to test a simple registration logged on as yourself, finding existing records, and even creating a new record.
Post the link on your website
In order to post the link, you first need to capture / copy the link.
Select Toolbar > Gear > Administrative > Try Registration. The URL is the link you would send to your webmaster to post on your website under a Register Now type of button.
Right-click, copy the link and then paste it on your website or in an email to your webmaster.
Email a Register Link
In addition to posting links on your website, you should also send an email to a targeted audience in your database to make it very easy for them to register. Be sure to include a Register Link or Register Link2. This is NOT the same as the link you post on your website.
See also
A word about testing and fees
If you are testing a registration that has a fee, you can use a Coupon. Or,if you have the test account number for your merchant provider, you can test using that. If you are using the test credit card number for Sage, the fee must be something other than $5, or it will get rejected. Sage allows you to use $5 and their test account in order to see what happens when a transaction is rejected.
Latest Update |
11/13/2020 |
Modify image link with secure protocol.