Background Checks and Trainings with Protect My Ministry
- Protect My Ministry
This is a third-party vendor that processes background checks, credit checks, and training classes. As part of Volunteer Management, TouchPoint integrates with Protect My Ministry to make it easy for you to request these for your volunteers or employees. Our integration allows you to request these directly from a person’s record in the database.
In order to use this feature, your church will first need to establish an account with Protect My Ministry. Once you have an account, you will be provided a PMMAPIKey.
Required Settings
Your System Admin must set up the following settings.
See also
- EnableBackgroundChecks
true
- PMMAPIKey
Your API secret key
Warning
Setting EnableBackgroundChecks=True without entering your PMMAPIKey will result in an error on a person’s Volunteer tab.
Optional Settings
Your System Admin can set up the following settings.
- EnableBackgroundCheckLabels
If you want to use labels (for example, to track which department requests a background check), set this to “true”.
See also
- EnableResubmitWithoutEmail
By default, this is turned off. If you want to be able to resubmit background checks without having to reach out to a user again, set this to “true”.
Training Classes with Protect My Ministry
TouchPoint can integrate training classes from Protect My Ministry (PMM) in addition to background and credit checks.
Setting Up PMM Trainings
Before you can use PMM trainings in TouchPoint, you must first have trainings enabled on your Protect My Ministry account. Contact Protect My Ministry directly to get training products added to your account.
Once trainings have been added to your PMM account, Protect My Ministry will reach out to TouchPoint Support to enable the Enable PMM Trainings setting in your database. This setting defaults to off and can only be changed by TouchPoint Support.
Ensure your existing PMM settings are correct under Administration > Setup > Settings > Integrations > Protect My Ministry, including your PMM Api Key.
See also
Requesting a Training
- Step 1
Go to the person’s record and navigate to the Ministry > Volunteer tab.
- Step 2
Click the green + Add Training button in the Training Classes section.
- Step 3
Confirm and/or fill in the fields as needed, select the desired training from the dropdown, and then click Submit.
This will automatically send an email to the person inviting them to complete the training. Once the training is completed, the results will be returned to your database.
After submitting a request, you will see the status as Submitted or Completed. Once the training has been completed and the results returned to your database, the volunteer coordinator can update the Approval column.
Notifications
Once a training has been completed, the TouchPoint user that originated the request will receive an email letting them know that the training has been completed.
After receiving the notification, go to the person’s Ministry > Volunteer tab to review the results and update the Approval column as necessary.
Note
If your church uses both MinistrySafe and Protect My Ministry, coordinate which vendor supplies which trainings so staff members request the correct one.
Required User Roles
Assign the following roles to the user(s) who will use this feature. Your System Admin can add these roles if they are not already in your database.
See also
- ManageApplication
This is needed to manage the Volunteer Application Review page.
- BackgroundCheck
This is needed to request standard background and DMV checks.
- BackgroundCheckRun
This is needed to request a background check but not view the Report Link. User should have either the BackgroundCheck or the BackgroundCheckRun role, but not both.
- CreditCheck
This is needed only if you need to request credit checks.
Note
If you never run credit checks, you will not need the CreditCheck role.
- TrainingClasses
This is needed to manage the PMM training classes process.
- ViewApplication
This allows view only access to the Volunteer Application Review page.
Now your database is ready to begin using Protect My Ministry for background checks and training classes.
Tip
We have a SQL Recipe for a special Background Check Report. Your System Admin can put into your database if you would like a report that you can run from the blue Toolbar that will indicate if a person has a background check and has columns for each field, such as the Last Date Checked, Approval Status, and more.
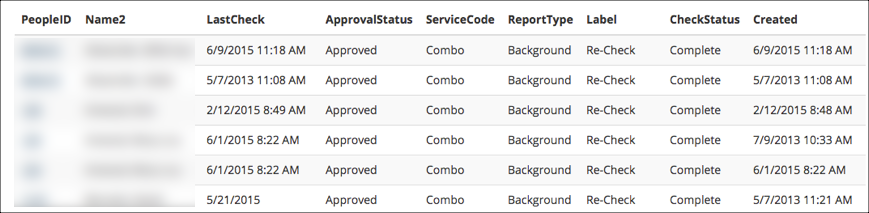
Sample Background Check Report
See also
Labels in Protect My Ministry
If you have an existing account with Protect My Ministry and are currently using Labels on their site, you have the option to use them in TouchPoint as well. This requires adding special settings as well as adding the labels in the Lookups.
The purpose of labels is to distinguish background checks and/or credit checks for different purposes. PMM displays these labels on their billing. Examples: Pre-Employment; Re-Check; Volunteer.
- Setting
Add the follow setting (case-sensitive) and add the value as true:
EnableBackgroundLabels
See also
- Lookups
Add the labels you have in PMM to the Lookups > Misc > BackgroundCheckLabels.
See also
Caution
Make sure the labels in PMM and the labels you add to TouchPoint are the same.
Latest Update |
04/21/2026 |
Expanded PMM training classes documentation.