New Users And Roles
Only the user with Admin role can create user accounts and assign Roles to Users.
Exception-My Data Accounts
Anyone registering online for an event or giving online can check a box to create his own My Data user account. This type of account does not have any roles associated with it. The System Admin can also create these accounts for individuals by selecting MyData when adding a new user account for an individual. If you do not want these types of users to view their own Profile tab you can set the Administrative Setting HideMemberStatusFromMyData to True. Also, you can set the Administrative Setting HideMyDataMemberBadge to True if you want to hide the badge that shows the Member Status. Both these settings can be found at Admin > Advanced > Settings on the Features tab, in the MyData Access section.
See also
Every TouchPoint user with access to the system must have a people record with a valid email address and a user account. Staff and lay leaders can also be assigned one or more roles to be able to perform duties based on their responsibilities within the church. All users will have the Access by default (except MyData Users). Only those who need it to perform their jobs should have the Finance role.
Note
Only an Admin who also has Finance role can assign the Finance role to another user. If your System Admin does not have this role, send a support request asking one of our TouchPoint Support Team members to add that role for the user.
If you do not see some of the roles listed below in your list of roles on your church’s database, that means that it is a newer role that was added after your database was created. You, as the Admin, can add these new roles. Be careful to name the role exactly as you see it listed.
See below for a list of staff and lay positions and their suggested user roles
We also have a help article with some helpful hints (best practices) when adding and removing new users.
Also, see below for the definition for each role.
Users Page
This page is accessed under Admin > Tools > Activity > Users and can be used to quickly see which users have a specific role. You can even filter for those with specific roles. In the list, the person’s name is a link to their people record. The management of users themselves, including the creation of new users, is done on the System > User Account tab of the people record.
Tip
There is also a SQL Report named User Roles your Admin can add to your database.
See also
Create a New User
Go to the person’s record.
Make sure they have a good email address.
Click on the System > User Account tab.
Click + Add User button.
Select the necessary roles.
Be sure to check the Send Welcome email? box so that they will be sent an email that will contain their username and a link to set their password.
Click Save.
Note
By default, MyData is checked. If you are creating an account for a Leader (not a staff member), just click OrgLeadersOnly (limiting role). This will automatically select the Access role which is required for this type of user. For staff users, be sure to click one of more of the Basic roles. Access is required for all staff members.
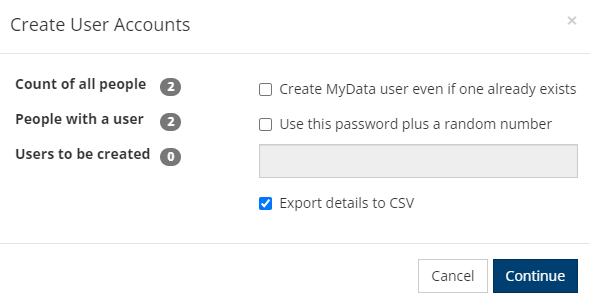
- Mass Create MyData User Accounts
If you want to mass create MyData accounts for a group of people, you can go to the Blue Toolbar from Search Builder or when viewing a Tag and click on the Gear icon > Users > Create Accounts. This will generate a prompt where you will see the number of users found and you will have the following options:
Create MyData user even if one already exists - This will create a new MyData user account even if one already exists.
Use this password plus a random number - You will type a password in the provided field and the systems will auto-add a random number at the end of the password you entered in that field.
Export details to CSV - Use this option to generate a spreadsheet with fields for each person’s PeopleID, First Name, Last Name, Preferred Name, CoupleName, Address Fields, UserName, and Password which you can use to do a mail merge.
- Delete a User Account
Follow these steps to delete an individual user account.
Go to the person’s record.
Click on the System > User Account tab.
Under Actions, click on the Menu > Delete User Account, then answer Yes to the prompt.
Tip
You do not need to delete user accounts when staff members leave. You can just edit the roles and click MyData to leave the account as a MyData account.
- Mass Delete User Accounts
To delete multiple user accounts at the same time, navigate to Admin > Tools > Activity > Users. You can use the Last sign in within (days) or No sign ins for (days) search options to find accounts that have not been accessed recently. After searching, click the top checkbox to select all or check each one individually for the user accounts you want to delete. Then, click the Delete Selected button to mass delete the selected user accounts.

Adjust roles for an existing user
Caution
Do not add a new user account for users if you just need to assign them more roles. Follow the instructions below.
Go to the person’s record, choose System > User Account tab.
Click on the username (or Menu > Edit) which will open a dialog box.
Check the boxes for the roles they need and then click Save.
Note
If you need to send the User Welcome, be sure to check that box before you click Save. By default that box is not checked.
You can change their password here, too; if, for some reason, you need to change it for the user. Otherwise, sending the Welcome email will allow the user to reset their own password. See below for a discussion of the various roles.
Copy user roles
Once a user is set up with the appropriate roles, you can copy those roles to another user.
Go the person’s record that you want to copy roles from.
Click on the System > User Account tab.
Click the menu option (3 vertical dots) under the Actions column on the right side.
Select Copy Roles.
Go to the person’s record that you want to have the roles you copied.
Click on the System > User Account tab.
Click the menu option (3 vertical dots) under the Actions column on the right side.
Select Paste Roles.
Note
After you copy roles from an existing user, the option to Paste Roles is available for the remainder of your browser session. This allows you to paste the copied roles to as many users as you would like. If you copy roles from a new user, then those roles will be available to be pasted. When roles are pasted to a user, the exact roles you had copied are placed on the user account. Any roles that the user previously had will be wiped out.
Add a New Role
How to create new roles in your database.
Go to Admin > Advanced > Lookup Codes > Miscellaneous.
Select Roles.
Click the Add Role button.
Click on the Role Name - which will be NEW and type the name of the role.
Click the blue checkbox to save the role.
Important
The only roles you should add that are not listed below are those you will use as security roles. These would be roles assigned to limit visibility of Tasks, Notes, Involvements, Extra Values, Email Templates, etc. so only users with that role can view them.
Role Definitions
Four Special Roles
There are four roles that should be mentioned first - Access, Admin, OrgLeadersOnly and Support. Please read about those roles, which are listed just below this paragraph, before going any further.
- Access Role
The one role that is common to all users (except My Data users) is the Access role. This gives the user the ability to log in to and see information in your database. This role must assigned to everyone who has a user account on TouchPoint, regardless of whether they are Staff or Laity. The exception is the My Data user. These users are not assigned any roles other than the pseudo role named My Data. The system will actually prevent you from assigning a role without selecting Access. If you deselect Access, the system will revert the user to a My Data user.
Exception re Access Role
Checkin is the only user role that can be assigned without selecting Access. This allows the user to only log into Check-In.
See also
See Access role below for a complete explanation of the permissions assigned with this role.
- Admin Role
This role should be assigned to the person(s) who will serve as the System Administrator for your church’s TouchPoint database. This role is not the role to give to someone whose position at the church is Administrative Assistant, for example. Admin in TouchPoint’s use case means the administrator of your data.
You should only assign this role to no more than 3 users, as it allows privileges that can result in problems if the user does not fully understand the database. This user can view all sent emails, except those regarding contributions, unless he also has Finance role. This user should always have Access and Edit roles in addition to Admin.
See Admin role below for a more complete explanation of the permissions assigned with the Admin role.
- OrgLeadersOnly Role
This role is assigned (in addition to the Access role) to all non-staff TouchPoint users. These are normally the lay leaders in the church, such as Teachers, Deacons, In-Reach Leaders, etc. Unlike other roles which give privileges, this role actually limits the user’s privileges. The OrgLeadersOnly user can access (view) only the records for those people who are enrolled in Involvements over which this user is a leader.
This type of user can view current and previous members of an Involvement he leads, as well as guests. You can read more about this role and the privileges it gives to lay leaders in the Lay Leader help article listed below.
- Support Role
This role is assigned by TouchPoint to the users (up to 4 on each church’s database) that will have the ability to Contact Support. This means that we expect those users to be the first line of defense, so to speak, for the other users at the church.
See below for more regarding the Support role.
Note
Some Involvements may have a setting that allows only users with a specific role to view the Involvement. This means that users without that role cannot access the members of those Involvements. That is true for OrgLeadersOnly users, even if they are a member or a leader in that Involvement themselves. This is setting is for Involvements that are confidential in nature - like Overcoming Abuse or Dealing with the Death of a Child.
User Roles
Important
All user roles except Checkin and MyData require the user to also have Access.
- Access
This is the key role that is required for your staff and lay leaders. See important note above. This gives ‘view only’ access to the most basic information on all people records and Involvements. This role is all that is needed by most ministers who may not need or want to edit records or record attendance. Most other staff members will need additional roles in order to perform their jobs.
Toolbar - Access users can use the blue Toolbar to send email, and generate reports and exports for the set of records they can access.
Contacts & Tasks - Access role also allows users to add and edit Contacts and assign, accept, and complete Tasks. This user can also access Reports in the Main Menu and run any that are not blocked with another role.
Search Builder & Tags - This role also gives users rights to Search Builder where they can create, save, and run their own and any public searches. Users with Access can also create and share Tags.
Add a new person - Without Edit or Attendance role, a user with only Access role would not be able to add a new person to the database except in the following cases: 1) When adding a Contactee while recording a Contact if the person is not in the database; 2) From the Main Menu > Manage People > Add Person, but only if the church allows that feature to be used. There is a setting that can disable use of Add Person from the Main Menu, and we recommend you add it to your database so new records get added in context.
Confidential information such as Contributions and Volunteer Approval Forms require special roles and are not accessible by users with only Access role.
See also
Administrative Settings - see MenuAddPeople setting- AccountManager
This role is used in conjunction with other roles. It is a limiting role, the basic function of which is to signal that the user has an account-based finance role which limits the Account Codes a person sees based on the other roles the user also has. If a user has this role, on an Involvement, they can only select the visible Account Codes associated with their other roles.
- Admin
The Admin role gives rights to create users and assign roles; manage database Settings, and perform several admin functions that are under the gear icon on the blue Toolbar on the Involvement > Search. These are Drop all Members and Make Involvement Inactive, Move all Pending Members to Members, and Repair Transactions, which is sometimes required after a conversion.
The Admin role also gives privileges to manage Programs and Divisions, and set up and finalize Promotion, view all emails, except those relating to contributions (unless he also has Finance role), view the SMS log, and complete SMS setup.
The Admin user can perform all the batch actions listed on the Admin menu and access the reports listed there.
In addition to the Admin role, we recommend that your System Admin have the following roles:
Basic Level 1: Access, Edit, Attendance, and Manage Groups
Basic Level 2: Coupon. The other roles in this level are granted automatically with Admin role.
Special Purpose: Checkin (for testing purposes)
None of the roles under Special Purpose are automatically assigned when you give a user the Admin role. However, in order to trouble-shoot for other users, he should probably have all of these roles except OrgLeadersOnly. Do not assign that role to an Admin users.
Financial: Finance - If the Admin user will not be assigned the Finance role he will need Manage Transactions. If he is assigned Finance role he does not need Manage Transactions or Finance Admin.
Advanced Roles: Admin (of course), OrgTagger and others as needed. You do not have to assign Manager and Manager2 roles because those functions are available when you have the Admin role.
- AppAdmin
Provides access to the Admin > Communication > Mobile App > Settings area.
See also
- Attendance
Gives user rights to record attendance for Involvements, add guests to a meeting, create new people records for new guests, and join guests to the Involvement User must also have Access role.
- BackgroundCheck
Allows the user to request background checks from Protect My Ministry and Ministry Safe. Must also have ManageApplication role and Access.
- BackgroundCheckRun
Allows the user to request a background check from Protect My Ministry and Ministry Safe but not view the Report Link. User should have either the BackgroundCheck or the BackgroundCheckRun role, but not both.
- Checkin
Only users with Checkin role will be able to log into the checkin software. Those users do not need Access role, just Checkin. The Checkin role also allows users to access the Check-In Dashboard.
See also
Tip
Create a people record for check-in, giving it a name such as Children’s Ministry and assign the role Checkin without any other roles. This is the user you should log on as when starting up check-in.
- Checkout
Only users with the Checkout role will be able to Check-Out or Move attendees from the Classroom Dashboard.
- ContentEdit
This role allows a user without the Edit role to edit the special Members Only page for an Involvement. Giving an OrgLeadersOnly user the ContentEdit role will allow him to edit the Members Only page, but not have rights to edit anything else. A user with Edit role can also edit that page if they are a leader in the Involvement without needing ContentEdit role. Access role is also required.
See also
- Coupon
Gives users rights to create Coupons to be used for those who make cash or check payments for on-line registrations (see on-line registrations article for further explanation). Access role is also required.
- Coupon2
Allows a person with both Coupon and Coupon2 to create a multi-use coupon. That is one that can be re-used. Access role is also required.
- CreditCheck
Allows the user to request credit checks from Protect My Ministry. Must also have ManageApplication and BackgroundCheck roles. Access role is also required.
- Delete
Allows a user with the Admin role to delete people records and Involvements when one is created by mistake. Access role is also required.
Note
For an Admin to be given the Delete role, he must submit a Support Request and ask for it.
See also
- Developer
Only relevant to the TouchPoint developers.
- Edit
Gives user the right to makes changes to the Personal tab, but not the Profile Member tab. Gives the user rights to add and drop members from an Involvement schedule emails, manage Parent/Child Involvements, and edit extra values. Also, a user with Edit, who is a leader in the Involvement, can edit the Members Only page in that Involvement. The user can access the blue Toolbar to send emails, run reports and exports, use Search Builder to create and save searches. A user with Edit can create new Involvements, access Manage Involvement Members from the main menu. Access role is also required.
- EditCampus
If you add this user role to your database and add the Setting EnforceEditCampusRole = true, only those users with EditCampus will be able to edit the Campus on a person’s record. Access role is also required.
Note
If you have the user role EditCampus, the Setting EnforceEditCampusRole = true, and the Setting MyDataCanEditCampus = true, then any user can edit his own Campus. However, only a user with EditCampus role can edit the campus for any other person’s record.
See also
- EmailTemplates
Gives access to create and manage email templates. Without that role, only an Admin can access and edit Templates. Access role is also required.
See also
- Finance
Gives user rights to view and post individual contributions, run contributions reports, create and manage batches, and create new Funds. This person is also able to access the Check Scan application. This user can also view all emails under Administration > Communication > Emails. This role also grants access to the View Transactions (or View Goer Transactions) link in the Involvement Member Dialog.
- FinanceAdmin
In order to open a closed batch, a user must have this role. We recommend that the person handling the normal day by day activities not have the FinanceAdmin role and assign that person’s supervisor FinanceAdmin. That way, a second person is required to be involved when opening a closed batch to make any changes.
- FinanceDataEntry
Assign this role as well as Access to a user that just needs to access the Check Scan application. This role is not needed by those who already have the Finance or FinanceAdmin role and, in fact, will conflict with them.
- FinanceViewOnly
This role can be assigned (along with any other roles needed) to a user that needs to view summary financial reports, but not be able to view individual contributions, reports showing individuals’ contributions, or perform any contribution data entry. Do not give this user Finance role, as that role will override this one.
- FinanceViewOnlyDetails
This role is similar to the FinanceViewOnly role, but also grants access to view individual contributions on an individual’s record.
- FundManager
This role is used in conjunction with custom-created fund-based finance roles. It is a limiting role, the basic function of which is to signal that the user has a fund-based finance role.
See also
- ManageApplication
Gives user rights to upload and view the volunteer form on the volunteer tab of a person’s record. Users with this role can also view and edit the notes on that tab.
- ManageEmails
Allows the user to view Admin > Communication > Email Log. This user cannot view contribution emails unless he also has Finance role. This role also allows this user to designate someone to email on behalf of another user.
- ManageEvents
Assign this role to the user that needs to control which online registrations/events will display on the TouchPoint Mobile App. This is done on the Public View tab in Involvement > Search/Manage. The user will need Access role in addition to ManageEvents.
See also
Involvements > Search / Manage Page - see Public Tab section
- ManageGroups
Gives user rights to create, rename, and delete sub-groups in Involvements. Access role is also required.
- ManageInvolvementMembers
Add this role for anyone that needs to access the page under Admin > Involvements > Manage Members. This page is used to move members from one class to another and then email room notices. It is used for Promotion by many churches.
See also
- ManagePrivacy
This role allows a user such as a staff member to view and edit the privacy preferences for an individual. It also allows a user to view the Directory tab in an Involvement. Access role is also required.
See also
- ManageResources
Allows a user to configure Media & Resources.
See also
- ManageSMS
Used with a MBT or Twilio account. Allows the user to access the Admin> Communication > SMS Log page and the Admin > Communication > SMS Setup page. Access role is also required.
See also
- ManageTouchpoints
Assign this role (in addition to Access) to a user that needs to be able to monitor all Tasks and Notes. When this user selects People > Tasks & Notes from the Home Page, he/she will be able to view all Tasks and Notes, not just those he/she owns or that are assigned to him/her.
See also
- ManageTransactions
Allows someone to see and manage all “non-contribution” transactions. This role grants access to the View Transactions (or View Goer Transactions) link in the Involvement Member Dialog.
Note
The Finance and FinanceAdmin roles also grant access to the View Transactions link in the Member Dialog, so ManageTransactions is not required if the user already has one of those roles.
Note
If they also have the AccountManager role then the user will see transactions related to those account codes.
- Manager
Gives user rights to the Merge Controller - to merge basic info. Also gives user ability to Convert (People Record) to Business and to Convert (Business) to Person from the Gear Icon on the Blue Toolbar on a People/Business Record. Access role is also required.
- Manager2
This allows a user with both this role - Manager2 as well as the Manager role to use the Merge/Delete button on the Merge Controller page without having to give the user the Admin role. So, be sure this user has both Manager and Manager2 roles. Access role is also required.
- MemberDocs
This allows a user to view the Membership Documents without being able to upload or delete them or make any other edits to Membership. Access role is also required.
- Membership
Gives user rights to edit the membership tab of a person’s record as well as to enter/edit the deceased date on a person’s basic tab. Access role is also required.
- MinistrySafeClasses
Gives user rights to view and manage the MinistrySafe Training Classes section on the Volunteer tab of a person’s record.
- MissionGiving
Allows the user to view reports related to special Mission Trip Involvements.
See also
- OrgLeadersOnly
This is a limiting role. When you add this role to Access role the user can access only the records of enrolled in Involvements in which the user is a Leader. Access role is also required.
See also
- OrgTagger
Gives user rights to assign main divisions and Involvement Types on the Involvement Search/Manage page on the Management View tab.
- ScheduleEmails
Gives user rights to schedule emails to be run in the future. A user with OrgLeadersOnly can be assigned this role without having Edit and still schedule emails. A user with Edit role does not need this role in order to schedule emails. Access role is also required.
- SendSMS
Used with a PBT or Twilio account. Without this role, a user cannot be added to a MBT or Twilio Group on the Admin > Communication > SMS Setup page to be able to send text messages. If the user also has the ManageSMS role, they can access and view Sent/Received texts and Reply words at Admin> Communication > SMS Log for the texting group(s) they are in.
Access role is also required.
See also
- SpecialContentBasic
Gives access to HTML Content and Text Content at Admin > Advanced > Special Content. Without that role, only an Admin can access and edit items in Special Content. This role also gives access to create and edit Custom Reports. Access role is also required.
- SpecialContentFull
Gives access to all items in Special Content section. Without that role, only an Admin can access and edit items in Special Content. This role also gives access to create and edit Custom Reports. Access role is also required.
See also
- StatusFlags
Gives the ability for the user to create/edit status flags.
- Support
This role is assigned by TouchPoint to the users (up to 4 on each church’s database) that will have the ability to Contact Support. This means that we expect those users to be the first line of defense, so to speak, for the other users at the church. These users could be those with Admin role or users who are super-users (without Admin) and who understand how to use the majority of the features in TouchPoint and are able to help their follow users. Then if a user still needs help, a Support user can submit a support ticket.
- SystemEmailTemplates
This role allows a user to view the email templates for system-generated emails, such as Attendance Reminders, Tasks, and the Recurring Gift Notice.
- ViewApplication
This role allows viewing (but not editing) volunteer application information and uploaded documents.
- ViewPrivateTouchpoints
This role allows a user such as a pastor or System Admin to view Tasks and Notes and associated reports that are protected with a role regardless of what other roles that user has. Access role is also required.
- ViewResources
Allows a user to see the resources on another person’s profile. This is useful for testing and troubleshooting, allowing you to verify that resources have been made available to a particular person.
- ViewTransactions
This new role gives a user view-only access to Non-Contribution transactions on the Transactions page. The user will not be able to perform any actions. It will also not allow adding transactions on the Member Dialog within an Involvement.
Note
If they also have the AccountManager role then the user will see transactions related to those account codes.
- VolDocs
Givers user rights to view and manage the Documents section on the Volunteer tab of a person’s record.
Caution
Only an Admin with Finance role can assign the Finance role to another user. If your church’s Admin does not have both roles, submit a help request and we can assign the Finance role to the person that needs it.
Job Position Examples
Here are some examples of the roles that might be assigned to an individual in a specific job position.
- System Admin
Access
Edit
Attendance
Manage Groups
Coupon & Coupon2
Checkin
OrgTagger
As the System Admin, you can assign yourself any of the other roles that you need in order to help a user troubleshoot.
- Secretary/Administrative Assistant
Access
Edit
Attendance
Manage Groups
- Financial Secretary/Cashier
Access
Edit
Finance
- Outside Accountant
Access
Finance
- Minister
Access
ManageApplication
- Ministry Assistant
Access
Edit
Attendance
ViewApplication
- New People Manager
Access
Edit
Membership
Manager (assign the Manager2 role to the Admin)
- Teacher/Lay leader
Access
Org LeadersOnly
- Small Group Leader
Access
Org LeadersOnly
Attendance
- Discipleship Lay Leader
Access
Org Leaders Only
Manage Groups
- Check-In Volunteer
Checkin
Impersonate a User
An Admin user can, when needed, impersonate a user on TouchPoint and see what that user is seeing, in order to provide assistance to that user. Here is how to do that:
Go to the user’s people record that you want to impersonate.
Click on the System > User Account tab.
Click the menu option (3 vertical dots) under the Actions column on the right side of the page from their username.
Select Impersonate User.
At that point, you will be viewing the Home Page as that user. You can navigate to anywhere that user has permissions.
Be sure to log out from that user’s account and log back in as yourself.
Note
A user without the following roles cannot impersonate someone who doesn’t also have that role: Finance, Support, and Developer
Latest Update |
06/15/2026 |
Updated Finance and ManageTransactions roles to document View Transactions link access in Member Dialog