Transactions Log
This is probably one of the most important back-office resources in TouchPoint. It is located under Admin > Finance > Search > Transactions.
Note
If you have activated the new Transactions page, this page will show as Transactions Legacy under the Finance menu.
See also
The Transactions Log is a record of all online transactions, which includes online registrations and online giving. Online registrations are displayed in this log even if there was no payment. It is a great resource not only for those managing online registrations, but especially for those with Finance role.
If a transaction is added manually using the Add Transaction feature in the Member Dialog for an Involvement that is being used for online registrations, those manual transactions will also display in this log.
This log is where run the Totals by Description Reports, which give you the summary totals to enter into your general ledger to account for online registration fees.
Special user roles are required in order to view the various types of transactions.
Required User Roles
- Online Registration Transactions
This includes all online registrations, with or without fees; but not any donations. It also includes manual transactions created for an online registration.
- Admin AND EditOR- ManageTransactions- Donations
These are either extra donations made during an Online Registration, or as regular online giving.
- FinanceAND- ManageTransactions- Mission Trip Support
To view and manage mission trip support donations.
- MissionsGiving
Totals Bar
The following are displayed in the blue bar above the list and are based on your filters:
- Total Transactions
This is the total number of transactions.
- Total Amount
This is the total dollar amount of all transactions, including normal online donations. If there have been adjustments made, the total will reflect those.
- Total Donated
This is the amount of any ‘extra’ donations from an online registration.
Note
Multiple transactions will be associated with a specific registration / payment either because a deposit and then subsequent payments have been made or a credit has been issued. To view all transactions associated with a payment, click the ID link (not the Transaction Id). This will filter for all transactions that are associated with that ID. To view more information about a transaction, click on the small i in the far left column.
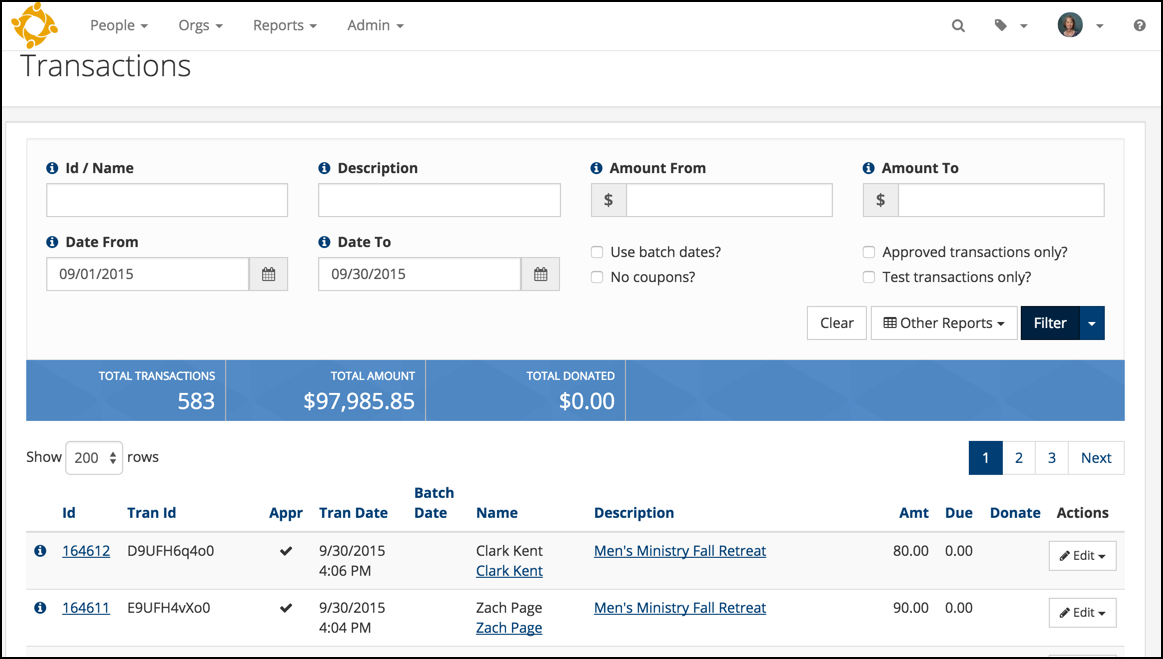
Information Contained in the Transactions Log
These are definitions of the column headers and the information displayed in those columns.
- ID (Transactions Log)
The ID is the system-generated TouchPoint Transaction ID #. Click the small i to see more information regarding the Transaction.
- Tran ID (Transactions Log)
The Transaction ID # comes from your payment processor / merchant provider, such as TouchPoint Giving, TransNational, Sage, or Authorize.net. Therefore, you can use this number if you need to view a transaction on their website. This ID is also displayed in the Member Dialog for the registrant.
- Appr (Transactions Log)
A checkmark in this column indicates that the transaction was completed and approved. You can filter for approved transactions only by checking the box in the header portion of the log.
- Tran Date (Transactions Log)
This is date and time the transaction was made.
- Batch Date (Transactions Log)
Transactions are settled by the merchant provider in batches. This is the date that the batch containing this transaction was settled. The Batch Date and Settled Date are the same thing. To search for transactions using a Batch/Settle Date range, select the Use batch dates option under Additional Filters.
- Name (Transactions Log)
This is the name of the person who made the payment for this transaction. It will display as they entered it. This may be different from the person registered for the event. Below that will be a link to the person registered. For recurring giving, there will not be a link.
- Description (Transactions Log)
This is name of the Involvement for which the person registered. It is a link to the Registration History page which provides all the details about the transaction. Once on the history page, the Involvement name is a link to the Involvement, and the Date/Time is a link to the XML for that transaction.
- Amt (Transactions Log)
This is the dollar amount received or credited for this transaction.
- Due (Transactions Log)
This will be the balance due if the registrant paid a deposit. It will also be the amount displayed when a credit is issued.
Note
If you issue a credit (refund) and the person is not going to re-register and pay the balance, you may want remove the amount due by selecting Edit and Adjust Transaction. This allows you to zero out the balance due.
- Donate (Transactions Log)
This is any amount over and above the cost of a registration when a person choose to make an Extra Donation. The donation portion is automatically put on the person’s contribution record and is automatically added to that day’s online batch.
Actions
Each transaction has an Edit button with various options listed below.
Important
A batch date must exist for a transaction before you can issue a credit. Voids and credits can also been done on the payment processor’s site as well. However, the recommended method is to handle these using TouchPoint.
Important
Donations: If you are issuing a credit or voiding a transaction that was for a donation, you must also remove the amount from the donor’s giving record. Use the same procedure you would for making any correction.
Note
Voiding or crediting transactions does not affect the person’s actual enrollment that came as a result of a registration. The ministry managing that registration should drop the person from the Involvement if they will not be participating.
- Adjust Transaction
There are several uses for this action.
If the church is giving a discount to someone that has paid a deposit, make an adjustment to reduce the balance due by the amount of the discount / scholarship.
After you have issued a credit for a transaction in which the registrant paid a deposit, the credit will increase the balance due by the amount of the credit. If the person is not planning to re-register and pay anything, they don’t actually still owe anything. Therefore, you will want to adjust the balance due to zero.
You can also use this to remove a balance due after you have issued a credit when the person paid the full amount and is now being given that amount back in a credit.
These adjustment can also be made on the Member Dialog box for the individual’s registration.
Paylinks and Adjustments
If you are making an adjustment for an active registration which had a deposit, this will also adjust the balance due that is displayed when the person uses their paylink.
Tip
To increase the balance, use a negative number. To decrease the balance, use a positive number.
See Important message above regarding transactions for giving.
- Void Transaction
You can void BANKCARD transactions that have not yet been pulled in by your processor. The cutoff time varies by church and processor but is typically 7 or 8 PM. If you cannot void the transaction, you will get a message to that effect. You should then issue a credit. NOTE: ACH transactions cannot be voided, only refunded once they batch.
- Credit Transaction
Use this to credit the person’s bank account or credit card. Some churches have policies that state no credits will be issued. However, if an event is cancelled, you will of course, need to issue credits. To issue a credit, the transaction must have already settled, so make sure there is a Batch Date displaying. On the right side of the screen, select Edit and then Credit Transaction.

This will open a dialog box asking for the amount to credit. You can enter all of part of the amount that was paid.
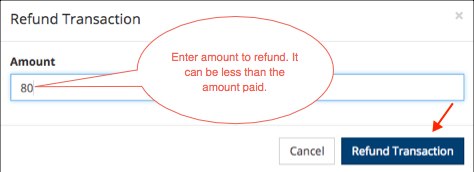
Then press the Refund Transaction button.
Note
The TouchPoint Giving payment gateway is the only one that allows issuing multiple credits for the same transaction.
See Adjust Transaction above for zeroing out the balance due that will display when you issue the credit.
Important
If you are crediting all or part of an online transaction, you will need to also make the appropriate adjustments to the associated contribution or registration entries. For more information, see Corrections/Reversals for Contributions/Registrations. If your church is using the TouchPoint Giving payment gateway, this step is not necessary since it happens automatically.
Important
Merchant providers have a time limit regarding issuing credits. Some will allow a credit up to 6 months after the original transaction. Each provider may have a different limit. You should contact your provider if you have questions regarding this. If you are unable to issue a refund for this reason, you will need to issue a check and then make an adjustment in the person’s member dialog.
See also
- Delete Adjustment
This option is only available for an adjustment transaction. It will totally remove the adjustment. Contact Support and someone on our team can handle that for you.
- Set Parent
This is used in special cases when 2 transactions need to be connected to the same initial / parent transaction. Contact Support and someone on our support team can handle that for you.
Filters
Using one or more of the filters, you can determine the set of transactions you want to view. After entering or selecting the filters, click Filter. Click Clear to start over.
- Description
This is the name of the Involvement (the registration) or Online Giving page name for which the transaction was made. Enter all of part of the name.
- Id / Name
This is the person making the payment, not necessarily the person registering for the event. Enter either a name, the TouchPoint ID # for the transaction, or the Transaction ID # from the merchant provider.
- Amount From
Enter an amount to search for transactions greater than that. Example: use
0to find everything that actually had a payment.- Amount To
Enter a amount to find transactions either equal to or less than the amount entered.
Tip
To find transactions for a specific amount, enter the same amount in both amount fields.
- Date From
Select a date using the date picker. Enter dates in both fields To and From to select a date range. If you select only a Date From, you will filter for transactions only on that date.
- Date To
Select a date using the date picker. If you select only a Date To, you will get all transactions prior to and including that date.
- Gateway
Select the payment gateway to filter for transactions processed through a particular gateway.
- Additional Filters
- Approved Transactions
The unfiltered list will display all transactions, even those who were not approved or not completed. By checking this box, you will not see those other transactions.
- Includes additional donation
By checking this box, you will see only transactions that include an amount in the Amount Donated column. This will be useful if you need to determine to what funds these amounts should be credited. (Note that the total of these amounts is given in the blue header bar under the label Total Donated.)
- Hide coupon
If you do not want to include the transactions for which a person used a Coupon to pay for the event, check this box. Coupon transactions will not be included in totals by description reports.
- Test transaction
If you need to know how to do a test transaction, send a Support Request and ask for instructions. Test transactions will not display in the log unless you check this box. When the box is checked, only test transactions will display.
- Use batch dates
When this box is checked, the transactions displayed will be based on the date that transaction settled, rather than on the date the transaction was made. The Transactions Log will display both dates.
- Fee Covered
When this box is checked, the transactions displayed will be ones where the donor covered the fee when making their donation.
Other Reports
This drop-down contains several options. These are available only for online transactions. They will not include payments made by Coupon.
If you want only transactions that have cleared your payment processor and have settled at your bank you must select Use batch dates under Additional Filters. If you run these reports without checking that option, you may have items at the top of the report that do not have a Settled/Batch Date.
- Reconcile/Settlement Report
This is the report to use when you are ready to reconcile your bank statement. Enter the date range of your statement in the Date From and Date To fields, check Use Batch Dates under Additional Filters, and then click Reconcile Report under Other Reports.
The report will display
a total amount at the top
a list of all the Settled Batches
the Batch Reference #- the reference # for the batch
a Settled Date
the Type (either Bankcard or EFT)
a Count (# of transactions in that batch)
a Total (this is a dollar amount total for that batch)
These totals should match the deposits on your bank statements. You can also filter using a Description and then select Reconcile Report, to view only transactions within that Batch for a specific event.
See also
Reconciling Batches - Note the Monthly - Reconcile your Bank Statement section.Tip
If you want to see the details for that batch, click on the Reference # link. This will open another tab in your browser and display just those transactions. Return to the initial tab for the report. Click another Reference #, and that batch will open in the same tab as the other batch.
- Totals by Description
This is the report you would use to know how much to allocate to your general ledger for each event. Filter for a date range, and select Totals by Description to view a list of all the events / registrations / giving for that date range that have settled. If you want only those that have settled, check Use Batch Dates.
This report will display
a description - the name of the Involvement for which the transaction was made
Accounting Code - if you enter that number on the Involvement’s Settings > Fees tab
a count (the # of transactions)
the Total dollar amount for that event.
Tip
If you want to see the details for one registration, click the description link. This will open another tab in your browser and display just the transactions with that description. To match the report, enter the same date range. Return to the initial tab for the report. Click another description link and that group of transactions will display in the same tab as the other group. This allows you to easily go back and forth between the totals report and the details for each description.
- Totals by Batch/Description
Filter for a date range, select Use batch dates to find those transactions that have settled, and select Totals by Batch/Description.
This basically combines the Reconcile Report with the Totals by Description Report. Each batch is broken out by Type and Description with the Count and the Total on the right. Whereas, the Totals by Description has one row per description, the report will have two rows: one for eft transactions and one for bankcard transactions.
Filter
Click the button to filter your results. Also, there is a drop-down for an export.
- Export Results
After filtering the transactions, select Filter > Export Results to see the same set of transactions in an Excel spreadsheet.
Mission Trip Transactions
For Mission Trips, the Transactions Log will display different information than for other registrations. See the article below, especially the section labeled Mission Trip Tracking on the Transactions Log.
See also
Latest Update |
02/23/2026 |
Clarified voids