One Page Forms
Important
This registration type has been replaced with the new Registration Form. The ability to create new One Page Forms will be disabled on August 31, 2024. Existing One Page Forms will still function and be accessible. We encourage you to begin using Registrations Forms for all future registrations.
See also
TouchPoint’s One Page Forms feature allow you to create a form or registration that is only one page from start to finish. You will decide which fields are shown and required for a new people record. You also have the opportunity to collect donations instead of fees.
Use Case - Memorial Gifts
If you’ve ever wished you could add questions to a giving page, this is your chance. There may be times where you want to gather more data than a giving page allows at the time of a contribution. Now you can.
Use Case - Church Merchandise Sales
Does your church have t-shirts, caps, or cups for members to purchase and you are looking for an easy way for people to order and/or pay? Use a one page form. The Submission Report will help you track those orders with ease.
Use Case - Quick and Easy Signups
If you’ve always wanted all registration questions to fit into one page, including the payment, now’s your chance!
Use Case - Fundraising Sponsorship Levels
If you’ve had any type of fundraising event and were looking for the ability to manage sponsorship levels easily through the registration, this is for you!
These are just a few examples of ways in which you can use the new One Page Forms feature. Now that you’ve got some examples, let’s move on to the setup.
Setup
- Step 1 - Create the One Page Form Involvement
Navigate to Involvements > Add Involvement.
Note
You need to create a brand new Involvement, rather than repurposing a pre-existing Involvement.
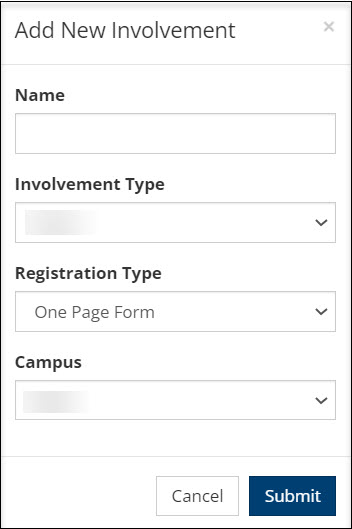
Name - This should be the name of your Involvement.
Involvement Type - Choose your Involvement Type.
See also
Registration Type - Choose the One Page Form Registration Type.
Important
Once this Registration Type is selected, you are unable to change to another Registration Type.
The One Page Form registration type CANNOT be used for Mission Trips.
Campus - Choose the Campus associated with your One Page Form.
- Step 2 - Configure the Registration Settings
Navigate to the Registration > Registration tab.
See also
The following settings are specific to the One Page Form registration type.
Allow Sign-in - You can control whether or not you want the Sign-In option to appear as a link at the top of the form.
Note
When someone is signed in, the form can only be filled out for that person. If they need to register on behalf of someone else, do not sign-in.
Terms & Conditions - This will be a dropdown of options based on Html files created with the
RegTermskeyword.Important
A system admin will need to create the Terms & Conditions HTML file by going to Admin > Advanced > Special Content > Html Content and clicking +Add New HTML File. Make sure that RegTerms is entered in the Keyword field for the terms to appear in the dropdown.
Registrant Details to Ask - Indicate with the checkboxes if you would like to show these particular fields during the registration process. Additionally, if you would like to show them, you may indicate if you would like them to be required. By default, they will not display if the Show box is not checked.
Note
If you want Campus to appear as an option, you must have the ShowCampusOnRegistration Administrative Setting set to True. That setting can be found under Admin > Advanced > Settings > Features > Registrations.
Tip
If you are familiar with other registration types, the following two settings are NOT available in a One Page Form.
Allow Only One - Only one person can be registered per transaction. Therefore that setting has been removed.
Disallow Anonymous - One Page Form registrations are anonymous by default. Therefore, that setting has been removed. Use the Allow Sign-In setting to give people the opportunity to sign in.
- Step 3 - Set the Fee Structure
This is where you see the settings related to fees and payments. The following settings and their functionality are specific to the One Page Form registration type.
Donation Fund - This should be the Fund ID to which donations should be directed. This is required if you are using either Ask Donation or Make Donation Instead of Fee.
Ask Donation - Indicate whether you want to ask for an extra donation.
Make Donation Instead of Fee - When this is checked, any fees (on the Fees tab or question-based fees) will be processed as a donation rather than a fee.
Note
Only someone with the Admin or Finance role will see this option.
Donation Label - Used to describe the donation. You MUST enter something in this field if Ask Donation is set to True.
Note
You are not currently able to charge a Service Fee on One Page Forms, but that functionality may be added in a future phase. In addition, all fees associated with One Page Forms must be paid in full at the time of registration. Therefore, there is no option to enter a Deposit amount.
See also
- Step 4 - Add the Questions
There are several Freeform and Standardized question options available.
See also
- Step 5 - Customize the Messages
This is where you will set the confirmation email, instructions, and reminders.
See also
Publishing the One Page Form Registration
Now it is time to make your registration link public.
Post the registration link on your church website and/or social media channels. To find the registration link, click on the gear icon on the Blue Toolbar. Then, click Try Registration. That will provide you with the registration link. Copy and paste that link.
Send a Special Link via Email or SMS.
Note
The following Special Links are valid for One Page Form registrations when sending by email or SMS: Register Link, RSVP and Regrets Links, and Vote Link. Register Link2 is not valid since the One Page Form is an Allow Only One registration. The person receiving the Register Link will only be able to register themselves. When used, the form will be prefilled with all basic and registration information stored on a person’s record.
Payment Processing
All payments, whether fees or donations, will be processed through the Online Registrations payment gateway.
See also
Warning
It is not possible to add a transaction to someone that you manually add to the Involvement, so you cannot generate a paylink like you can with the Join Involvement registration type. Therefore, we recommend that everyone fill out the One Page Form rather than manually adding them.
Tracking Registrations
Registrants will be added as Members of the Involvement. To see their registration details, open their Member Dialog box.
See also
Warning
We recommend encouraging people to fill out the One Page Form rather than manually adding them to the Involvement. This will make managing answers to questions much smoother, producing more accurate reports.
Reporting
A report of the One Page Form registrations is available by viewing the Submission Report from the Blue Toolbar of the Involvement.
See also
Latest Update |
8/28/2024 |
Add important note about Registration Forms