People Page
The People Page contains information pertaining to an individual and their family. There are several sections: the Business Card section; Family Members sidebar; Tabs; Toolbar.
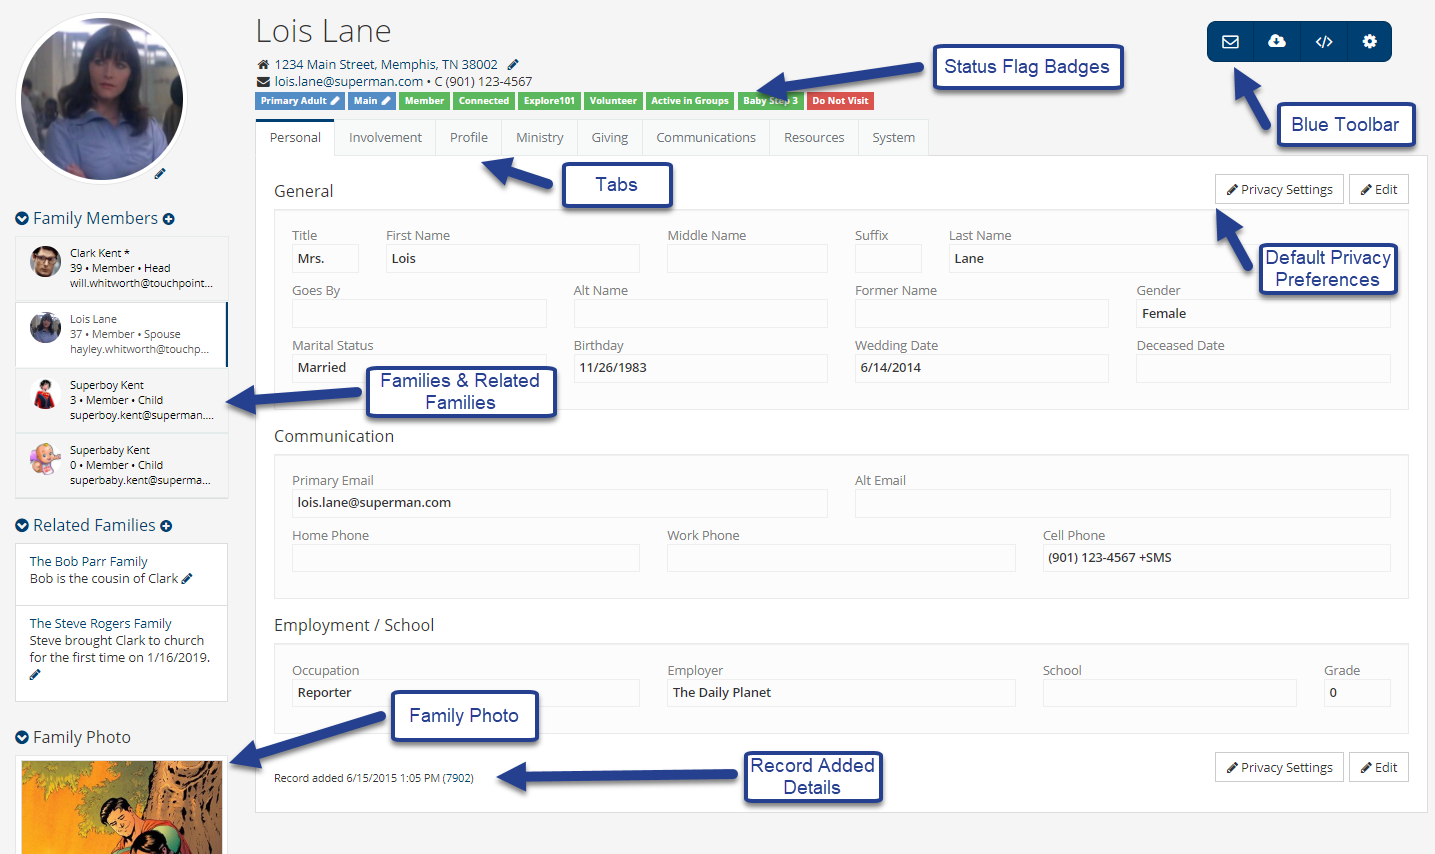
Business Card Section
- Picture
If a picture has been uploaded, it will display in this section. Anyone with Edit role can upload a picture. Also, My Data users can upload their own picture.
See also
- Street Address
Click the pencil icon to edit.
See also
Click the address for links to a map or driving directions, which are turn-by-turn directions from the church. In order for the driving directions to work properly, the database must have StartAddress in the Administration > Setup > Settings with the church’s address as the Setting value.
See also
An individual can have a Personal Address as well as a Family Address, with one marked as preferred. For those who receive mail at a PO Box, but want to give you their physical address, use the Mailing Address Extra Value feature.
See also
- Email Address
Click the email address to open a new mail message using your email program, such as Outlook. You can also email an individual by using the Email function from the Blue Toolbar, just as you would for a group of individuals.
Each person can have a Primary Email address and a Alternate Email address. If both fields have good email addresses and both are checked as Active email will be sent to both addresses. If the person has just one email address use the Primary Email field and make sure it is checked as Active.
- Campus
If the church database has multiple campuses, the Campus displays on a blue badge under the person’s name and address. You can edit the Campus by clicking the pencil icon.
See also
- Family Position
This also displays as a blue badge under the person’s name and address. Click the pencil icon to edit. The standard positions are Primary Adult, Child, and Secondary Adult.
See also
- Member Status
This green badge displays the person’s current church member status.
See also
- Status Flag Badges
These display based on the status flags in Administration > Setup > Settings and are based on special saved searches.
See also
Toolbar
Click here to send emails or text messages.
- Cloud
Click here for reports and exports.
- Gear
Click here to do more things - add to tag, create tasks, etc.
See also
Note
The toolbar on the people page is used for the same functions as everywhere else in the database.
Family Members
- Immediate Family
All the members in this immediate family are listed on the left side of the people record. If the list is not showing, click the blue circle with the arrow to open that list. The list displays a small photo, age, member status, email address, and position in family for each family member. An asterisk beside the name indicates this person is the spouse of the person you are viewing.
Click a specific family member in the list to view the record for that individual.
Click the Family Members heading to Convert to Search all the immediate family members.
See also
- Related Families
Under the Family Members section is the section for Related Families, along with the description of the relationship between the families. If the list is not displaying click the blue circle with the arrow to open the list.
Click the Related Families heading to Convert to Search all the individuals in the related families. That will include the immediate family you are viewing.
See also
- Family Photo
If a photo has been uploaded, it will display below the related families. Click the pencil to upload a picture of the family. This functions like it does for an individual photo.
See also
Tabs
Each people record has tabs with more information. There are sub-tabs for all except the Personal tab.
- Personal
Contact information: Home, Cell and Work Phone numbers, email addresses
Personal information: Name (including Goes By name, Former name, Alt Name), Gender, School, Grade, Employer, Occupation, Campus, Member Status, Join Date, Spouse, Wedding Date, Birthday, Age, Deceased Date (displays in red type)
Privacy Settings: Default privacy settings for use with mobile directories, including Do Not Contact settings
Record Added Date/Time and, in parentheses, the User Id # of the person that created the record: That ID # is a link to that user’s people record.
Last Login: The date and time will accompany for the user’s last account login for both Mobile and Web.
Note
For records that are created during the course of an online registration, the user ID # will be 0. This is also true for records imported from another church management system during conversion to TouchPoint. That is because a specific ‘user’ did not create the record within Touchpoint.
- Involvement
Current: A list of involvements in which the person is enrolled with links to the involvements and leaders, Member link to Member Dialog box (which contains information about their membership in that involvement), an attendance string (which is also a link to the attendance detail page) as well as their Attendance Percentage, when applicable.
Previous: This is similar to the Current tab, but lists those involvements in which the person was previously enrolled, along with their Join and Drop dates.
Pending: This is used during Promotion or when forming Committees as a ‘staging area’ for enrollments; also contains links to those involvements listed.
Note
Click the small arrow to display more information for an entire group of involvements or the small
iicon to display more about an individual involvement.Tip
The information on the Current, Previous, and Pending Involvement tabs can be customized per involvement type. See Custom Involvement Tabs.
Tip
You can control the order in which Involvement Types are displayed on these tabs and hide Involvement Types from MyData and OrgLeadersOnly users. Go to Administration > Lookup Codes and select Involvement Type from the Involvements panel. To set the display order, enter a number in the Sort Order column. To hide involvements of a certain Involvement Type, toggle its Show setting to
No.Attendance: This is a chronological list of each meeting the person has attended, with links to both the specific meeting and the involvements. This grid also displays a column for the person’s AttendType (Member, Leader, Offsite, In-Service, New Visitor, etc.) as well as Other Attends (indicates if they attended another class or were off-site).
Registration: This has updated information from latest on-line registration or check-in, as well as a list of Previous Registrations. This is also where you can manually enter Allergy information, Emergency Contact info, check boxes for Custody Issues, Authorized Checkout People and OK to Transport. On standard Check-In labels, codes are used to indicate these: A = allergy; C = custody issues; T = ok to transport. If you are using Mission Trip online registration, this is where the link will be for Emailing Supporters and tracking their balance.
Volunteer: This tab will show the levels of approval for volunteer service, as well as the approval date and volunteer applications. This page is also where you can request a background and/or credit check if your church is using our integration with Protect My Ministry or MinistrySafe. Roles control access to information on the Volunteer tab.
Manage Serve Availability: This is where a person can update their serving availability by a day of the week or a specific date range. This can also be managed by a user with the Access role.
- Profile
Member: Church Membership, Decision, Letter Status, Baptism, New Member Class, Drop, Extra Membership Data, and on the right column Membership Documents, Status Flags, and Statement/Envelope Options with Electronic Only, the person’s Contribution Statement type (Joint, Individual, None) and their Envelope Preference (Joint, Individual, None)
Comments: You can record any comments received on a guest registration card. These comments display on the Inreach / Outreach Forms.
Extra Values: There are either Standard Extra Values or Ad Hoc Extra Values. These will vary from church to church.
Family Extra Values: These are Extra Values that, when added to one person’s record, will display on the record of each family member.
Entry: This is information captured when a person first has contact with your church, usually received when the person first visits the church and completes a guest card.
See also
- Touchpoints
About Person: This is the list of Tasks and Notes about this person.
Note
A person will not be able to see tasks or notes about himself/herself.
Owned By/Assigned To: This is the list of Tasks and Notes that are either Owned by or Assigned to this person.
Note
By design, this page will only show a maximum of 100 results per page. If you plan to export tasks & notes, you will only be able to export in increments of 100 or less (depending on how many are on the page).
See also
Advanced Search: For advanced search options, go to People > Tasks & Notes.
See also
- Giving
This tab is only displayed for a My Data user (for their own record), and for users with Finance role. It opens tabs for Contributions (displaying a list of individual contributions the person has made) and Statements (where the user can download statements and manage statement and envelope options).
See also
- Communications
Received: This is a list of all emails this person has received. Only users with Admin or ManageEmails can view the entire list. Other users can view Received Emails if they were either the sender or another recipient. Click on the Subject to view the email details.
Sent: This is a list of all emails this person has sent. The same visibility rules apply as for Received.
Transactional: These are all of the email confirmations and notification type of emails.
SMS: These are the text messages that the person has received and replies he/she has sent.
Scheduled: These are emails that the person has scheduled to be sent at a later date.
Subscriptions: This will list any email addresses for which this user has Unsubscribed. A staff user can manually add an email address to unsubscribe the person from that email address. This is also where the user will manage his/her SMS Subscriptions.
Failed: This will show any emails that did not get sent to the person due to a Spam Report, a Bounce, or other reason.
See also
- Resources
This tab is only displayed if the Resources feature is enabled on the database. When enabled, the tab will display resources available to the user, organized by resource type and category.
See also
- System
User Account: If the person is a TouchPoint user, this will display the username and their assigned roles. This is where an administrator can manage their roles, and change their password, if necessary.
Changes: This is a tracking of changes made to personal and family information.
Duplicates: This will list any possible duplicate records. Once you identify a duplicate, you need to merge the two records.
Merge History: This will indicate that another record has been merged into this one.
See also
Latest Update |
04/24/2023 |
Added information about the search page being limited to 100 results.